Getting started with Azure IoT Central
Table of Contents
Video guideInstallationIntegration with Azure IoT ExplorerSetting up your Azure IoT ExplorerConnecting SIA Connect to Azure IoT HubSending data from SIA Connect and monitoring telemetry in Azure IoT ExplorerSending data from Azure IoT Explorer (Cloud-to-device messaging) and monitoring in SIA ConnectAdding digital twin from Azure IoT Central deviceIndividual enrollment (manual)Group enrollment (automatically)Validating the connectionDefining device telemetry message templatePublishing telemetry events to Azure IoT CentralMonitoring telemetry events in IoT CentralConfiguration of devices in Azure IoT CentralIndividual enrollment with symmetric keysGroup enrollment with symmetric keysProperty synchronizationCreating a device templateCreating a view for controlling propertiesAssigning template to deviceMapping properties to real data pointsValidating property synchronizationSIA Connect is a plug'n'play gateway for Industrial IoT, Industry 4.0 & Smart Building capable of communicating in 30+ different industrial protocols with million of devices. This ensures seamless connections between shop floor and building devices and Azure IoT Central. With device twin model support for Azure IoT Central the solution enables fast convergence from OT to Cloud while providing flexibility and scalability.
Video guide
Video instructions can be found at this link: Video guide
Installation
When you receive the unit, some basic installation setup is required such as network configuration and electrical installation.
To install the solution as software please refer to the following instructions:
The following steps will guide how to provision and connect data from industrial devices to Azure IoT Central.
Integration with Azure IoT Explorer
Azure IoT Explorer is a graphical tool used to interact with an Azure IoT Hub. This tool can be used to see the received telemetry and to send messages from Azure IoT Hub to your device.
In this portion of the guide we will cover the following topics:
- Setting up your Azure IoT Explorer
- Connecting SIA Connect to Azure IoT Hub
- Sending data from SIA Connect and monitoring telemetry in Azure IoT Explorer
- Sending data from Azure IoT Explorer (Cloud-to-device messaging) and monitoring in SIA Connect
Setting up your Azure IoT Explorer
After installing Azure IoT Explorer, you will need to establish a connection to your Azure IoT Hub - this is done by using the connection string
When you have the Azure IoT Hub connection string, click Add connection on your Azure IoT Explorer:
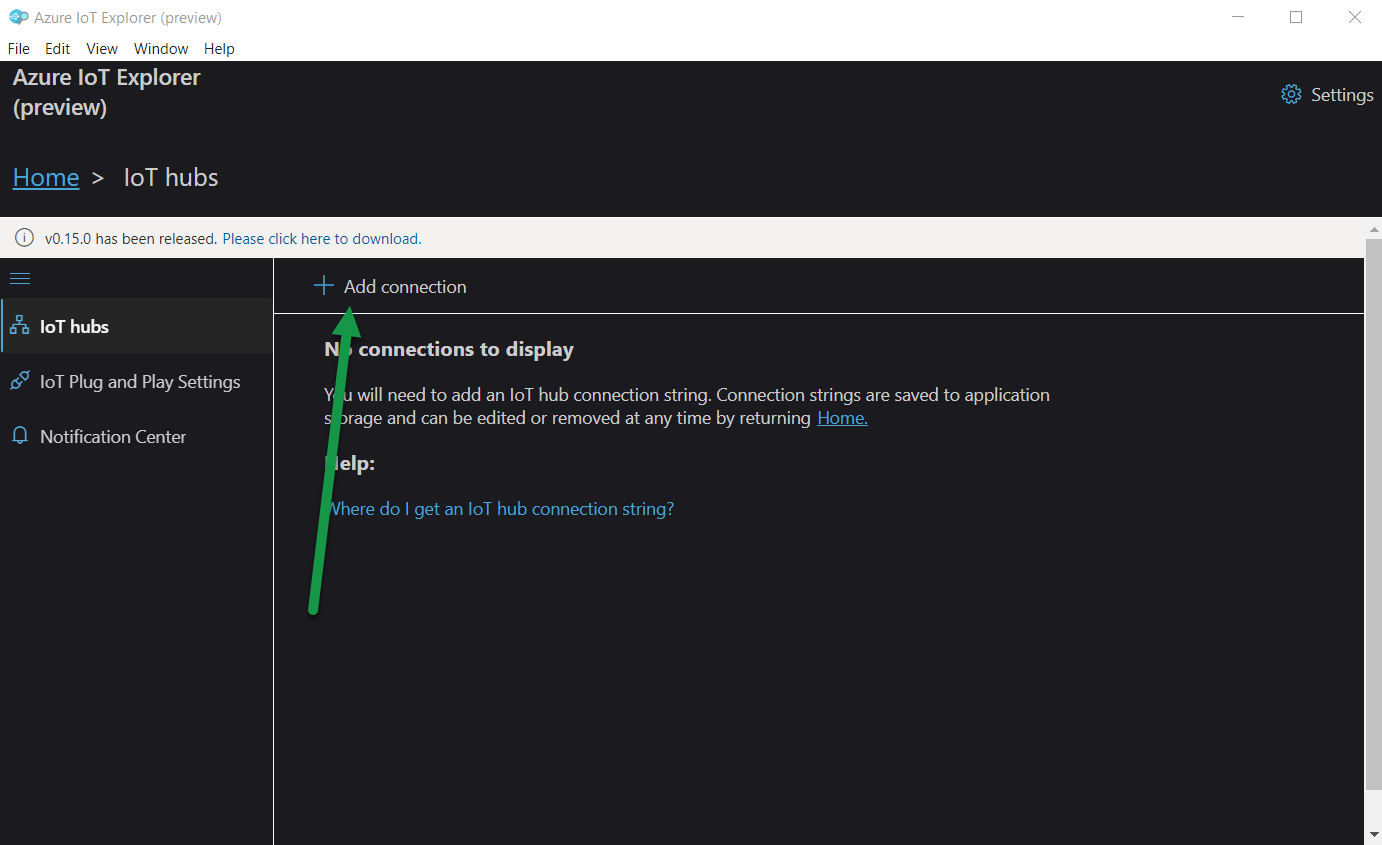
Here you will be prompted to input your connection string
After you input the connection string, you will be able to save the IoT Hub connection:
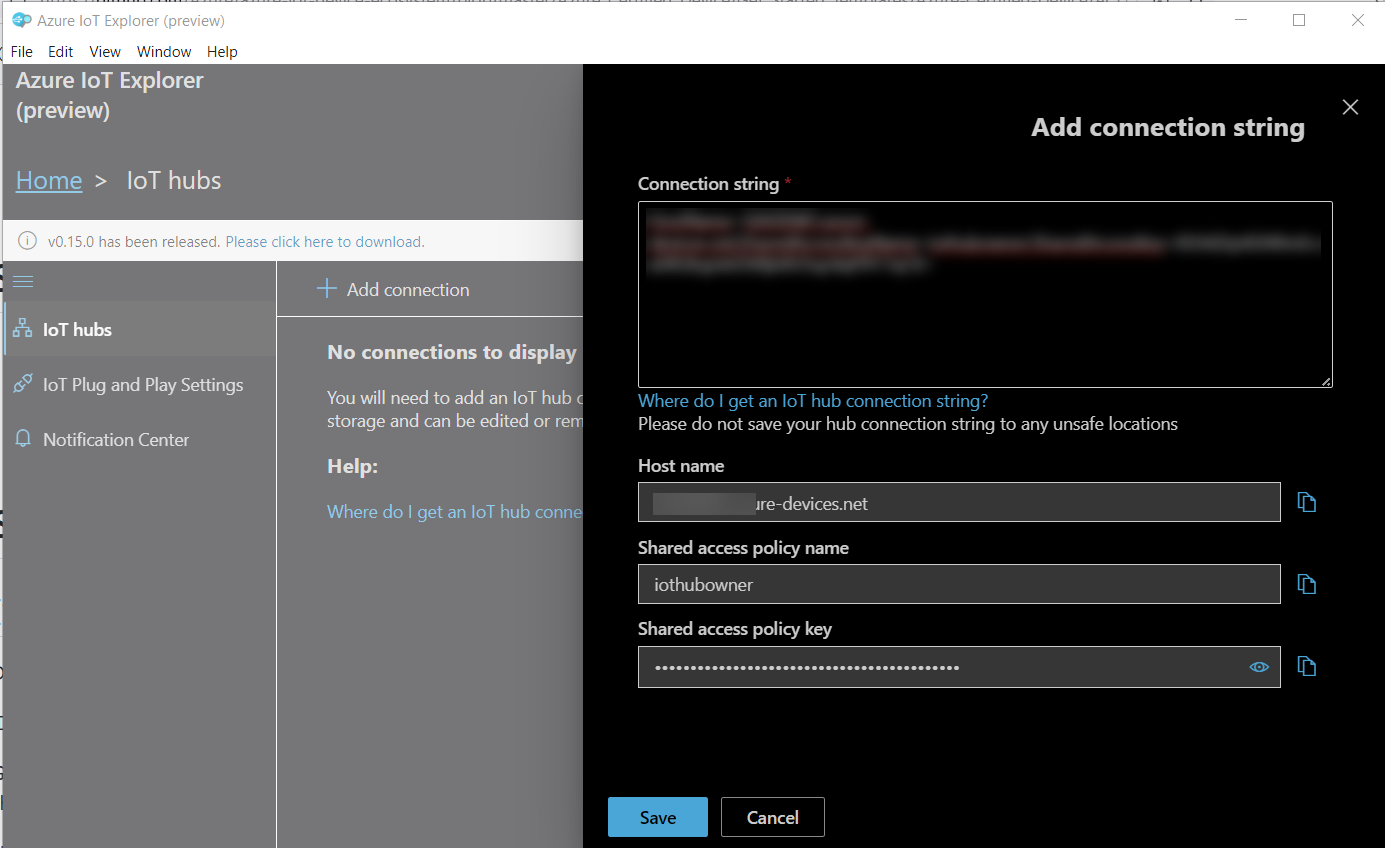
Now that we are connected to the Azure IoT Hub using the IoT Explorer, we can create a new device, which will represent a SIA Connect unit
Click on New:
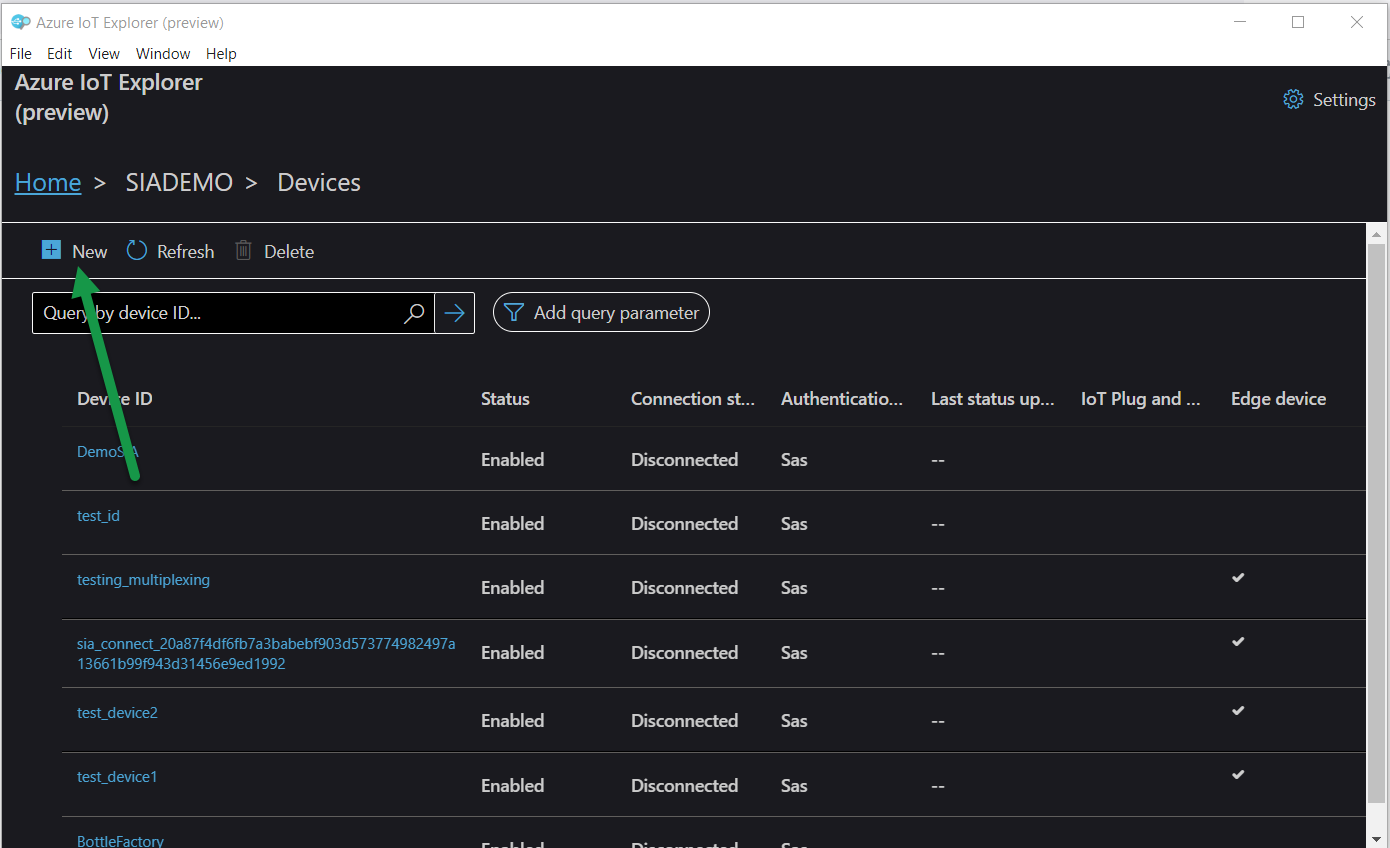
Input a Device ID for your device. This can be anything you'd like, but it cannot contain spaces. Click Create
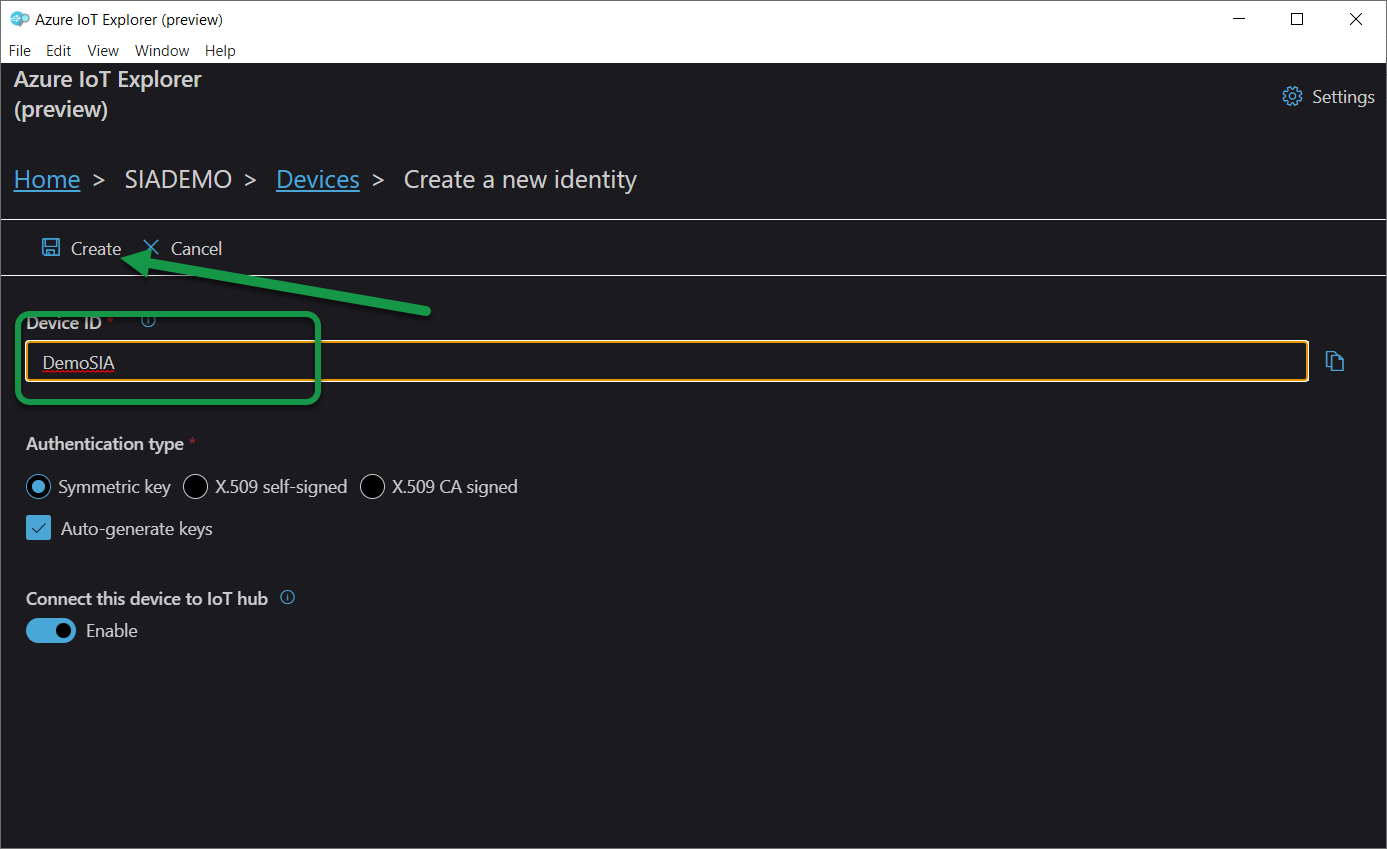
Now we have a Device, that we can connect SIA Connect to. To do this, we need the Primary Connection String:
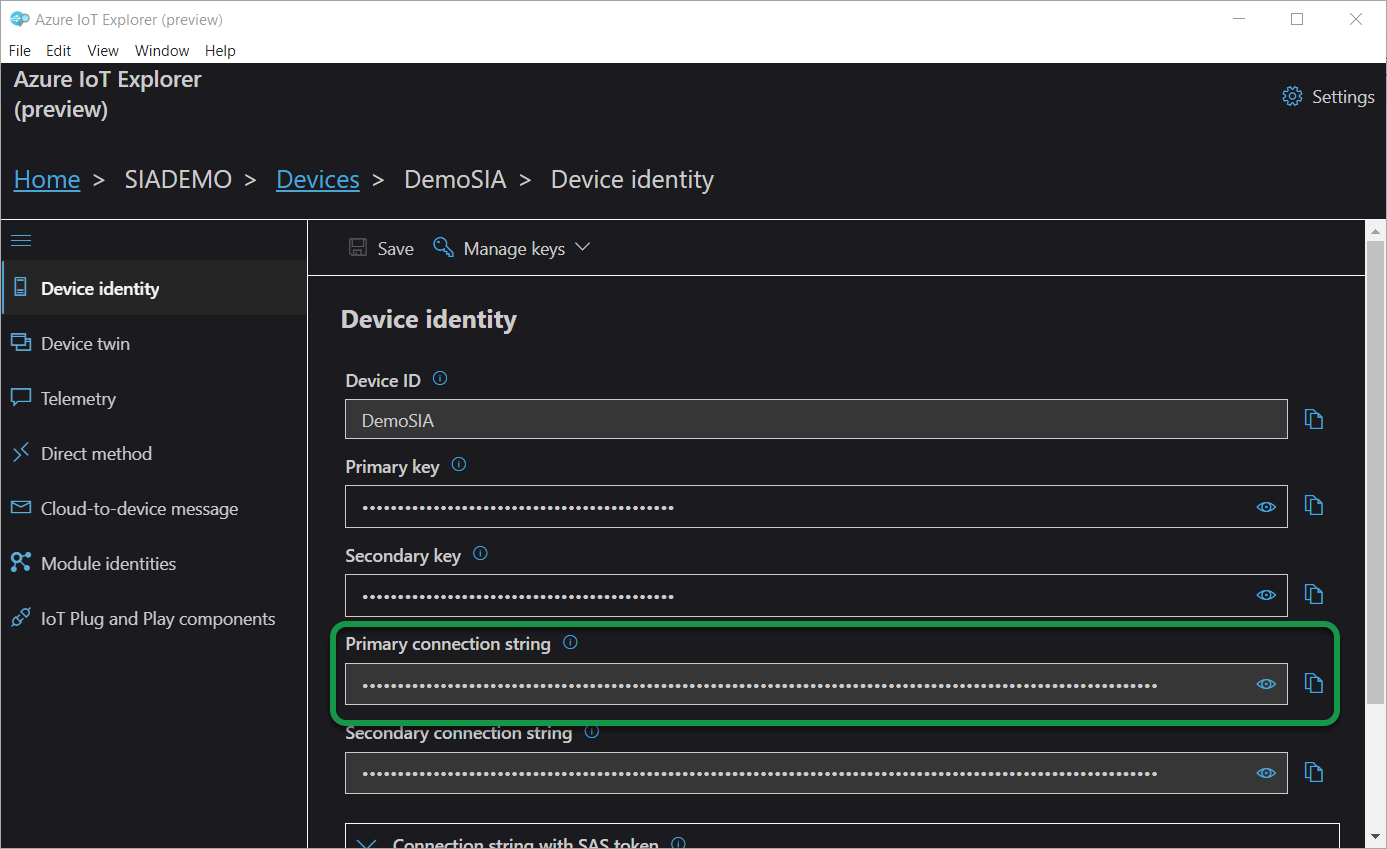
Next step is using the primary connection string to connect SIA Connect to Azure IoT Hub
Connecting SIA Connect to Azure IoT Hub
Create a new Instance in SIA Connect using the Azure IoT Hub connector.
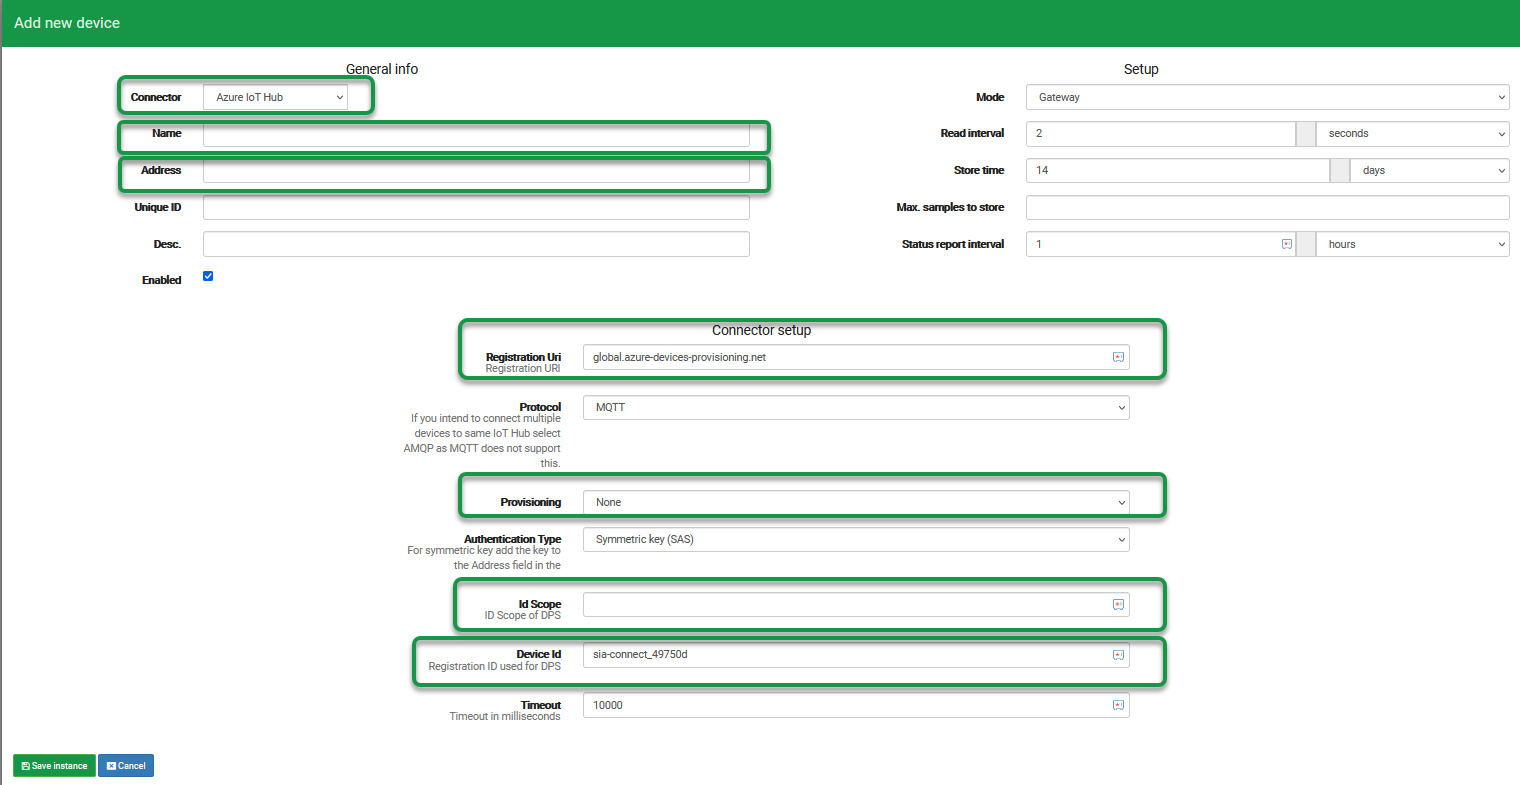
| Parameter | Description |
|---|---|
| Connector | Azure IoT Hub |
| Name | This is chosen by the user. It can be anything you'd like |
| Address | Primary connection string - found on the device created in Azure IoT Explorer |
| Registration Uri | Empty |
| Provisioning |
None |
| ID Scope | Empty |
| Device ID | Empty |
When you have filled out the information, your Instance should look like this:
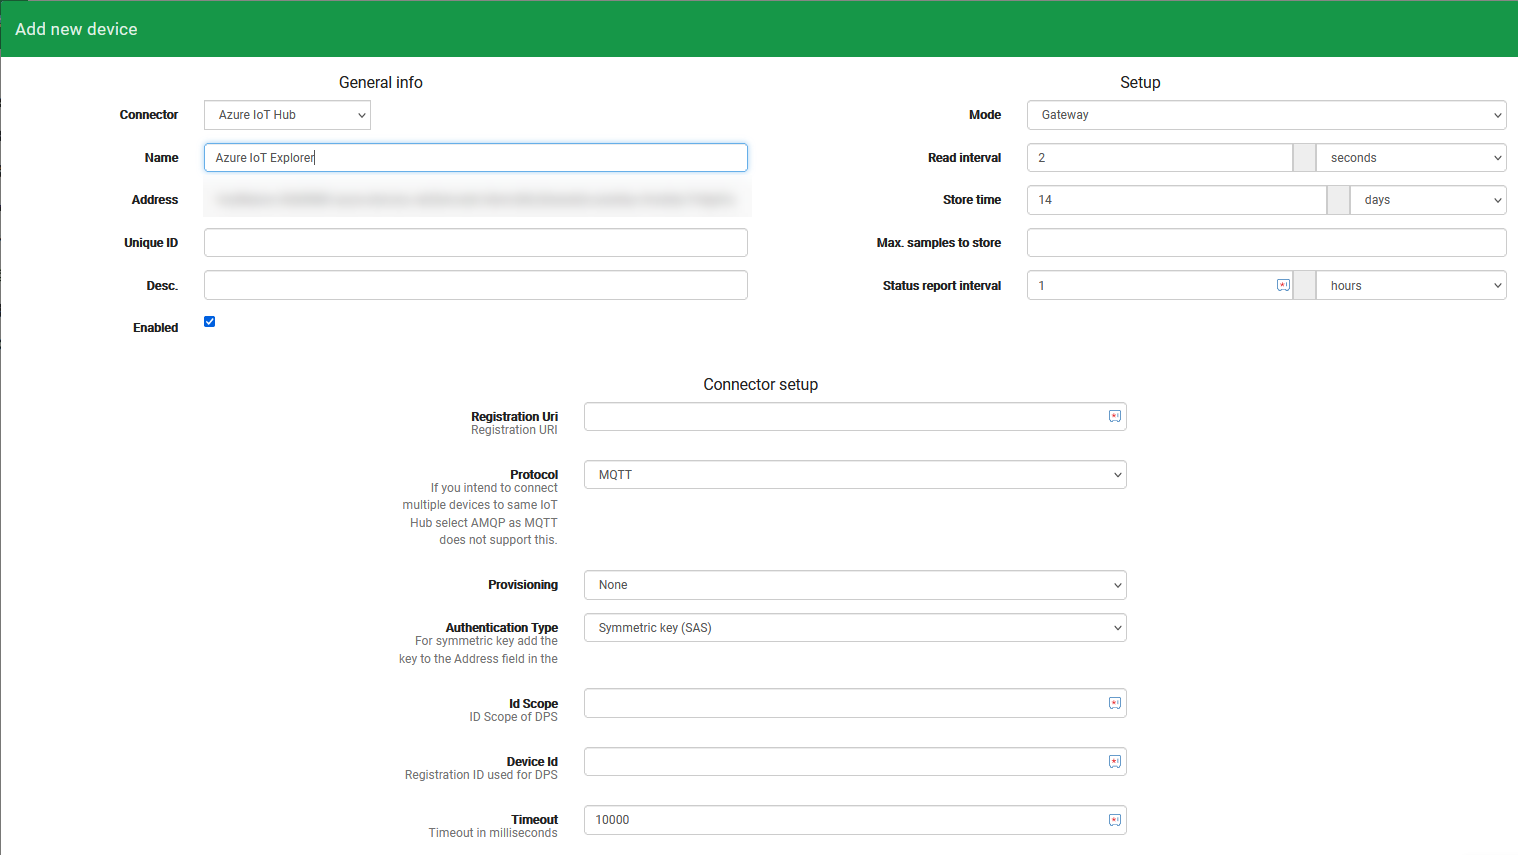
Sending data from SIA Connect and monitoring telemetry in Azure IoT Explorer
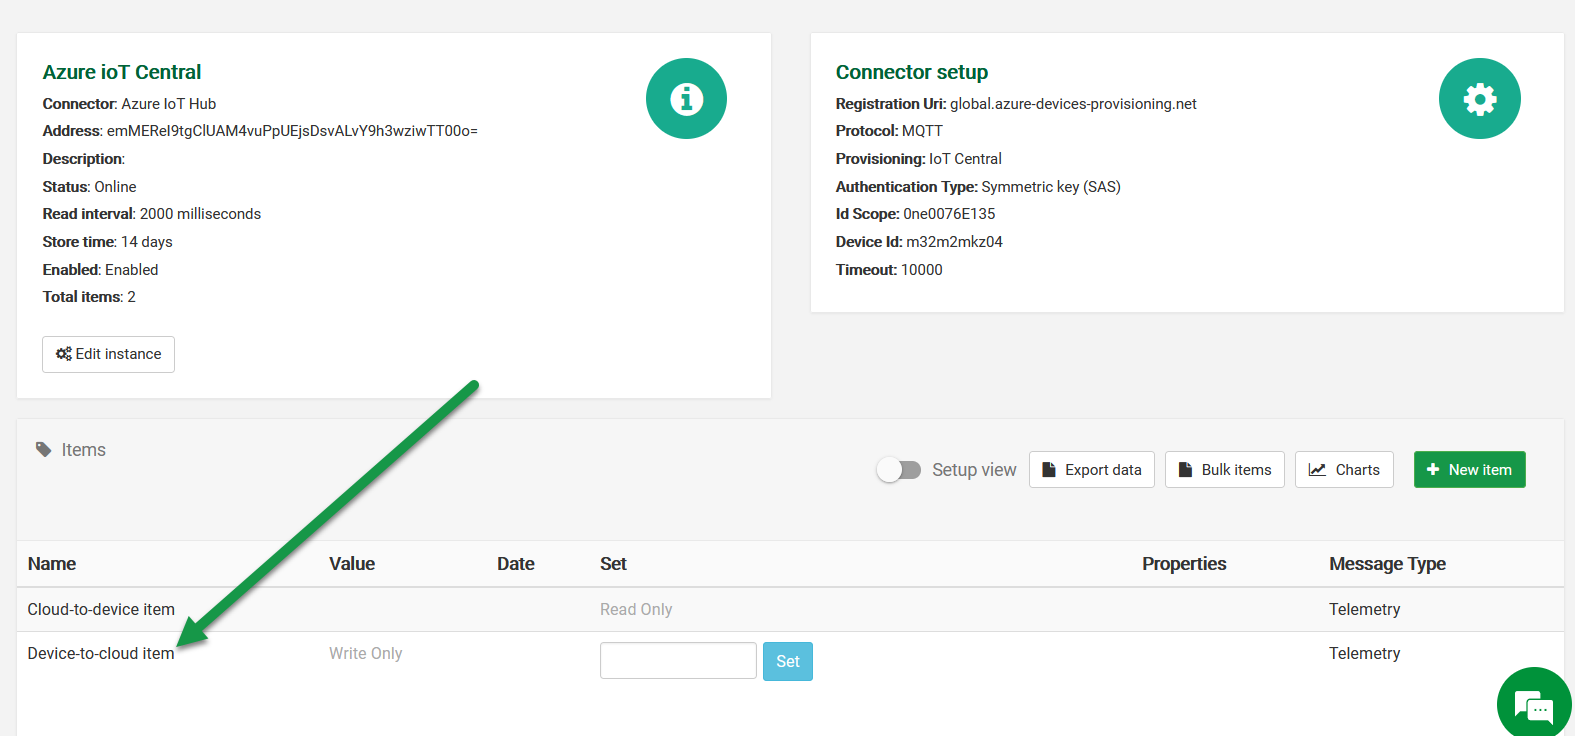
When the Instance has been created, SIA Connect will also automatically create two items, Cloud-to-device and Device-to-cloud. The item we are using in this case is the Device-to-cloud item
To monitor the telemetry, go to the Telemetry menu in Azure IoT Explorer, and click Start:
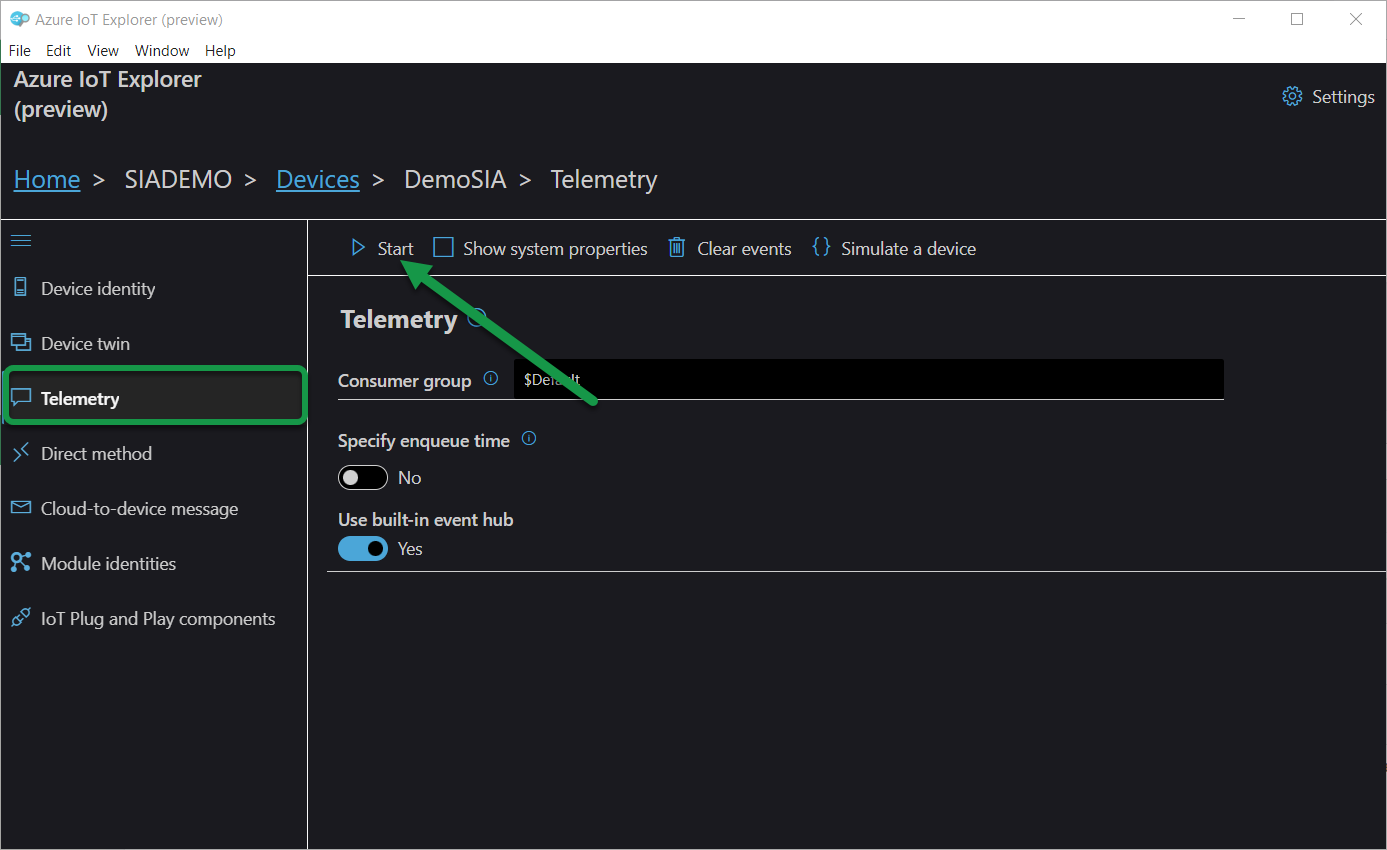
Now that we are actively monitoring the telemetry, we can send messages from SIA Connect to Azure IoT Hub, and monitor the data in Azure IoT Explorer
To achieve this, we input a simple payload into the Device-to-cloud item and click Set:
This payload can be anything you'd like - it is just to test the connection

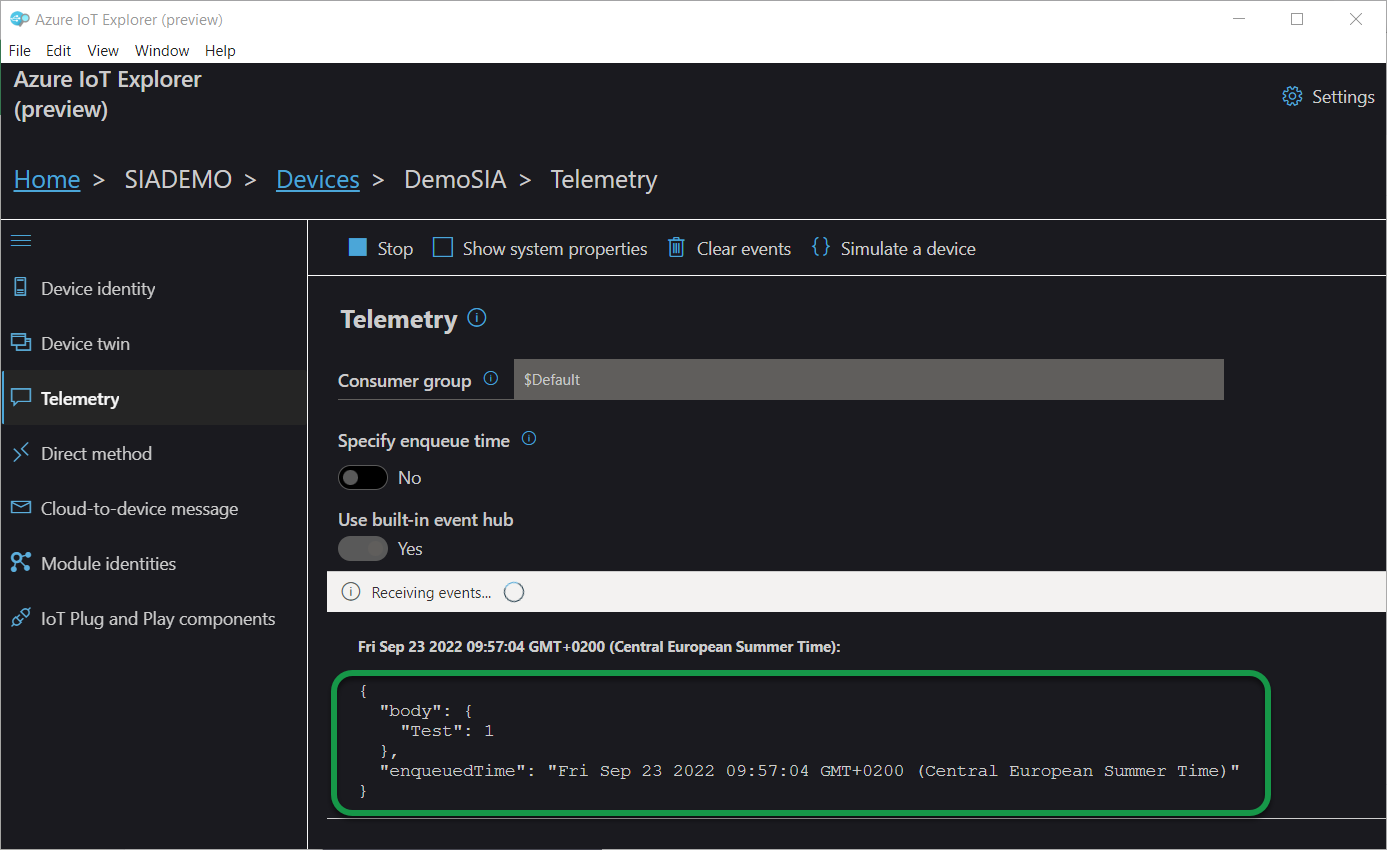
On the Azure IoT Explorer, we can now see that the data has been received:
Sending data from Azure IoT Explorer (Cloud-to-device messaging) and monitoring in SIA Connect
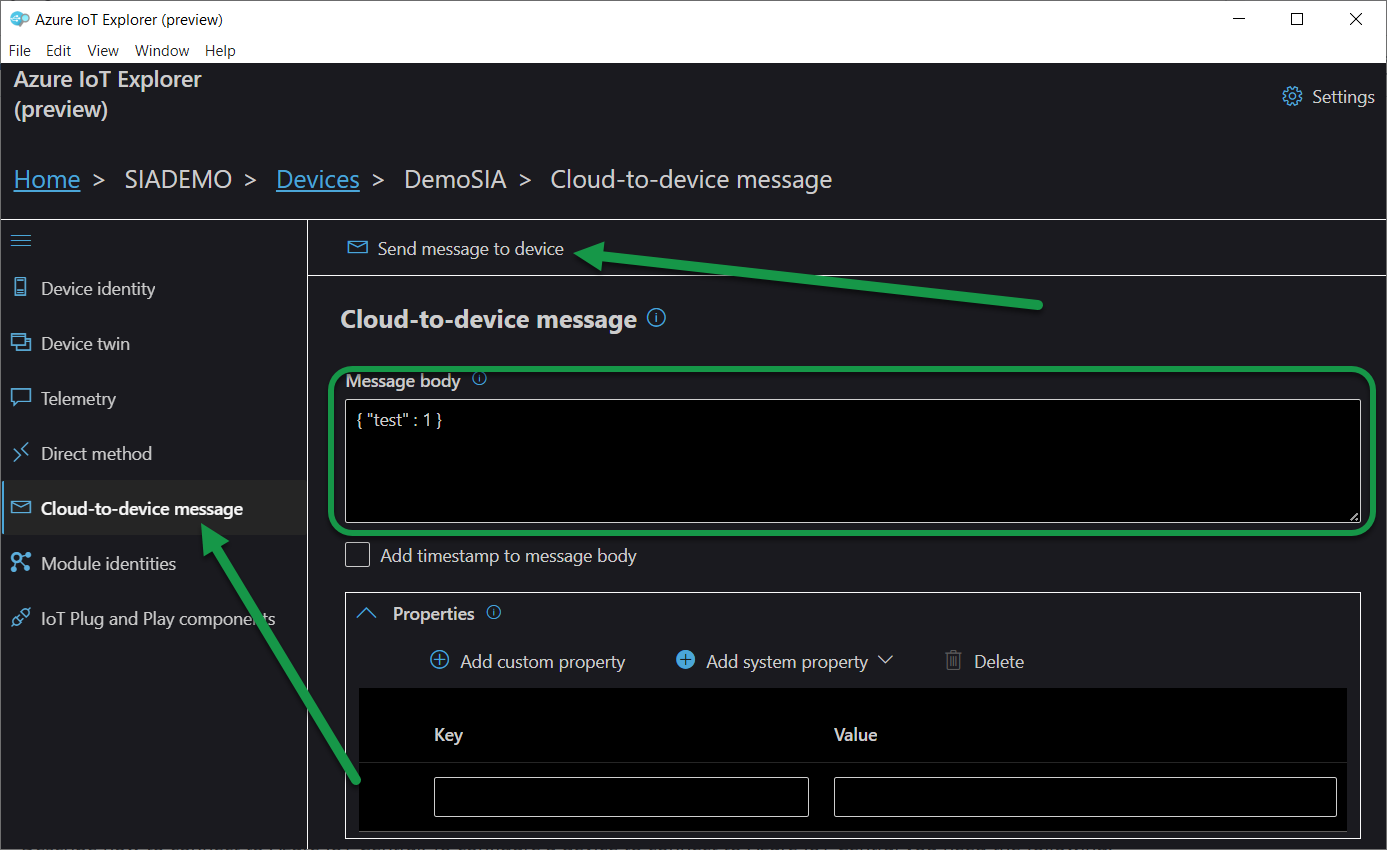
Navigate to the Cloud-to-device message menu, fill in the Body with a payload, and click Send message to device:
In this case we are sending a very simple payload. This can be anything the user desires
On the Cloud-to-device item in SIA Connect, you can now see the new value:

Adding digital twin from Azure IoT Central device
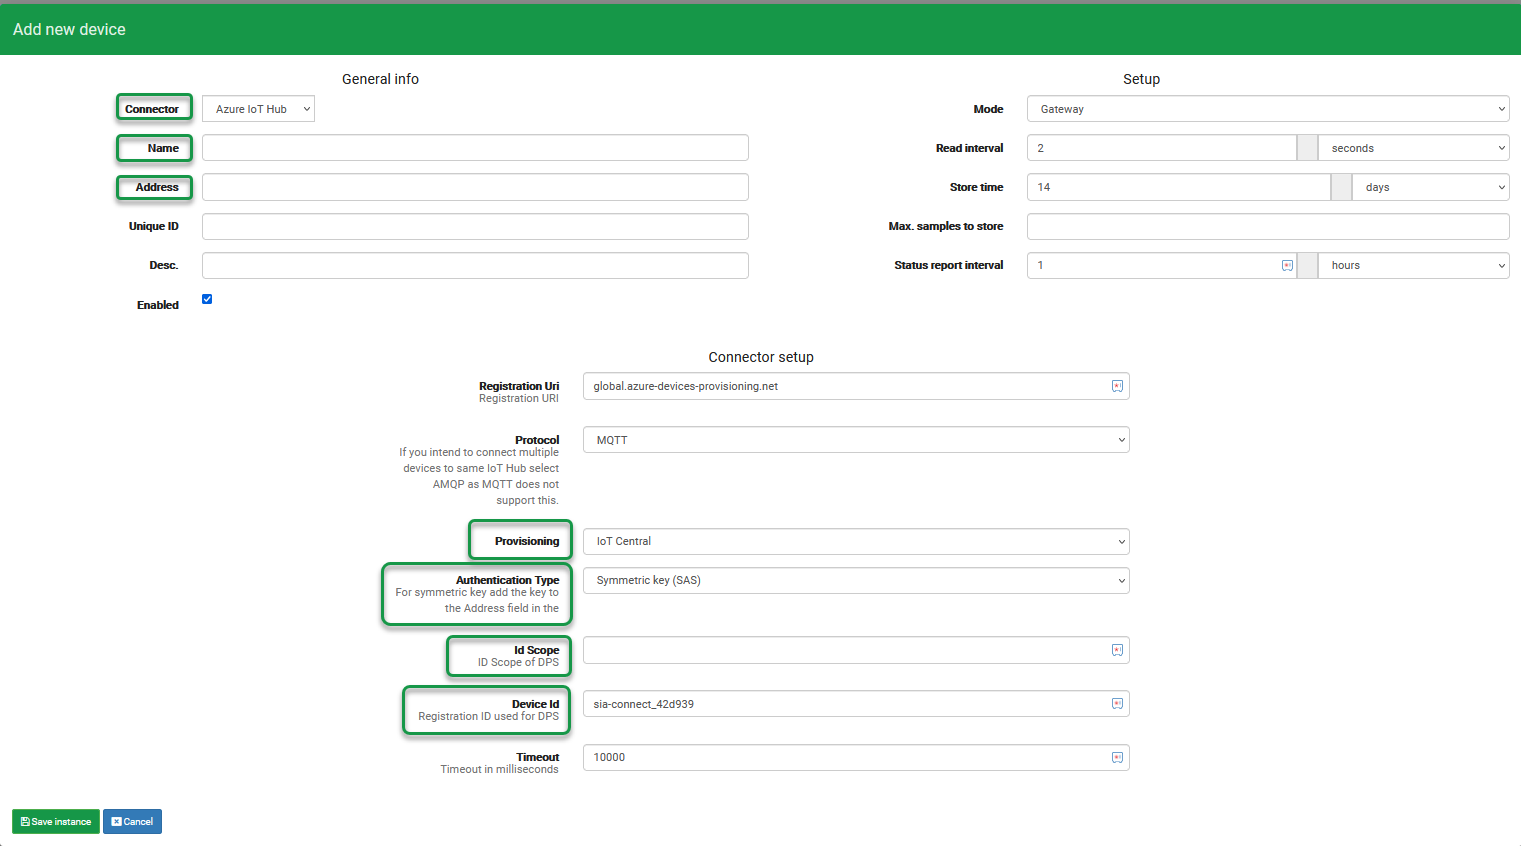
To add a digital twin representation of a Azure IoT Central device create a new Instance using the Azure IoT Hub connector. It is possible to enroll a device by using the following services in Azure.
- Group enrollment (Automatically)
- Individual enrollment (Manually)
Apply the digital twin information of the device in IoT Central to the new instance. To determine a devices symmetric keys, device id and ID scope please refer to the section Configuration of devices in Azure IoT Central
Individual enrollment (manual)
To manually add a IoT Central device by using the Individual enrollment use the parameters in the below table.
To get the group enrollment symmetric key please refer to section "Individual enrollment with symmetric keys" in this article
| Parameter | Description |
|---|---|
| Connector | Azure IoT Hub |
| Address | Primary key obtained from device IoT Central |
| Provisioning | IoT Central |
| Authentication type | Symmetric key (SAS) |
| ID Scope | ID scope obtained from device IoT Central |
| Device ID | Device ID obtained from device IoT Central |
Group enrollment (automatically)
By using group enrollment devices will automatically be created in Azure IoT Central with the given "Device ID" defined in SIA Connect.
To get the group enrollment symmetric key please refer to section "Group enrollment with symmetric keys" in this article
| Parameter | Description |
|---|---|
| Connector | Azure IoT Hub |
| Address | Primary Key obtained from the Enrollment Group |
| Provisioning | Group |
| Authentication type | Symmetric key (SAS) |
| ID Scope | ID Scope obtained from the Enrollment Group |
| Device ID | Desired enrollment name of the device in IoT Central |
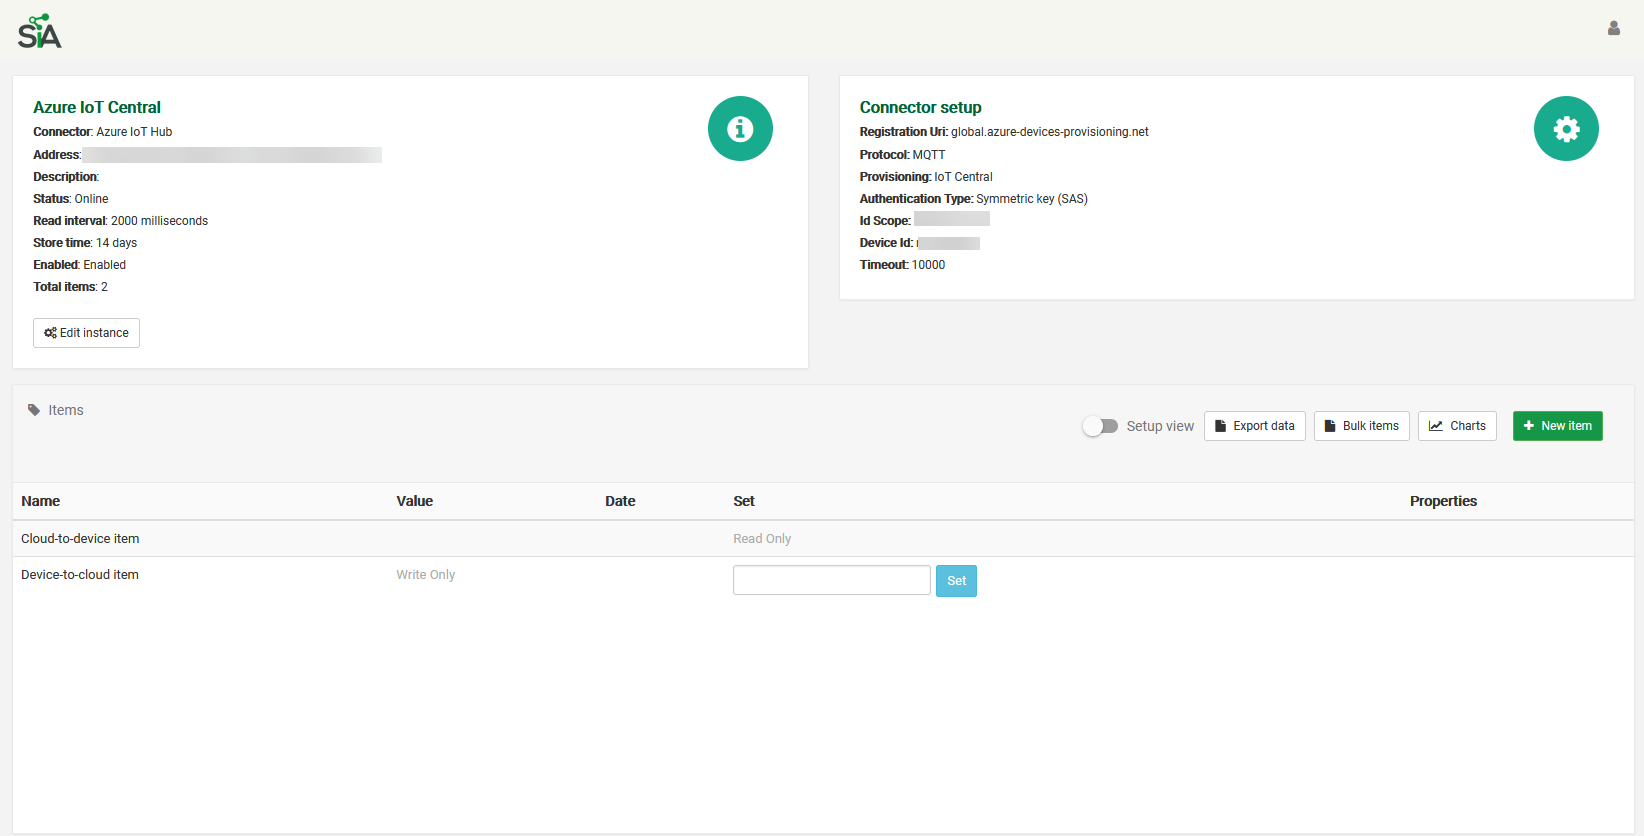
When the setup is done, the instance should have added at least two new items which represents data tunnels to IoT Central. That's it, next step is to create data flows between other instances (PLCs, sensors, etc.) and to IoT Central.
Defining device telemetry message template
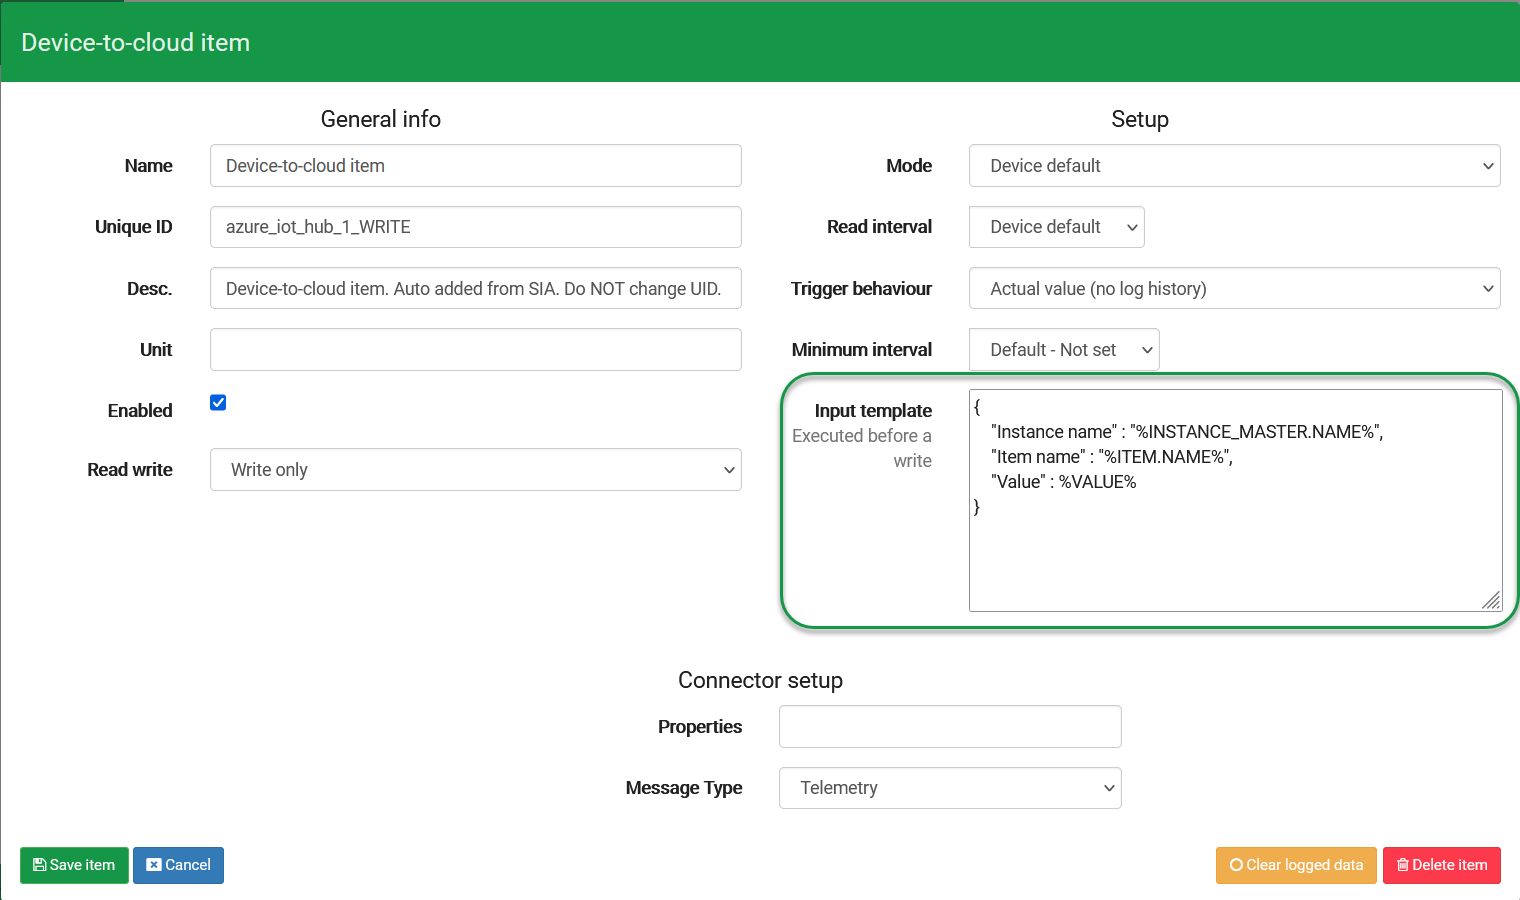
To exchange data between other instances (PLC, sensors, etc.) connected and Azure IoT Central, an Input Template on the Device-to-cloud item can be created to define how published messages comes into IoT Central. If no input template is defined the raw data value read from the another instance is transmitted.
To define the message template, click the Device-to-cloud item:
Insert the desired message format into the Input Template.
In this example, we will keep it simple, and input this payload:
{
    "Instance name" : "%INSTANCE_MASTER.NAME%",
    "Item name" : "%ITEM.NAME%",
    "Value" : %VALUE%
}
Publishing telemetry events to Azure IoT Central
This example demonstrates how a Siemens S7 PLC publishes telemetry events to IoT Central through SIA Connect.
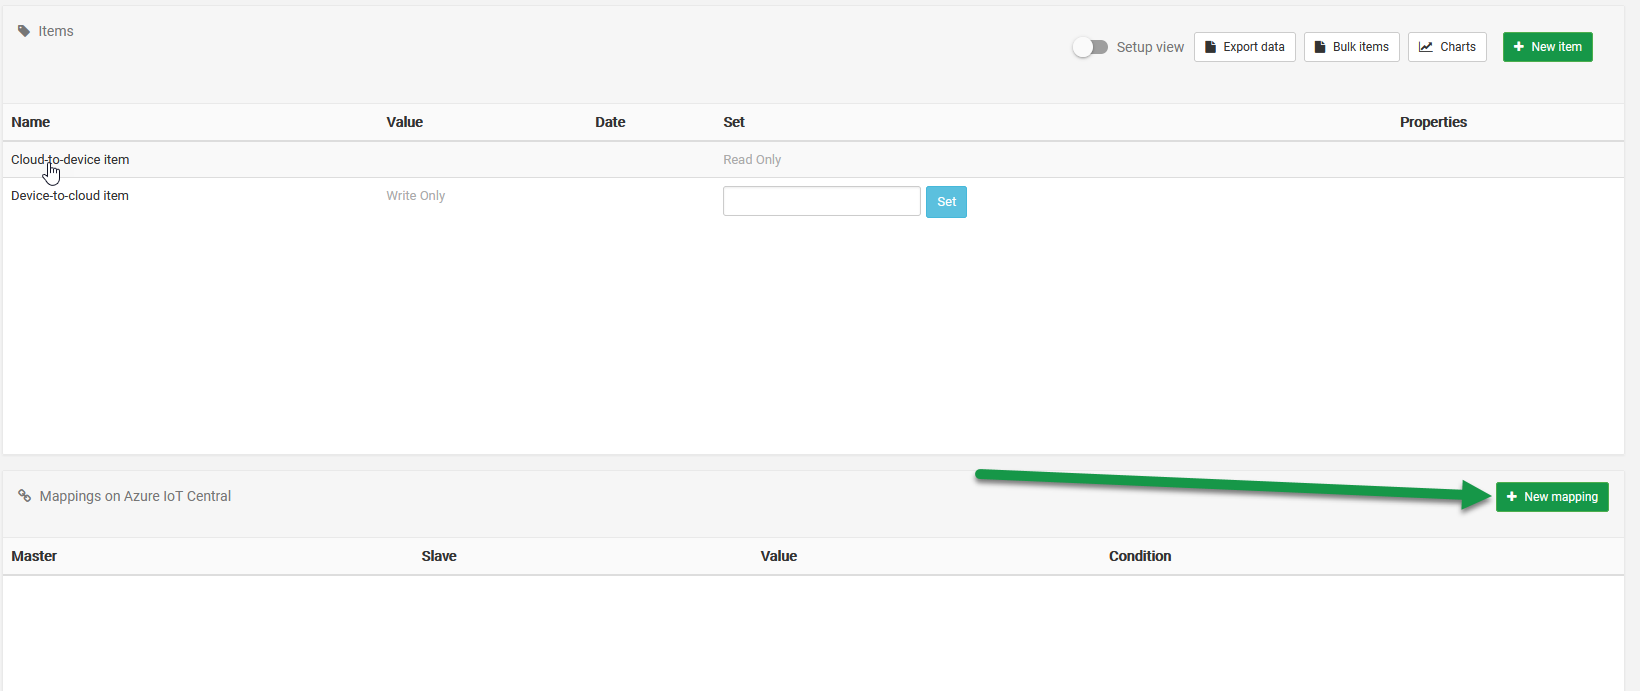
To publish telemetry events from the Siemens S7 PLC a mapping between its data items and the Azure IoT Central's "Cloud-to-device item" needs to be added. Check this guide to learn how to add more instances.
A mapping creates a stream of data between the two items.
Click New mapping in one the instances.
Choose the master/sender and slave/receiver instance and item.
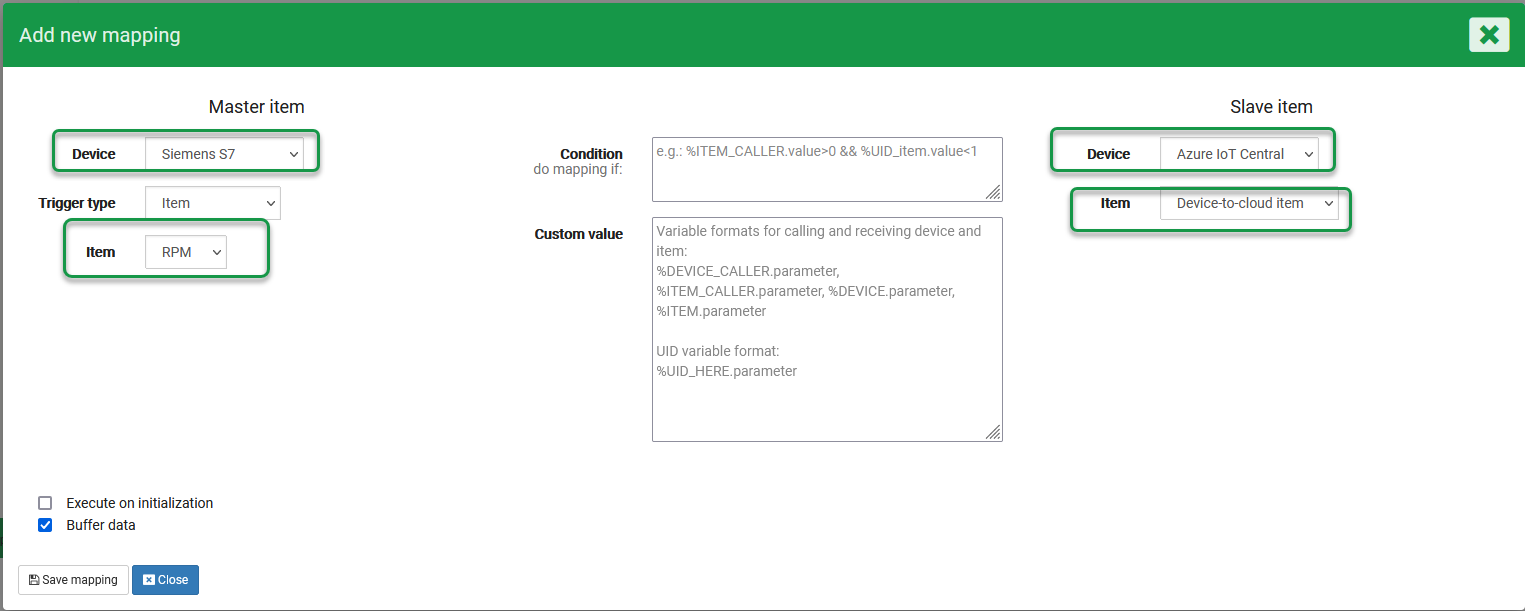
Select the sired instance and a data item for master/sender (Siemens S7 PLC in this case) and as slave/receiver select the "Device-to-cloud item" for the newly created Azure IoT Central instance. Save the mapping.
New data from the sending is now being published to IoT Central!
Monitoring telemetry events in IoT Central
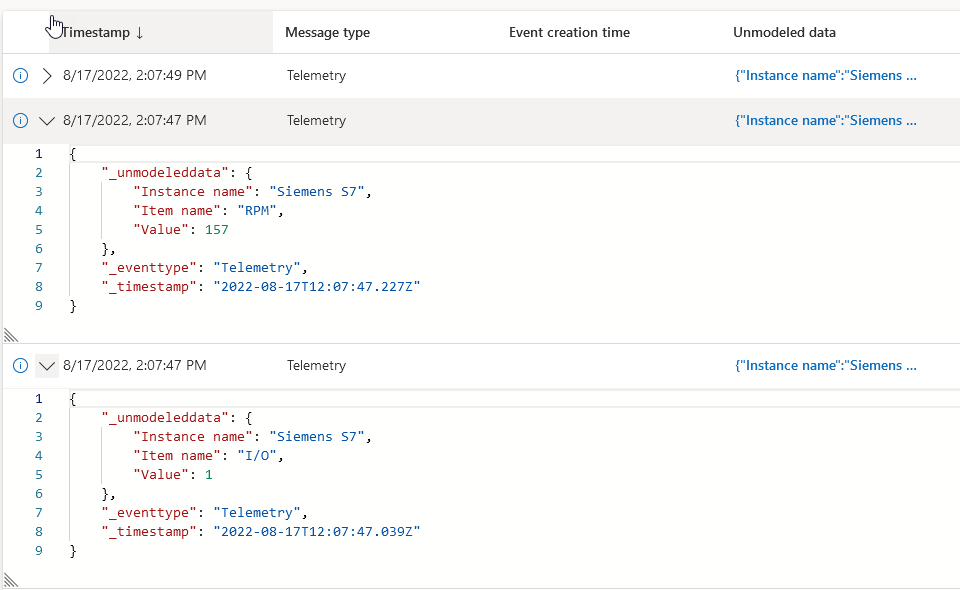
Validate the data flow from the sending instance in IoT Central:
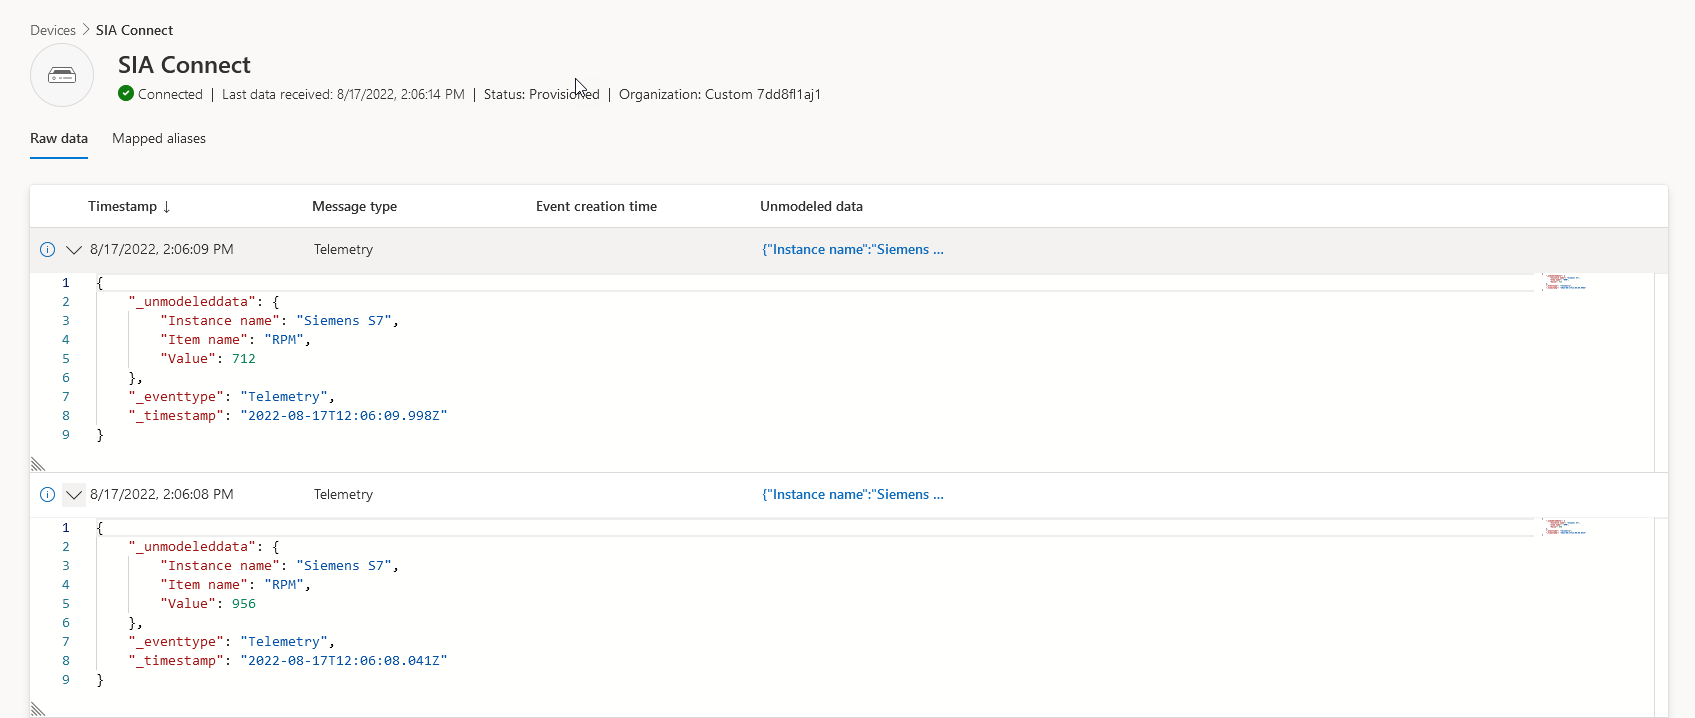
Keep in mind that you can have several senders/master to the same receiver/slave. In the above screenshot telemetry events is arriving from two Siemens S7 PLC items, namely RPM and I/O.
Configuration of devices in Azure IoT Central
To get started with IoT Central, navigate to https://apps.azureiotcentral.com/home and to the app to where the device is going to be provisioned. Provisioning is to be done by using the respective symmetric keys.
The following provisioning is supported:
- Manually creating devices in IoT Central
- Individual enrollment
- Automatically from the device by parsing generic app authentication
- Group enrollment
Individual enrollment with symmetric keys
From here, click New
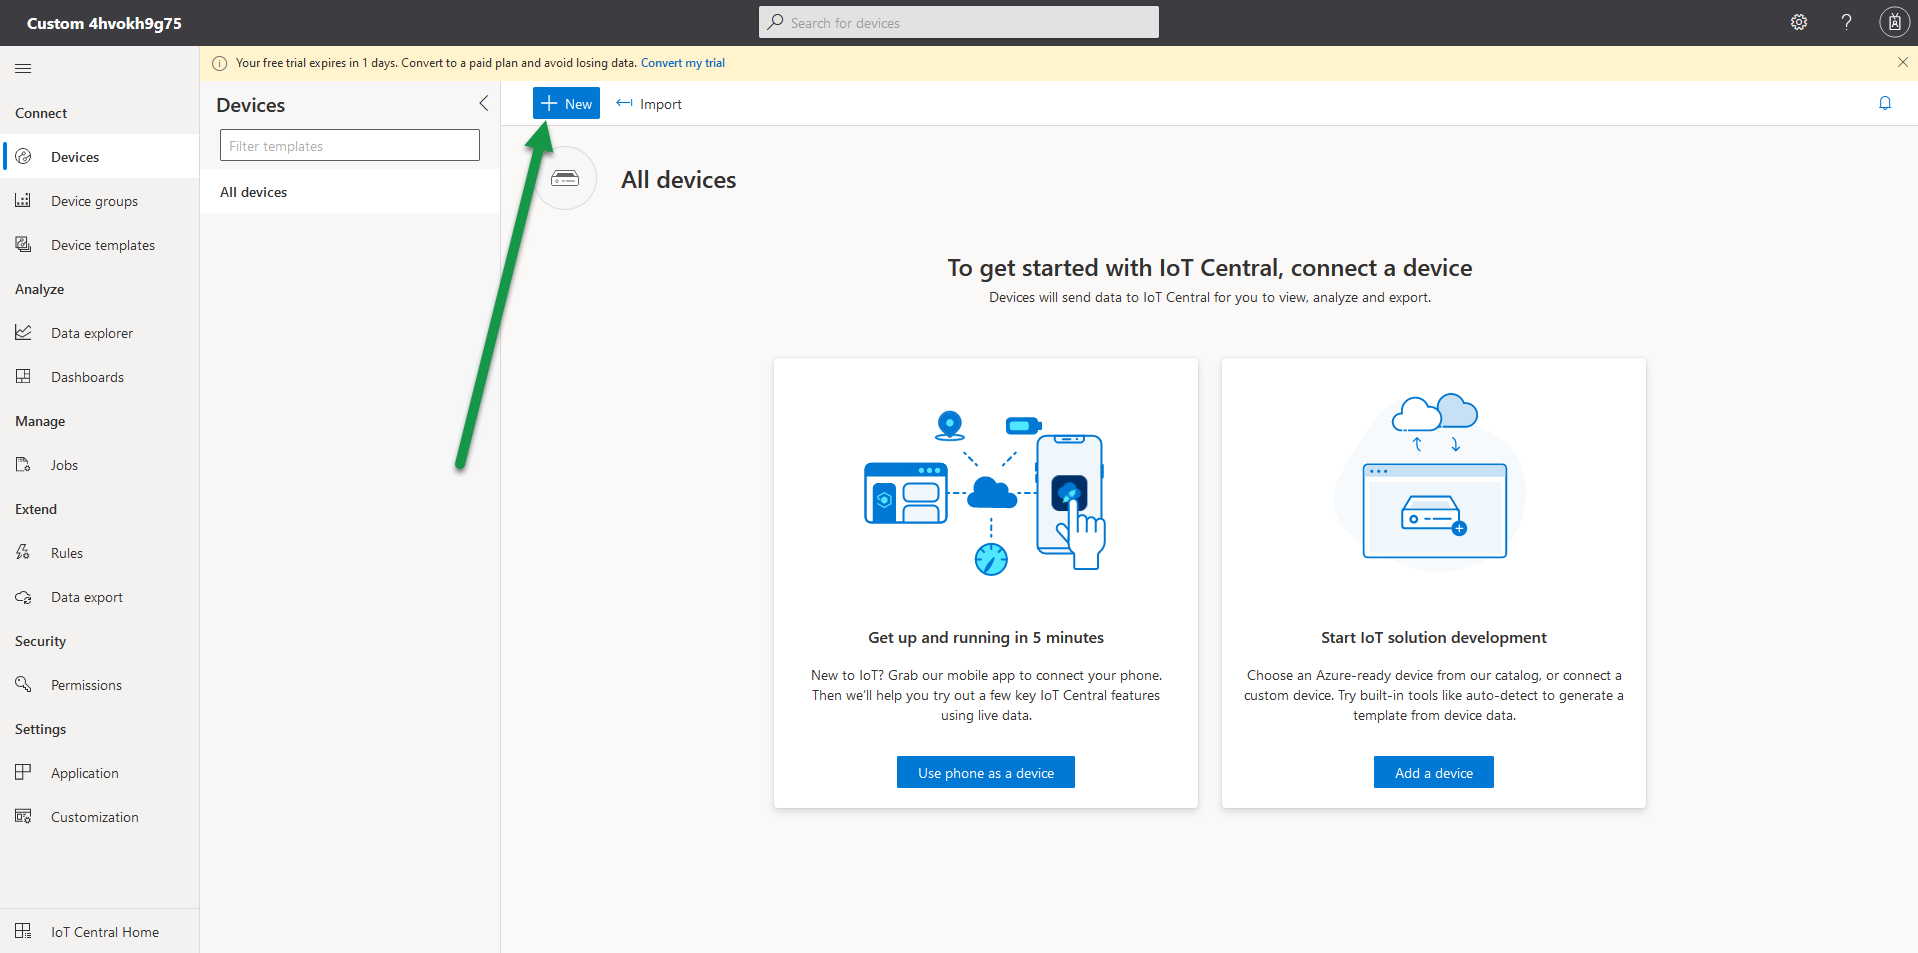
You will be presented with a popup, where you can fill in the information regarding your new device:
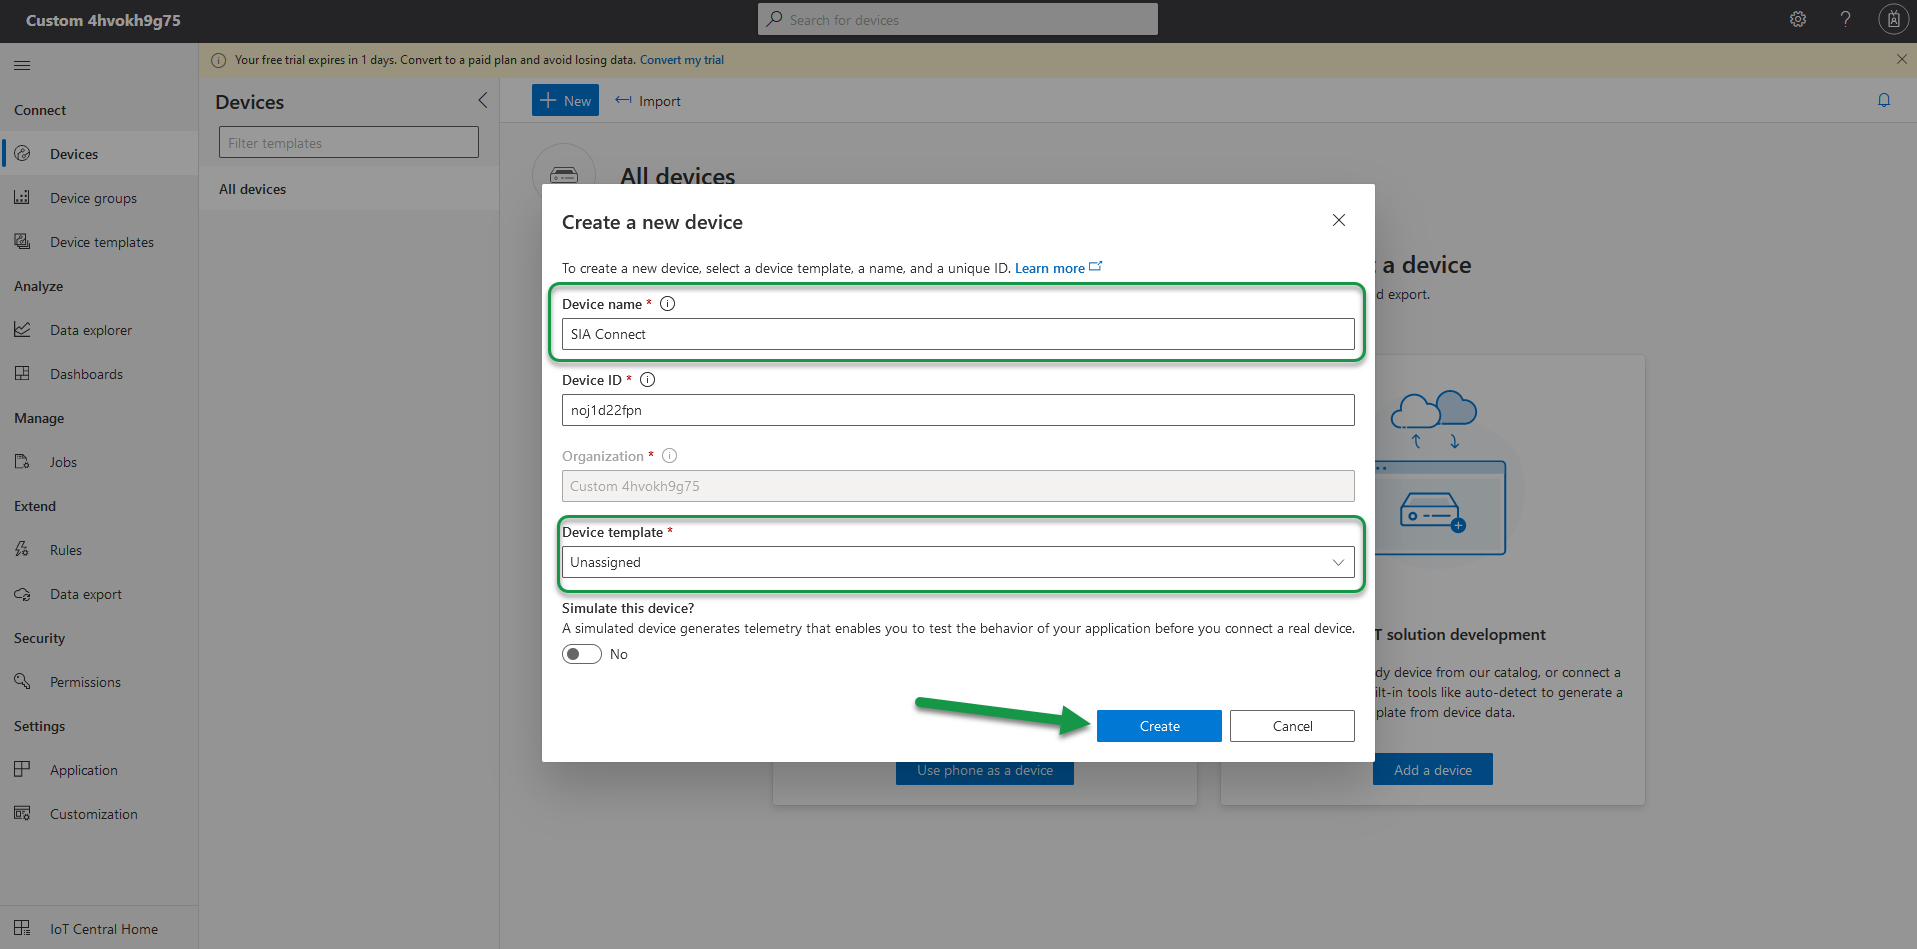
| Parameter | Description |
|---|---|
| Device name | We have chosen to call it "SIA Connect". This can, however, be anything you want it to be |
| Device template | Leave this to "Unassigned" Alternatively, attach an already created Device Template to it, if you have one ready |
The rest can be kept to the default value.
Click Create
The newly created device will appear under the device list:
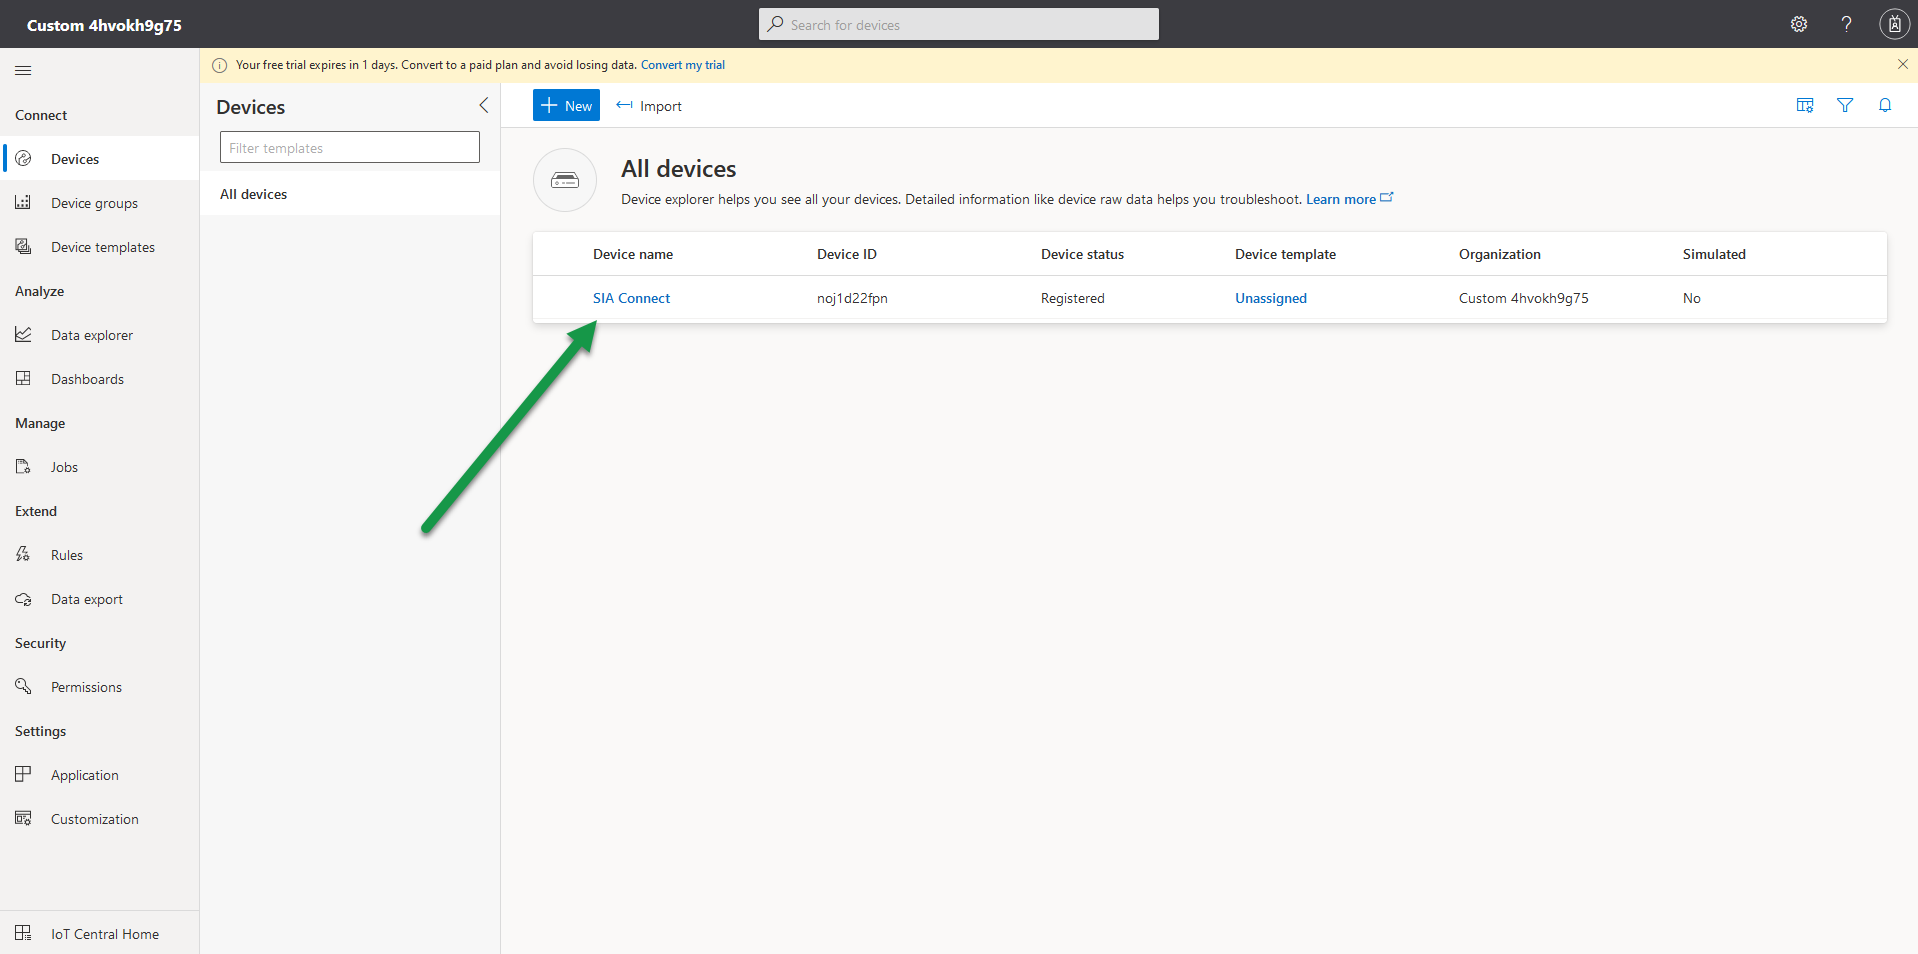
Click the device name to access it
From here, select Connect:
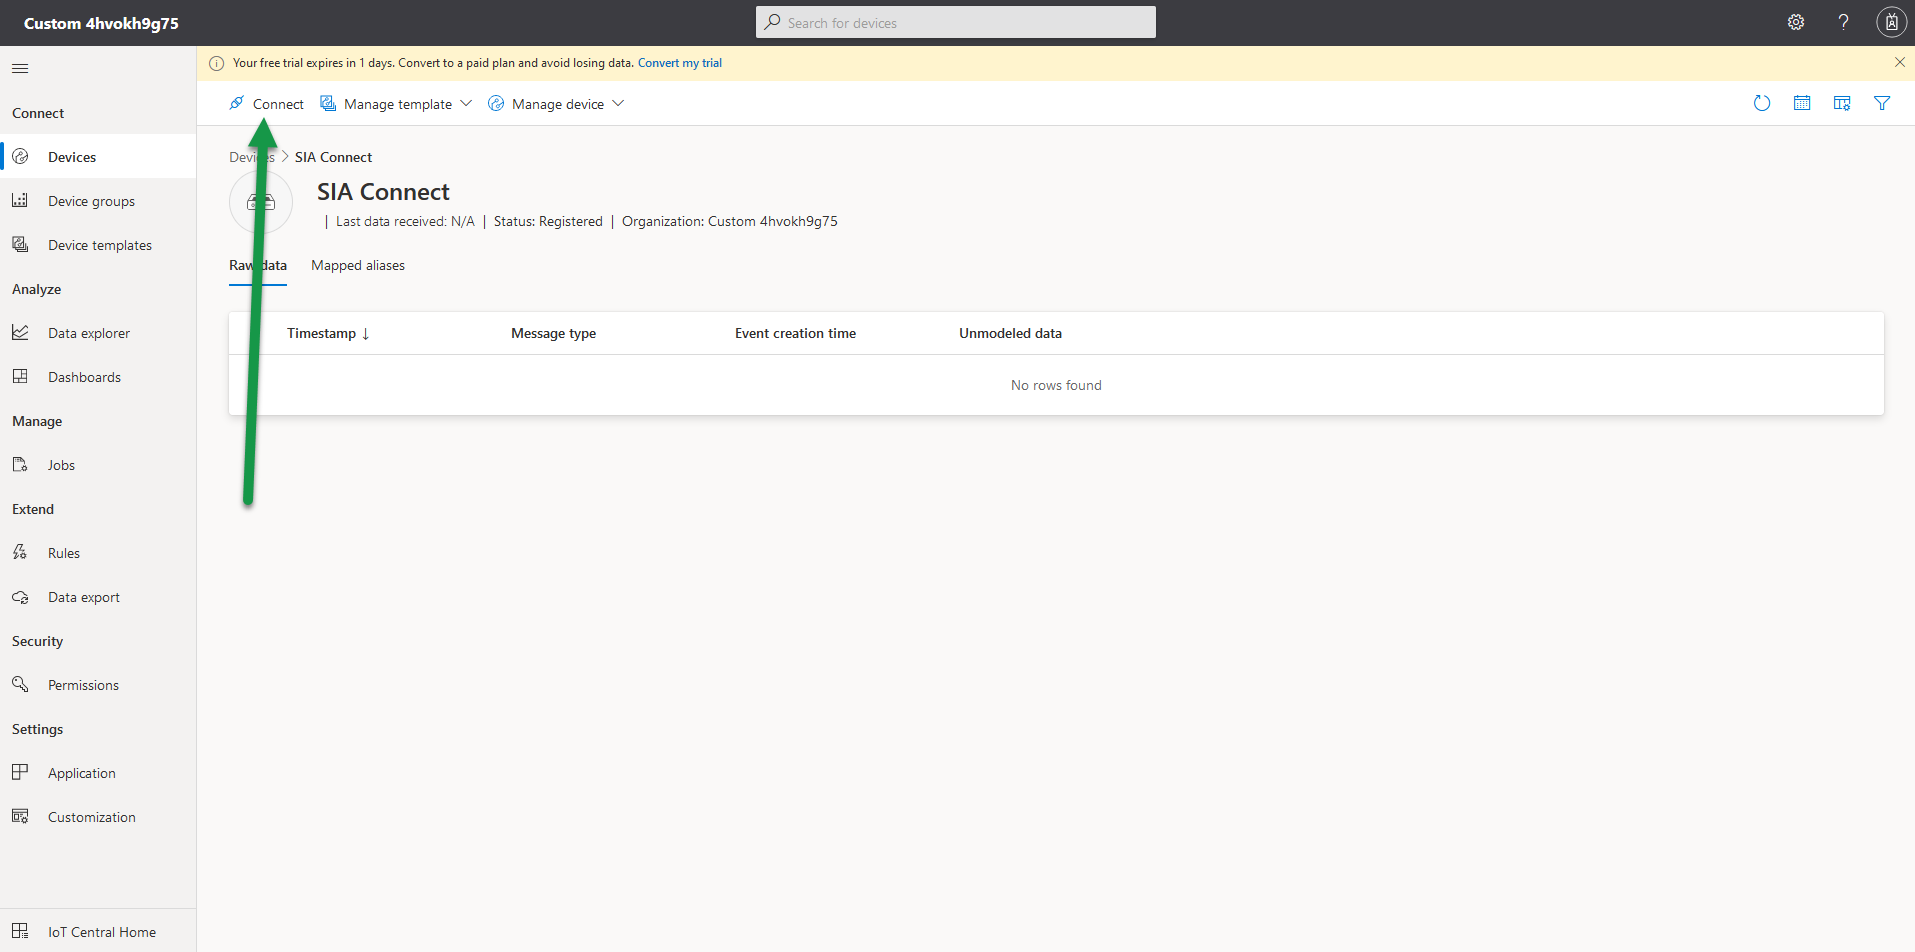
You will be presented with a popup containing all the information needed to connect to Azure IoT Central:
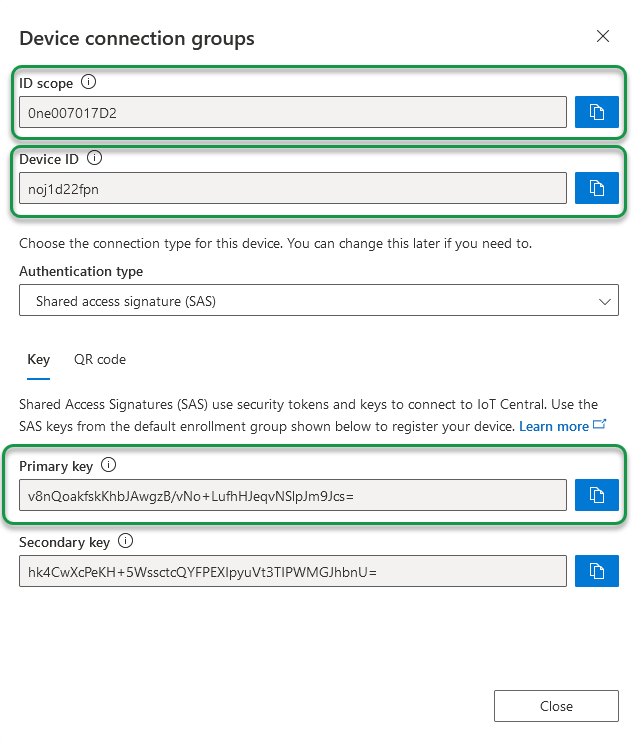
Note down the following:
- ID Scope
- Device ID
- Primary key
as they are needed for establishing connection from SIA Connect.
Group enrollment with symmetric keys
Group enrollment will automatically enroll and provisioning your SIA Connect unit as a device in your Azure IoT Central. In order to get the group enrollments symmetric keys follow the steps given below:
Navigate to Permissions
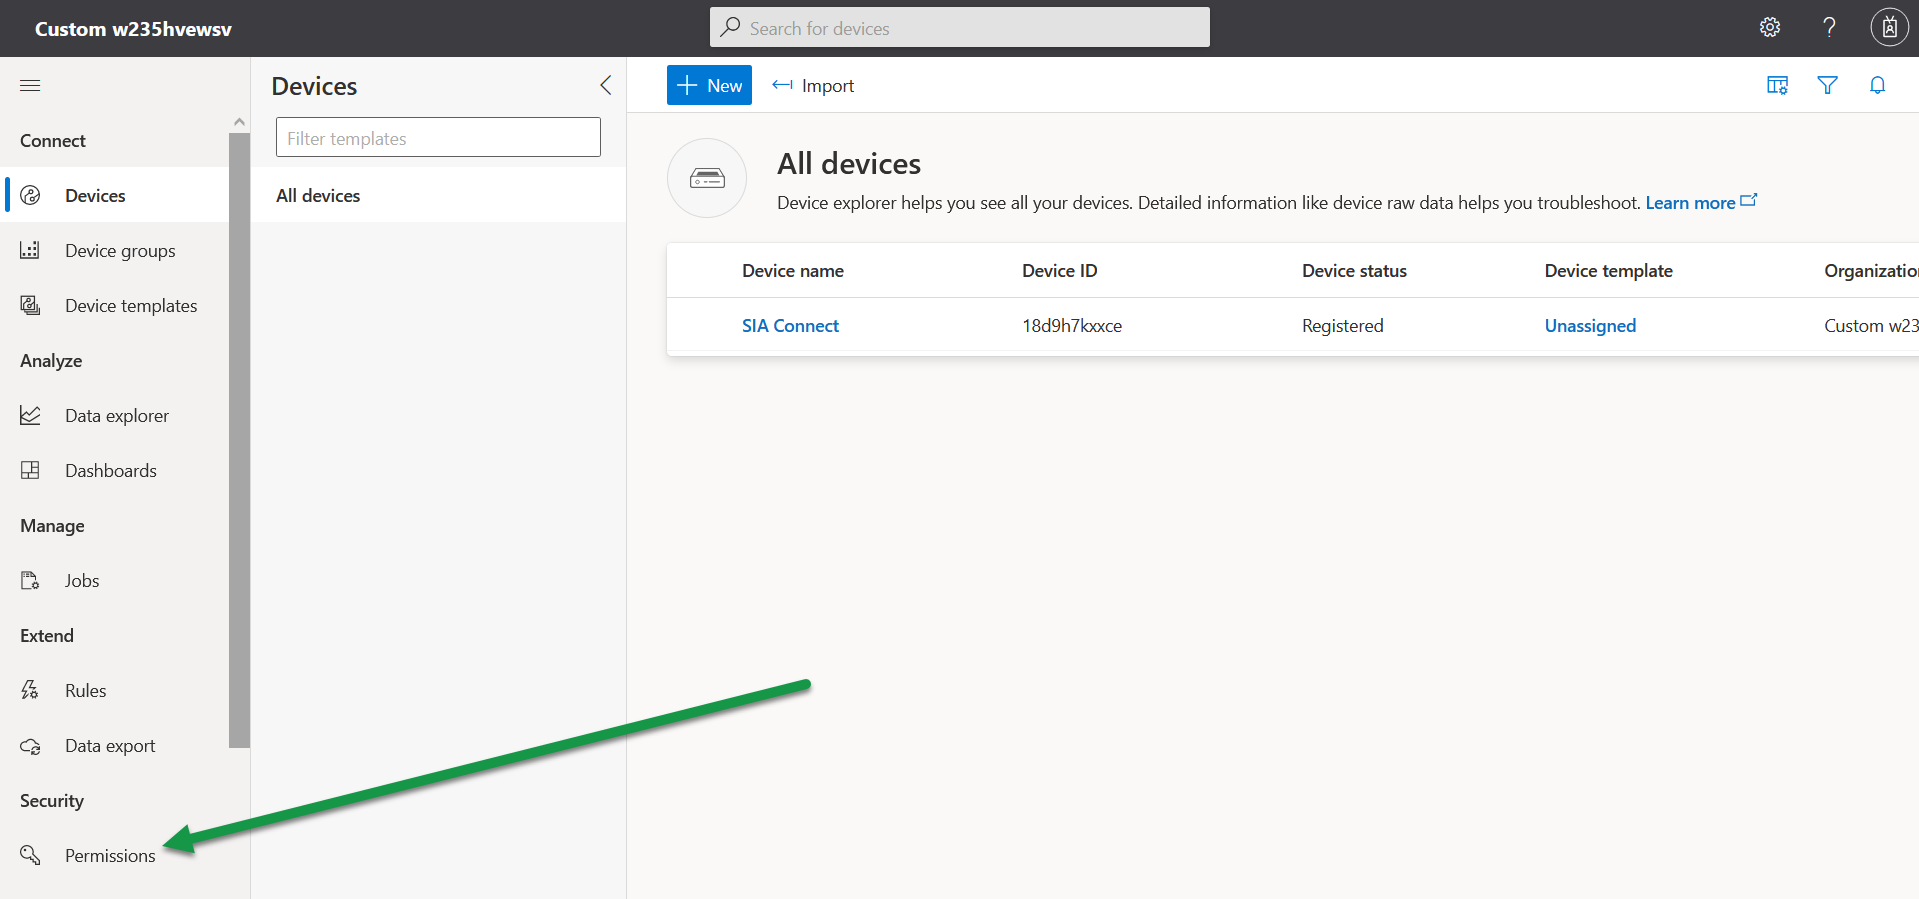
From here, navigate to the Device Connection Groups and choose one of your Enrollment groups:
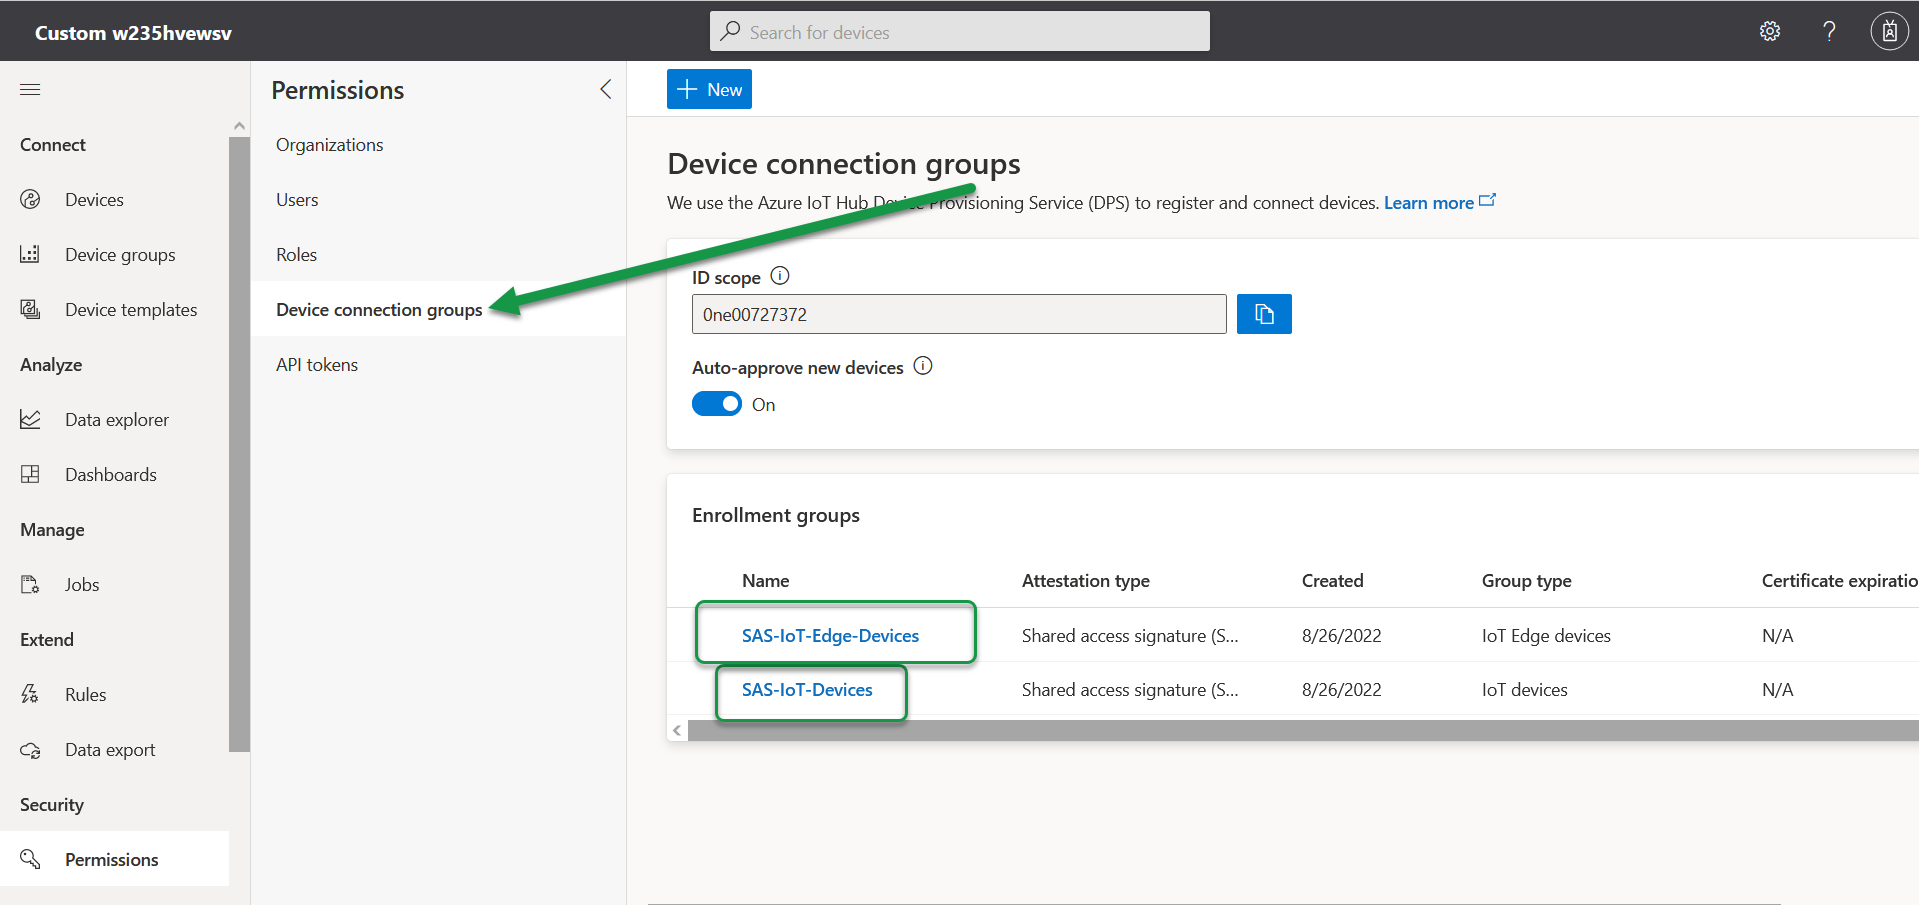
In this example we will be using the SAS-IoT-Devices
From here you will be presented with the Primary key and ID Scope, which we will need for a later step
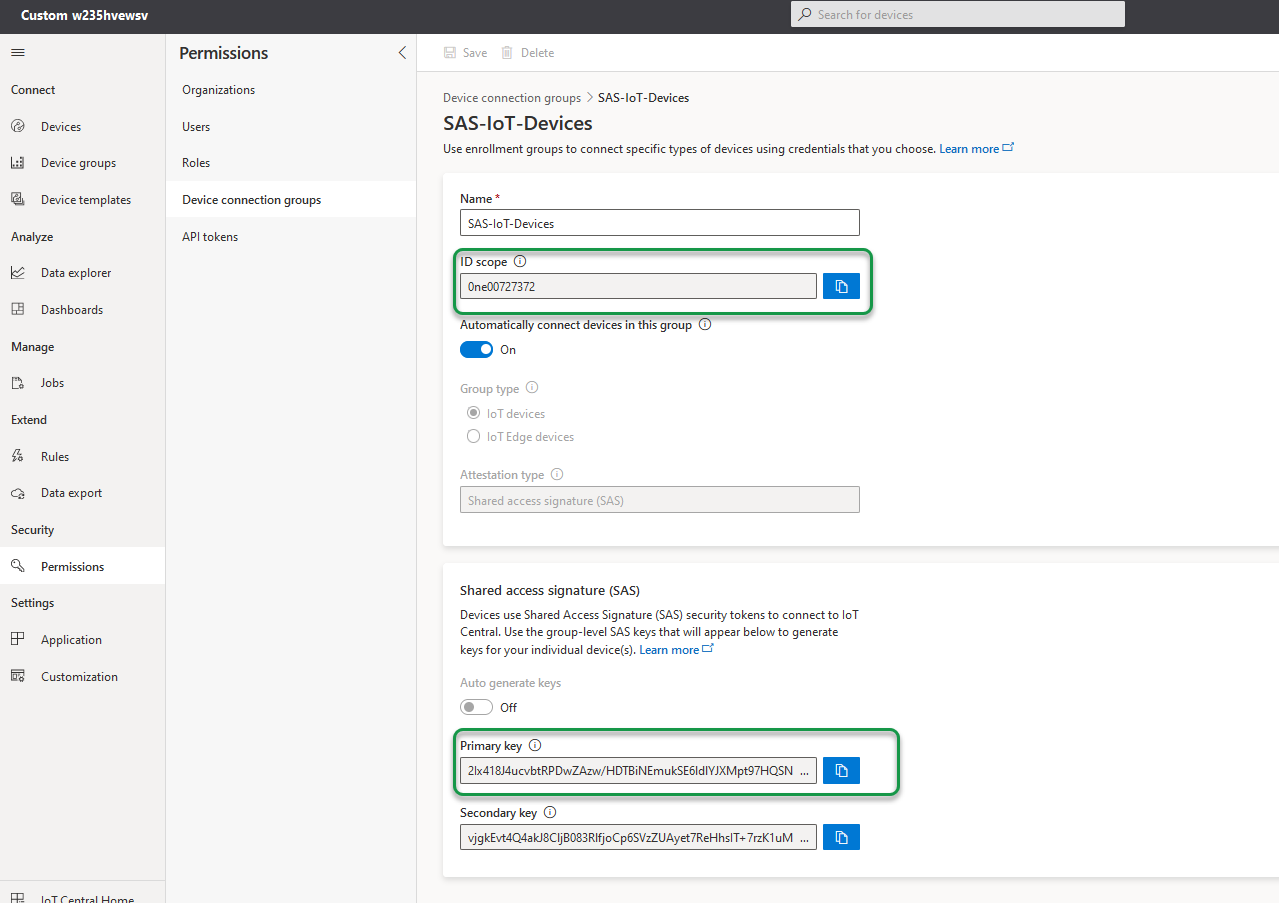
Note down the following:
- ID Scope
- Primary key
as they are needed for establishing connection from SIA Connect.
Property synchronization
Properties represent point-in-time values. For example, a device can use a property to report the target temperature it's trying to reach. By default, device properties are read-only in IoT Central. Writable properties let you synchronize data between your SIA Connect device and your Azure IoT Central application. In short, writable properties allow for both sending and receiving data from your Azure IoT Central application to your SIA Connect device.
Creating a device template
For the purpose of this test, we will create 2 properties:
- IO: used by the Siemens S7 PLC to turn the test program on
- RPM_SP: used by the Siemens S7 PLC to change the desired setpoint
First, we need to create a template, where these properties are represented
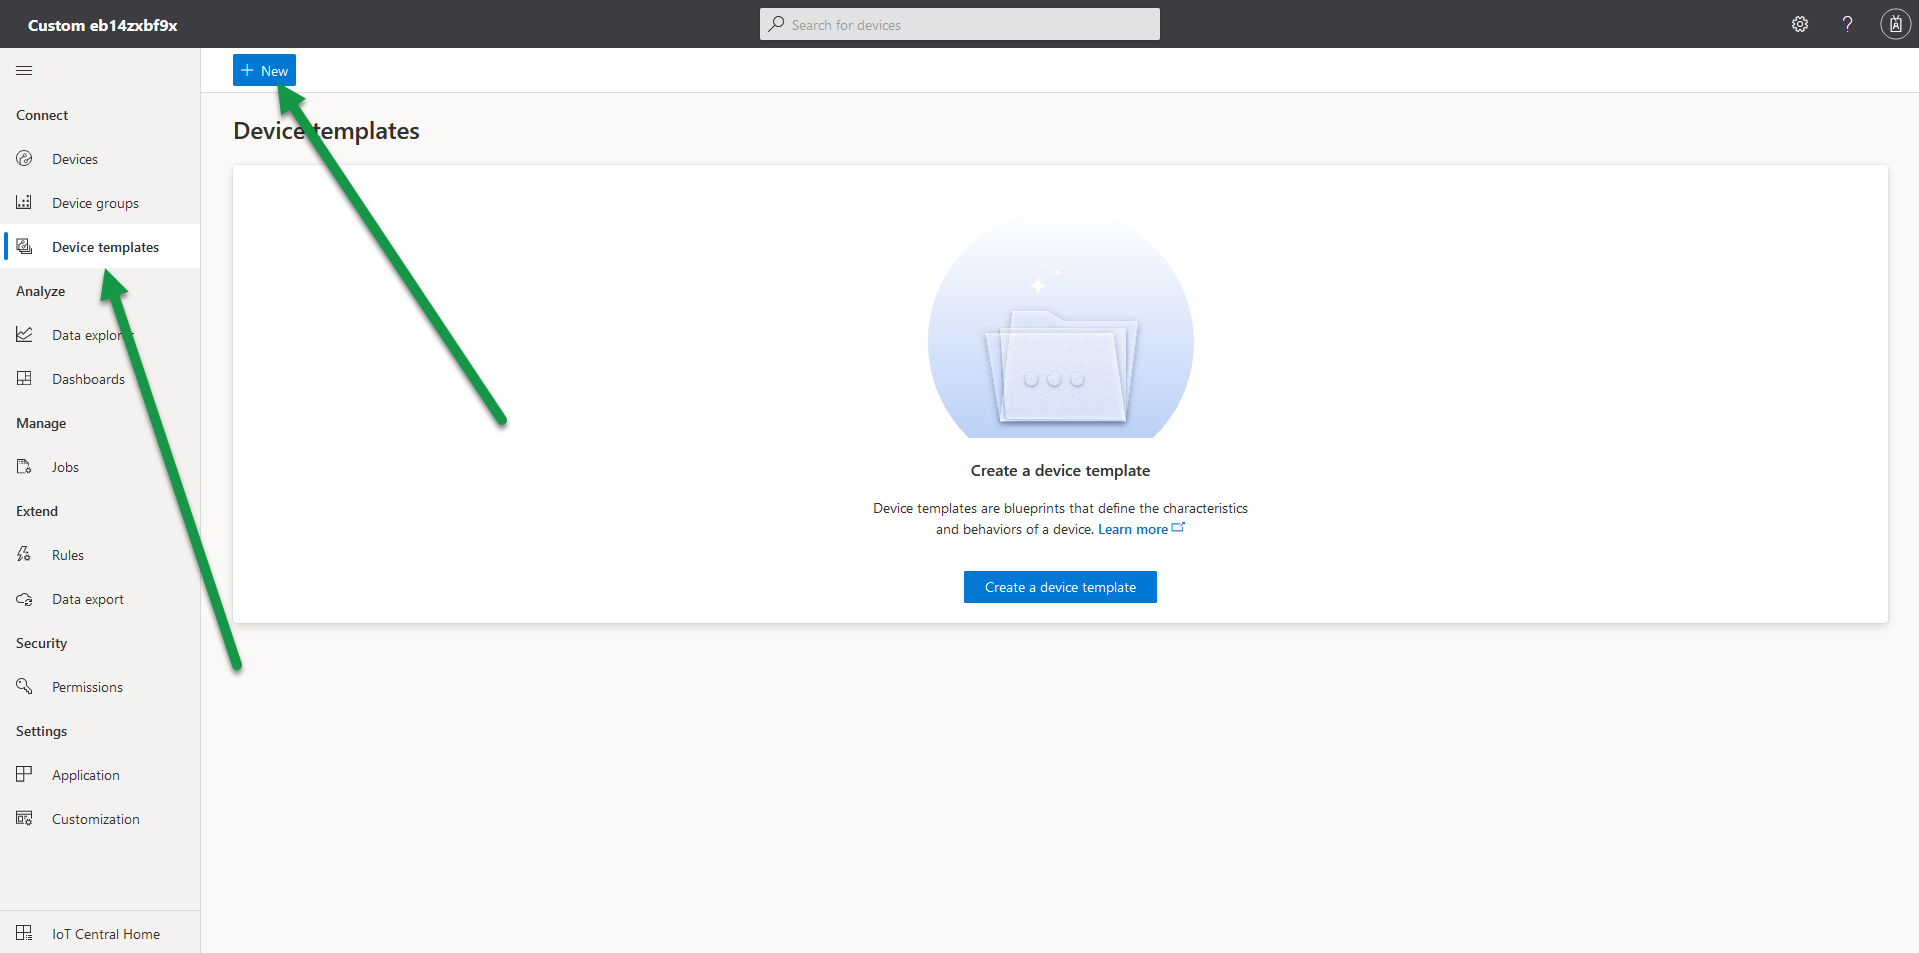
Go to Device templates and select New
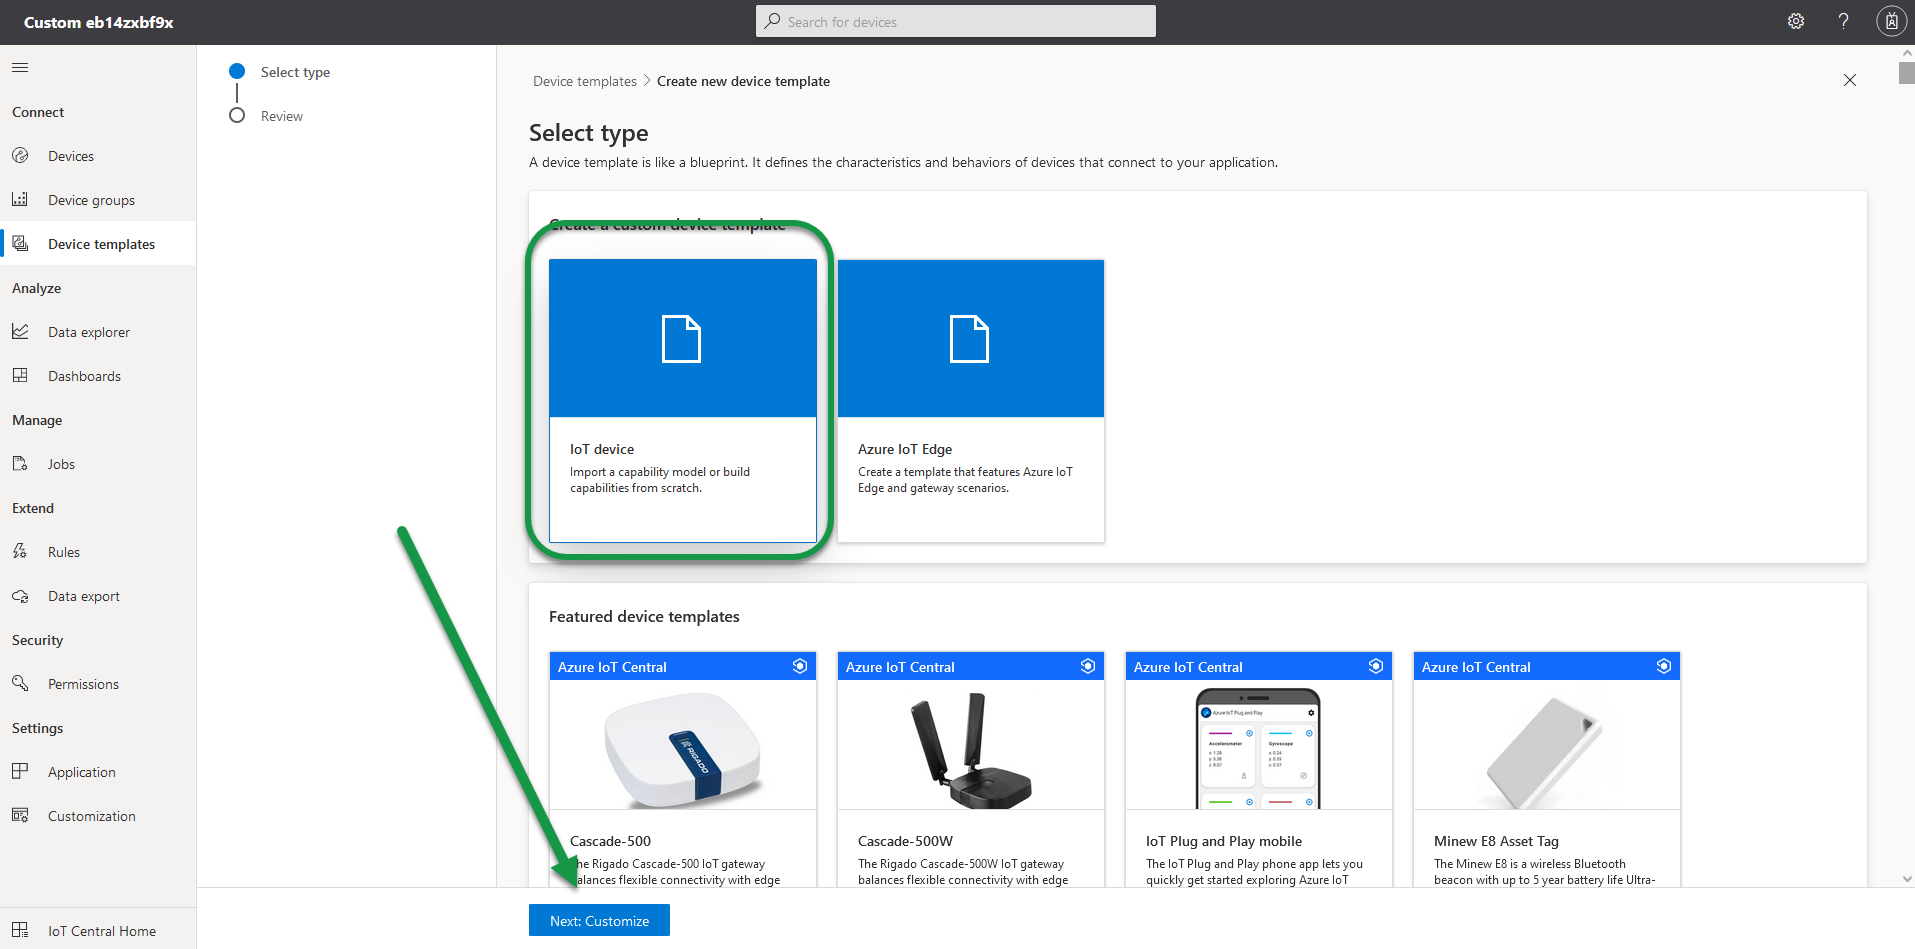
Select IoT Device, and click Next: Customize:
Give the template a name and select Next: Review
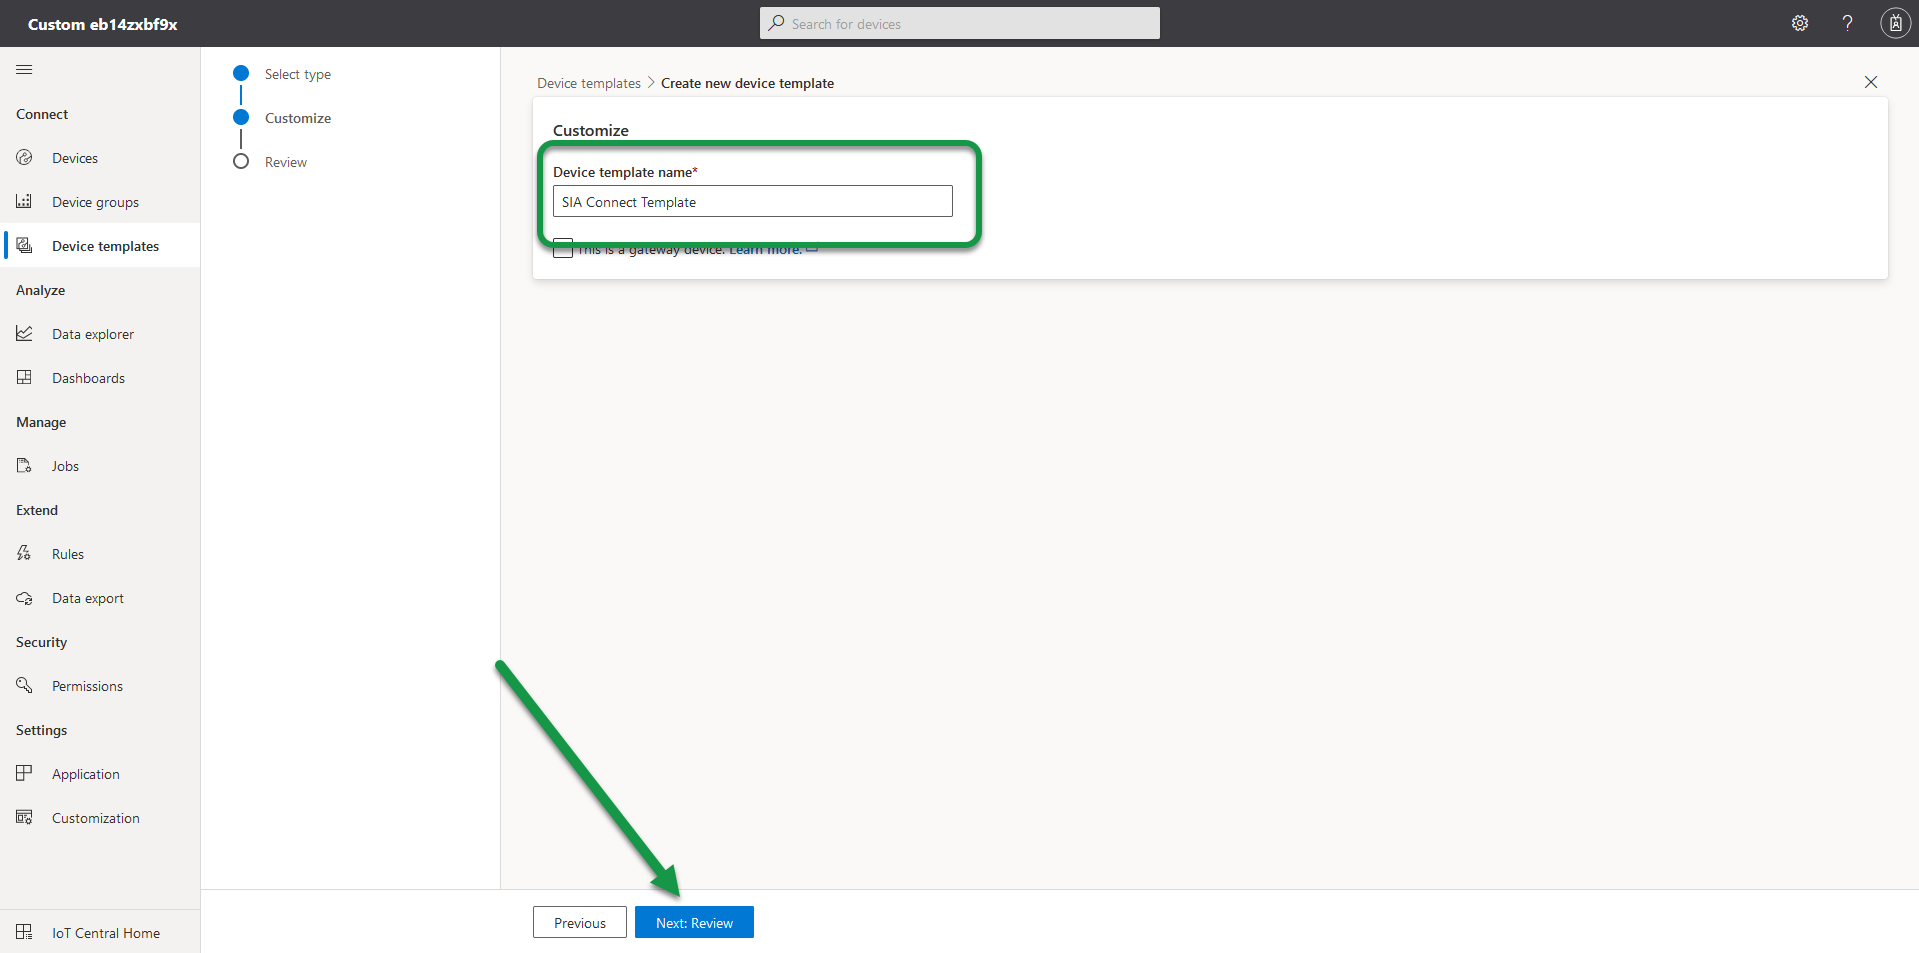
Select Create
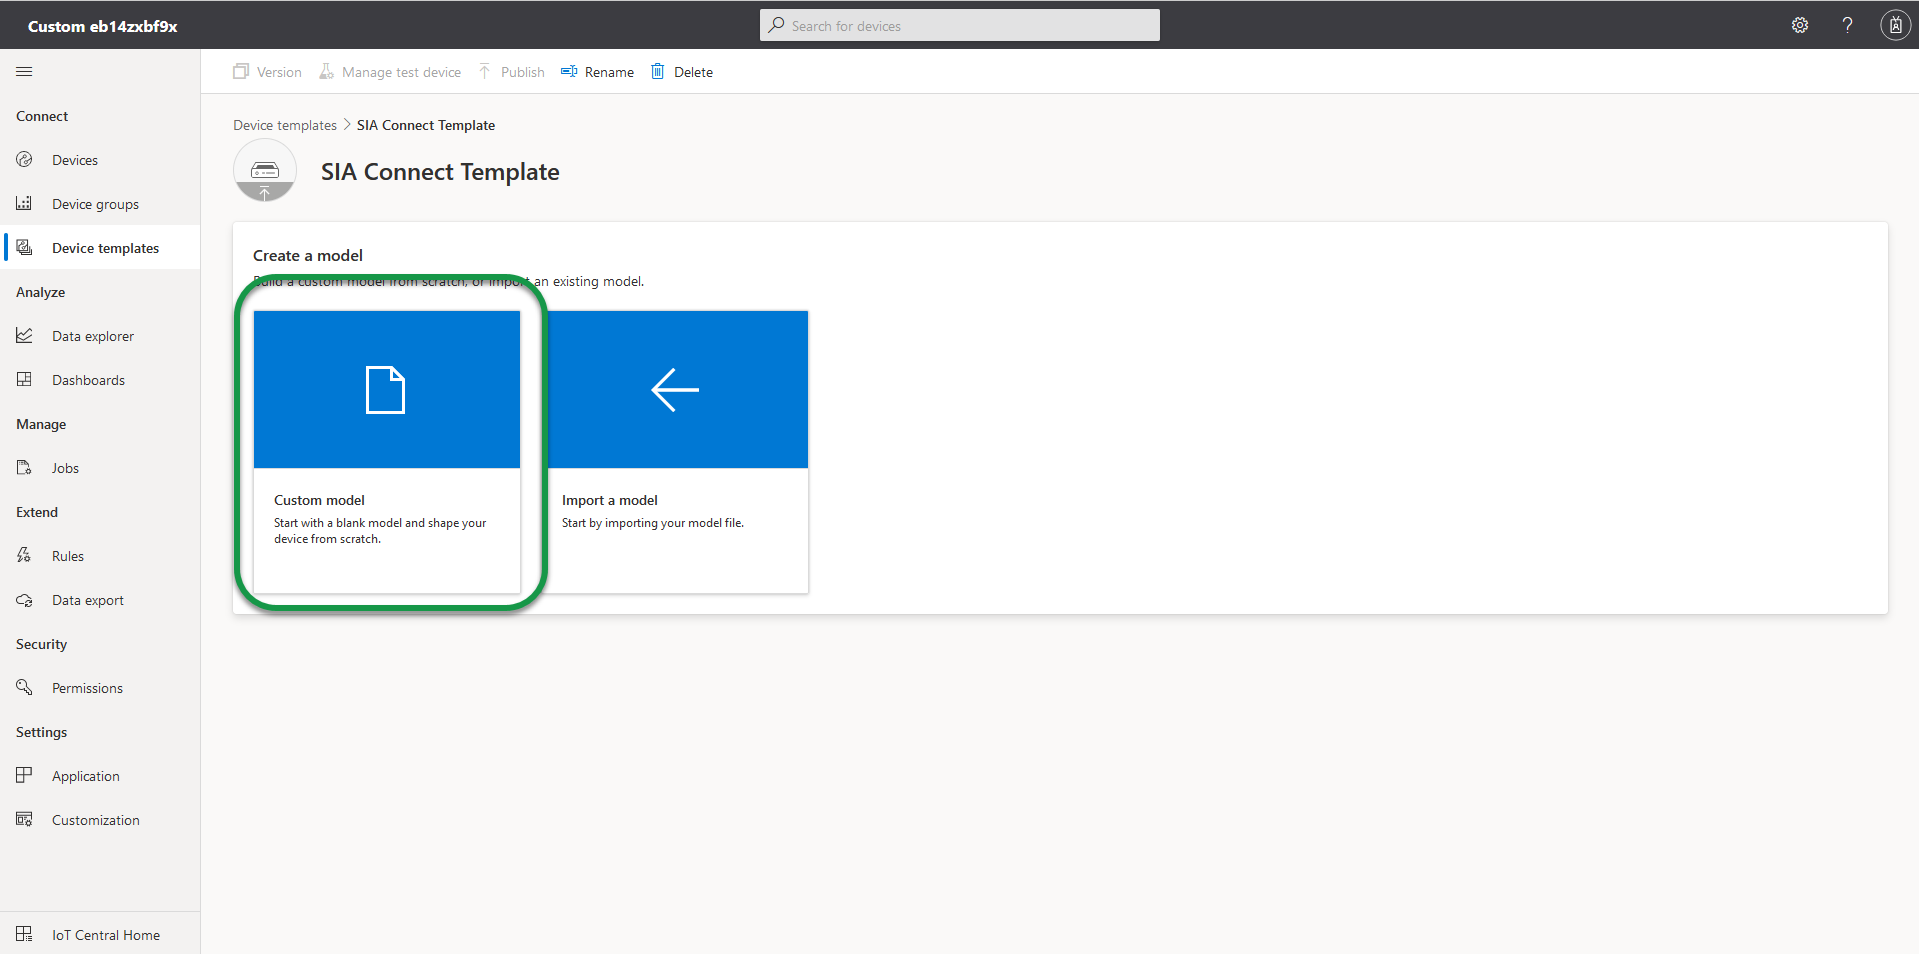
Select Create custom model
From here, we can add Properties and Telemetries by using the Add capability button:
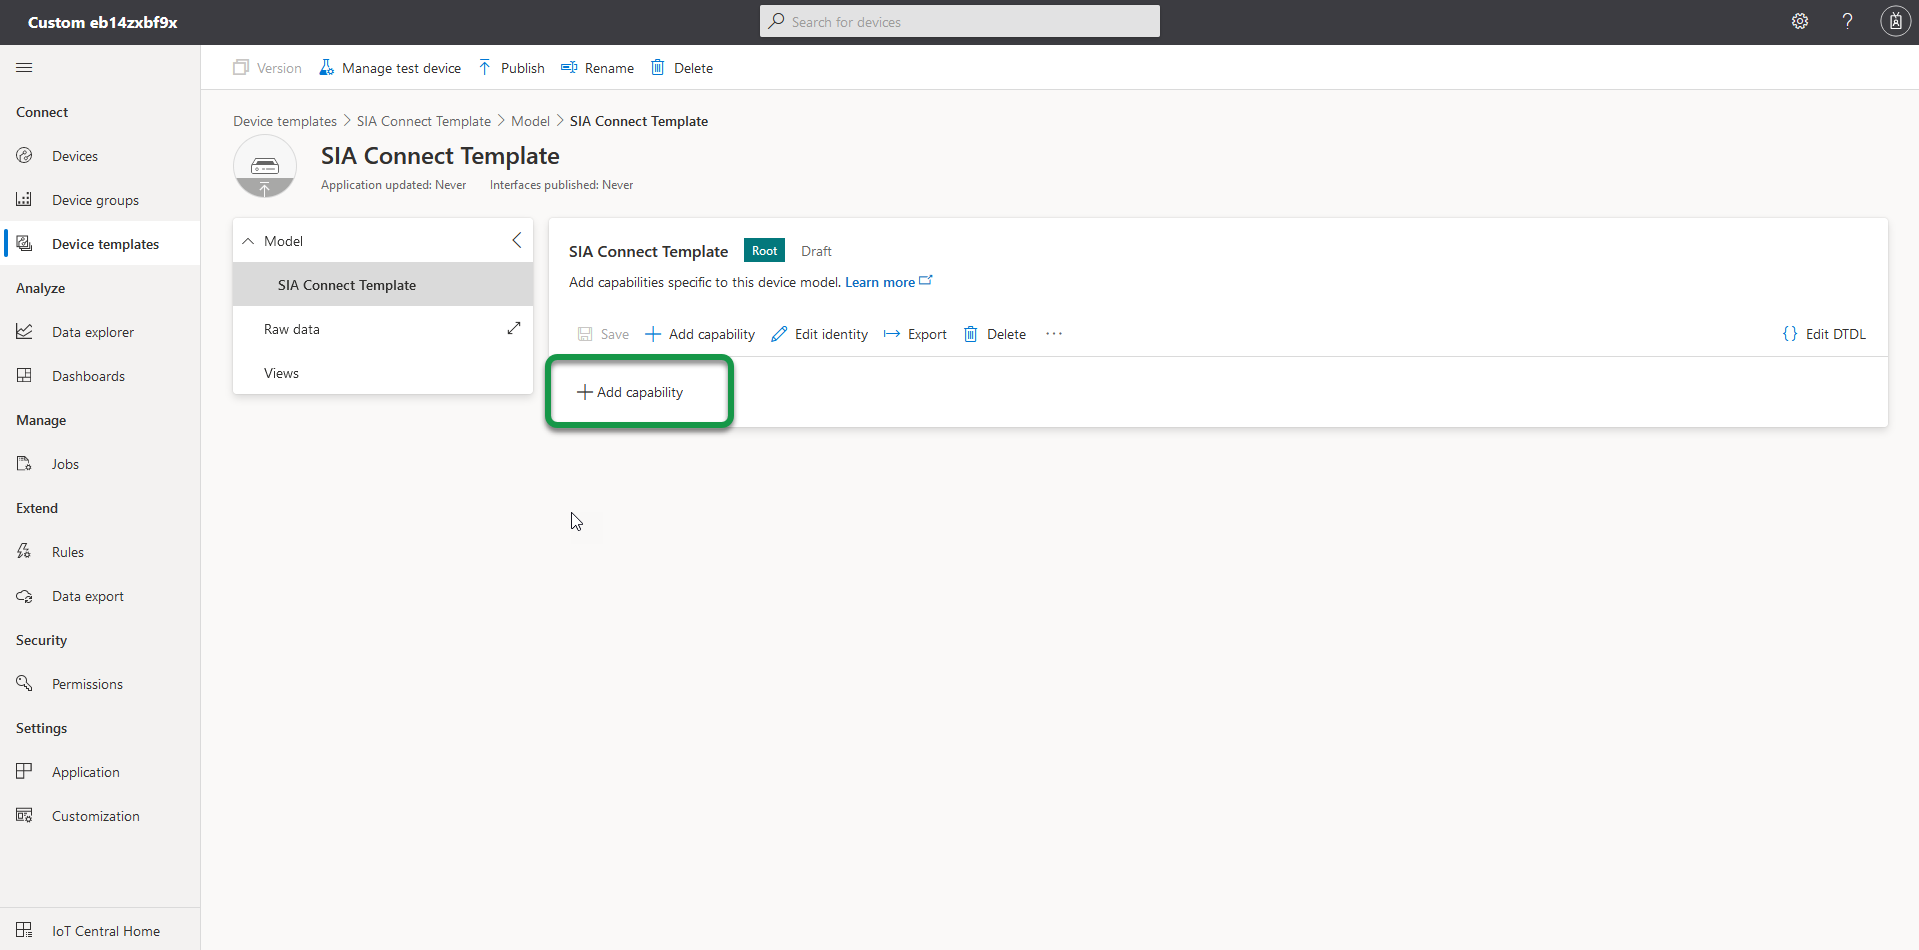
We will create 2 properties, by adding capabilities to the template.
The first we create is the IO-property:
To see more data, click the arrow next to the X on the right side

| Parameter | Description |
|---|---|
| Display name | Name shown on the main overview |
| Name | Actual name of the property. |
| Capability type | Property or telemetry. In this example a Property |
| Schema |
Datatype of the property. |
| Writable | Writable properties can be set from IoT Central |
We do the same with the RPM_SP property, and we end up with a template looking like this:
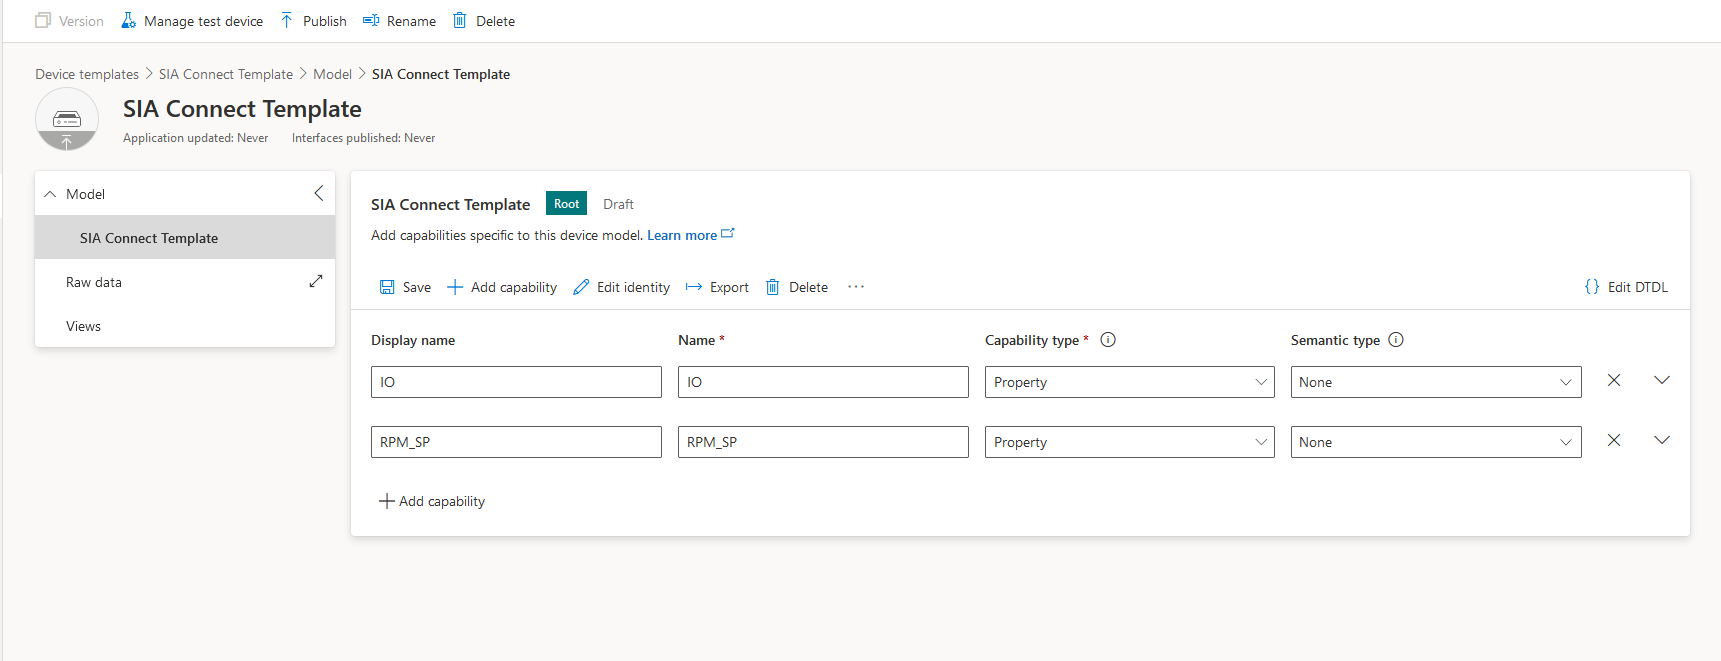
From here, we Save the new template.
Creating a view for controlling properties
Properties can be set either by sending raw JSON commands or through IoT Central "Views". This example shows how to use the "Views" functionality of IoT Central.
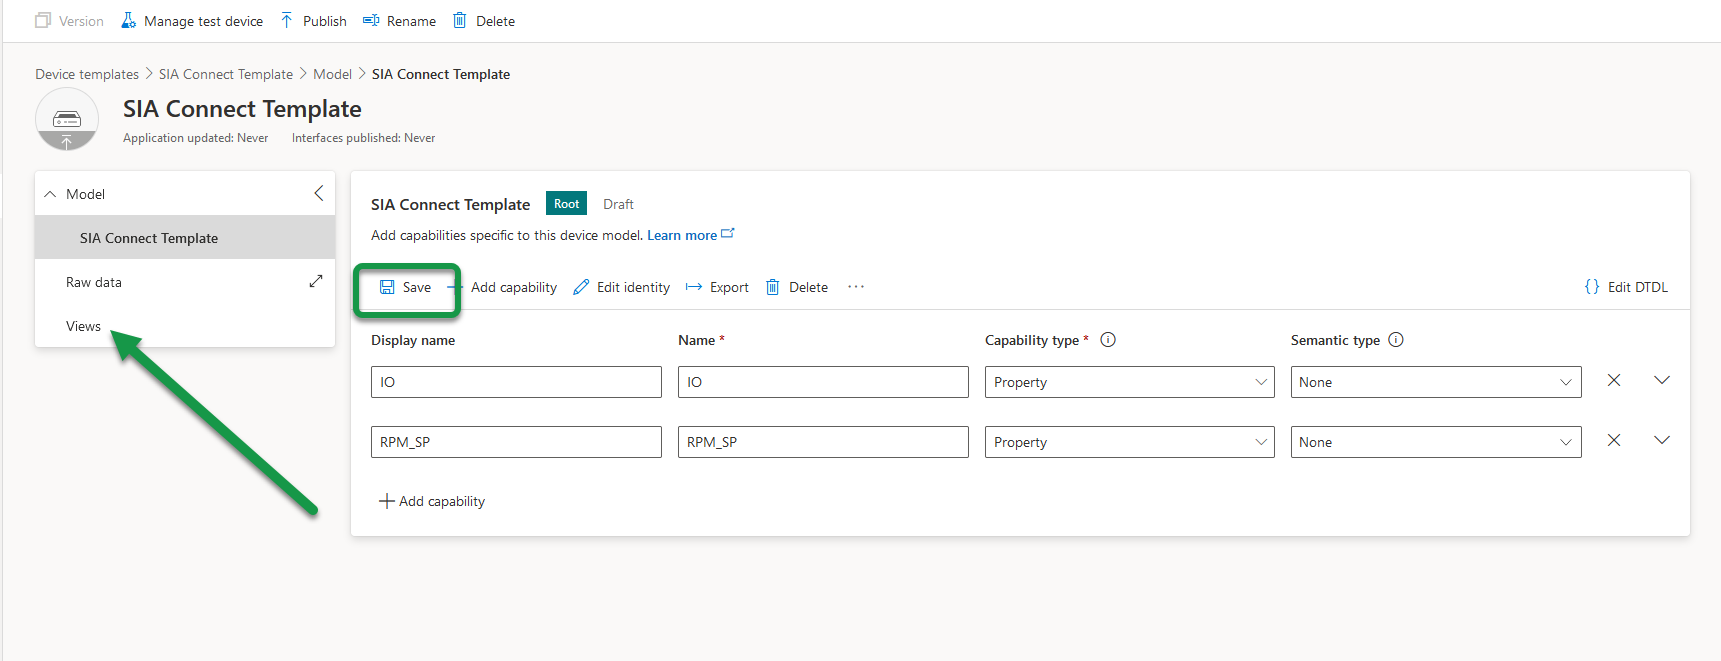
Go to Views
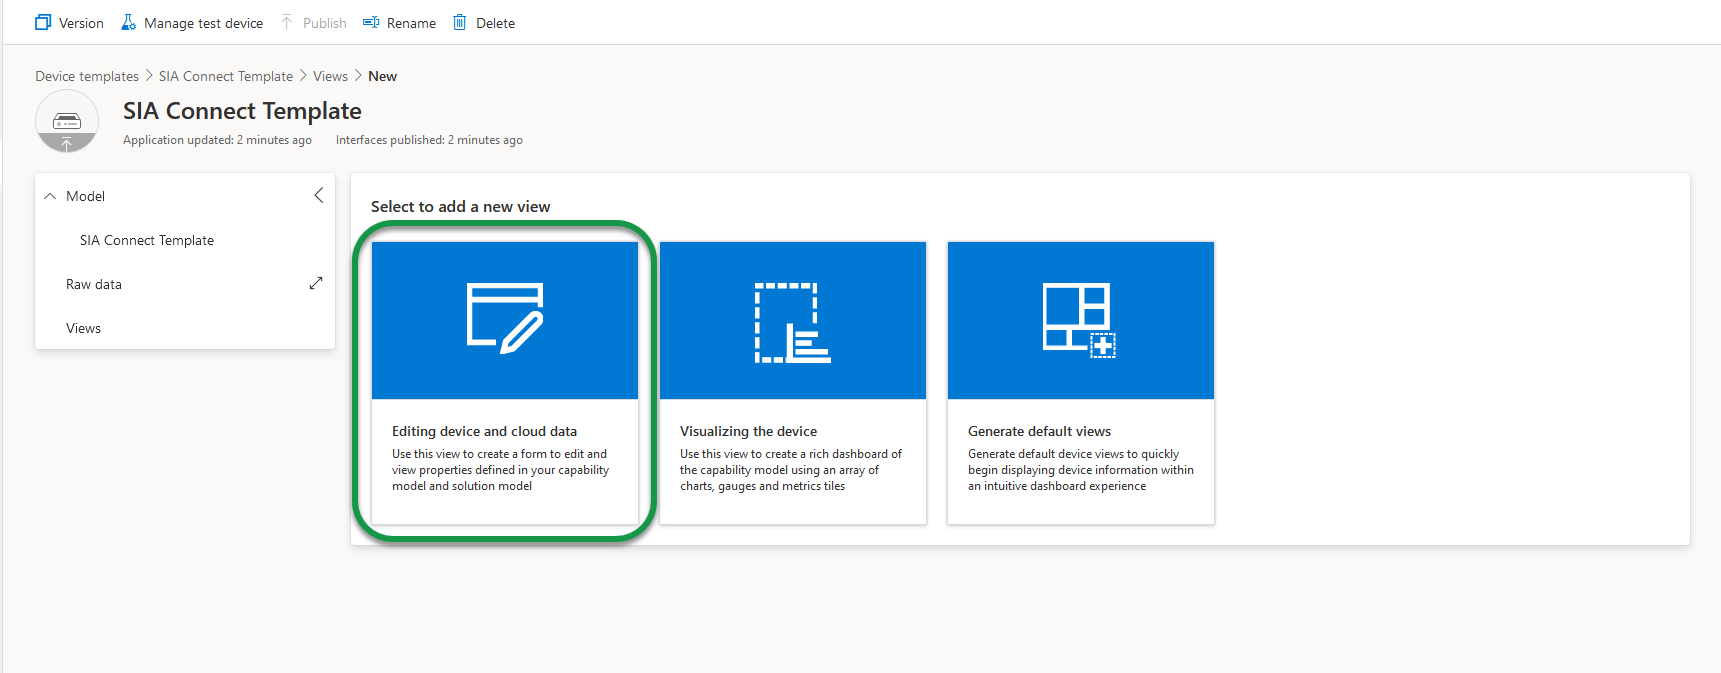
Select Editing device and cloud data
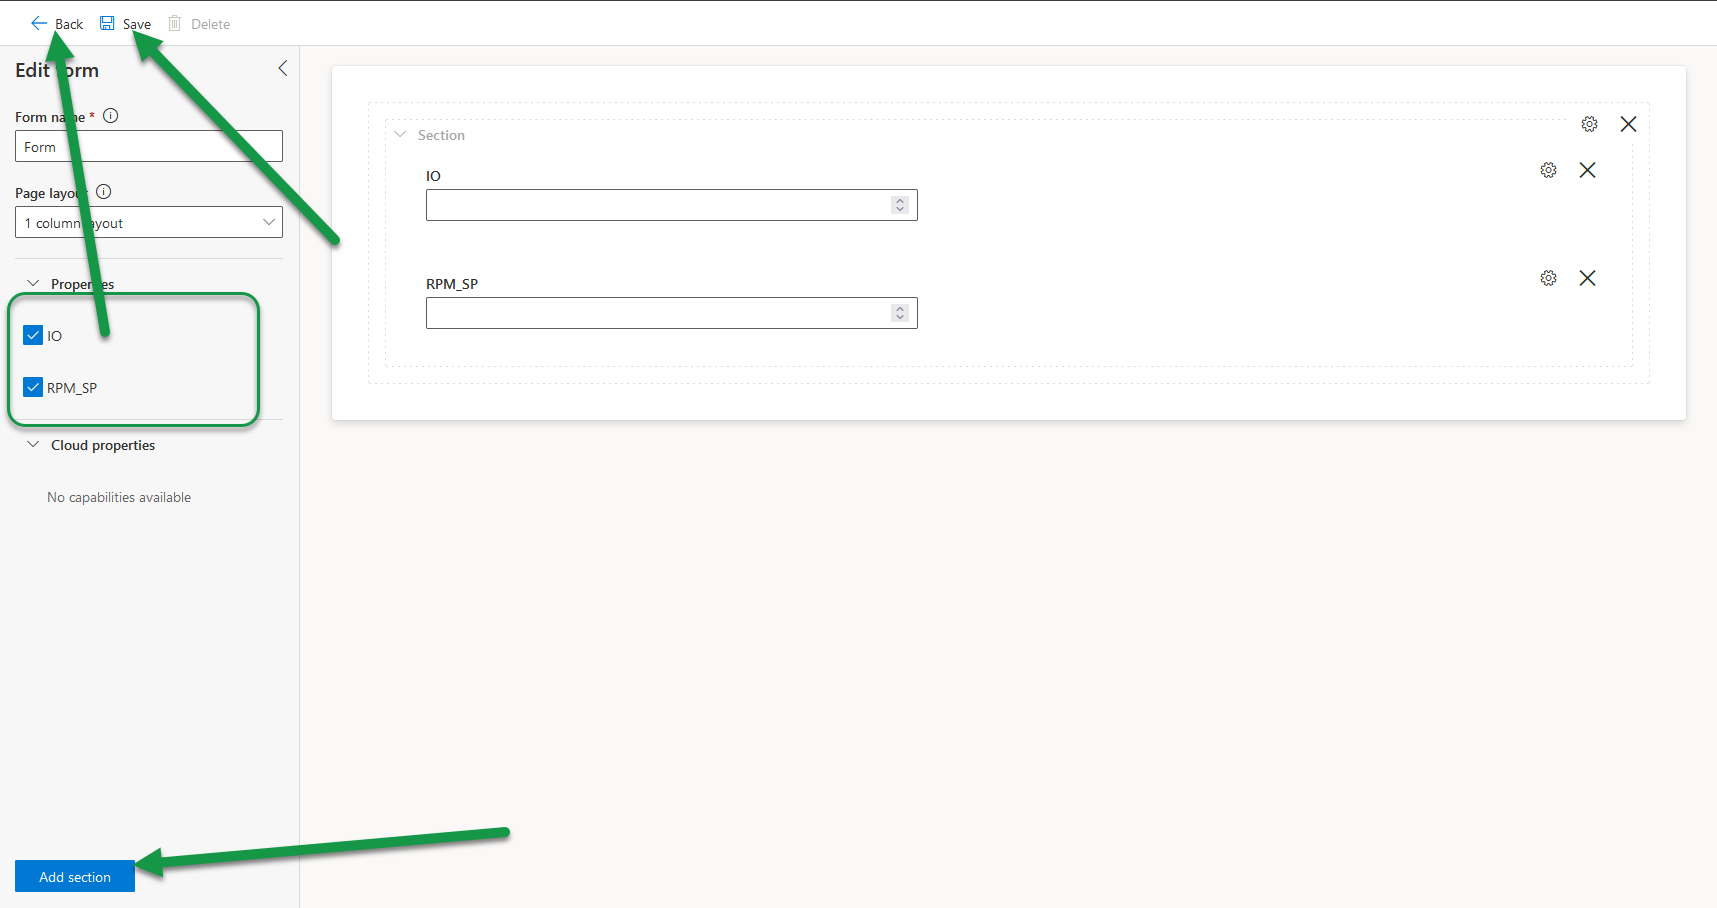
Select your newly created Properties, click Add section, click Save, and click Back
From the template page, click Publish
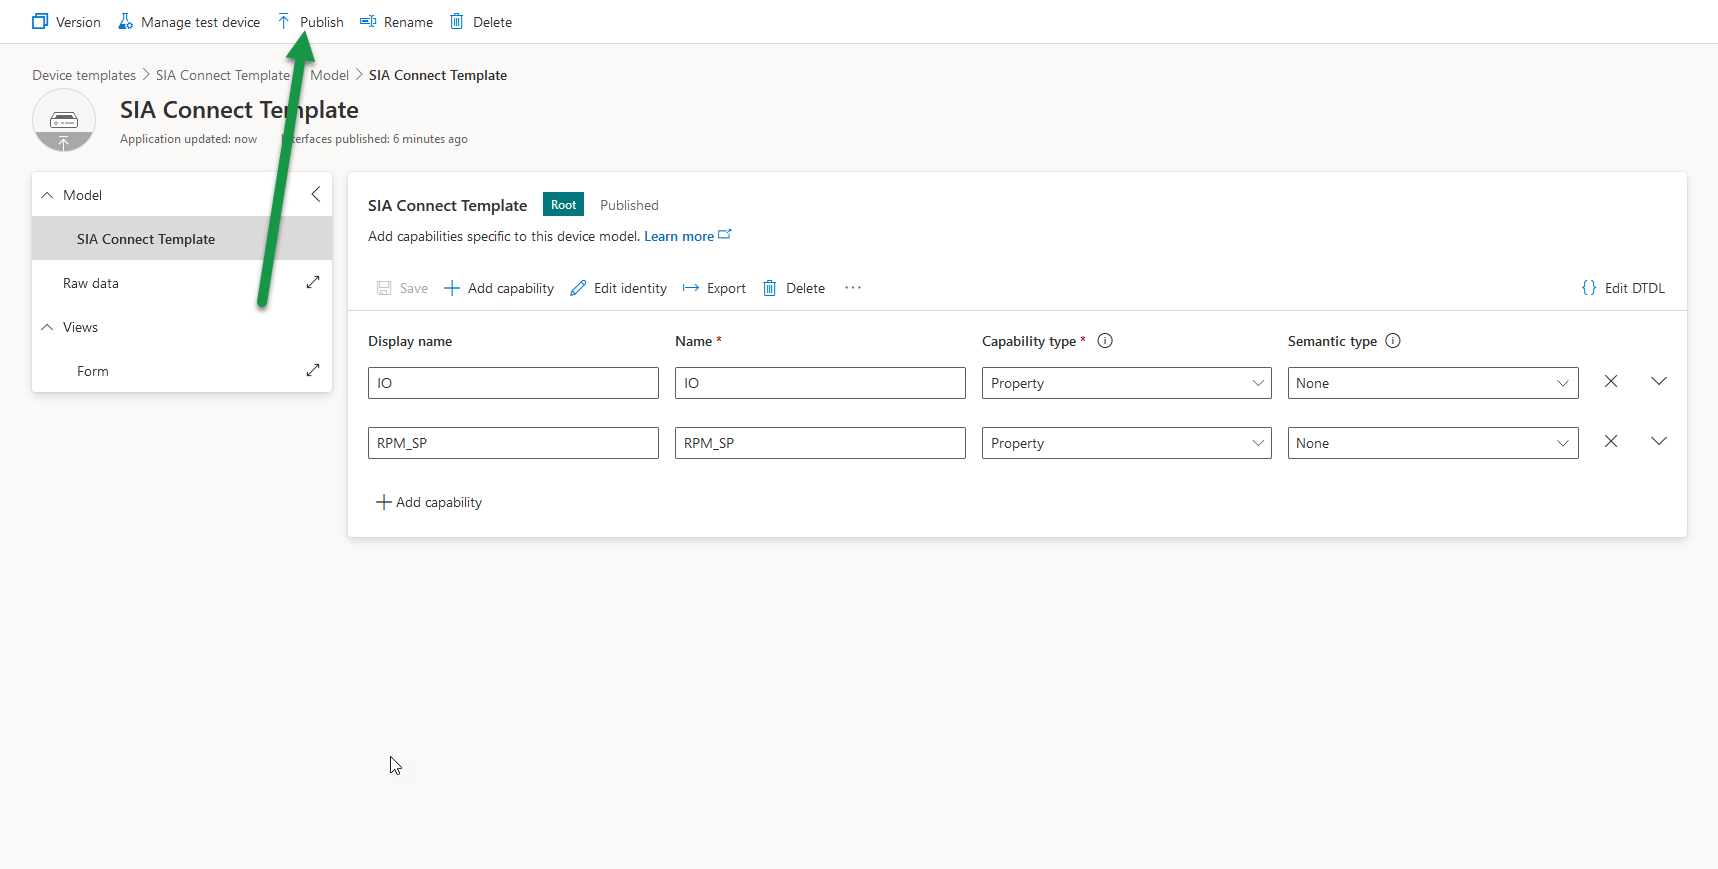
Now the template and associated view are published and ready to be assigned to devices.
Assigning template to device
This new template needs to be assigned to our device. We do that by going to the device, select Manage template and select Assign template
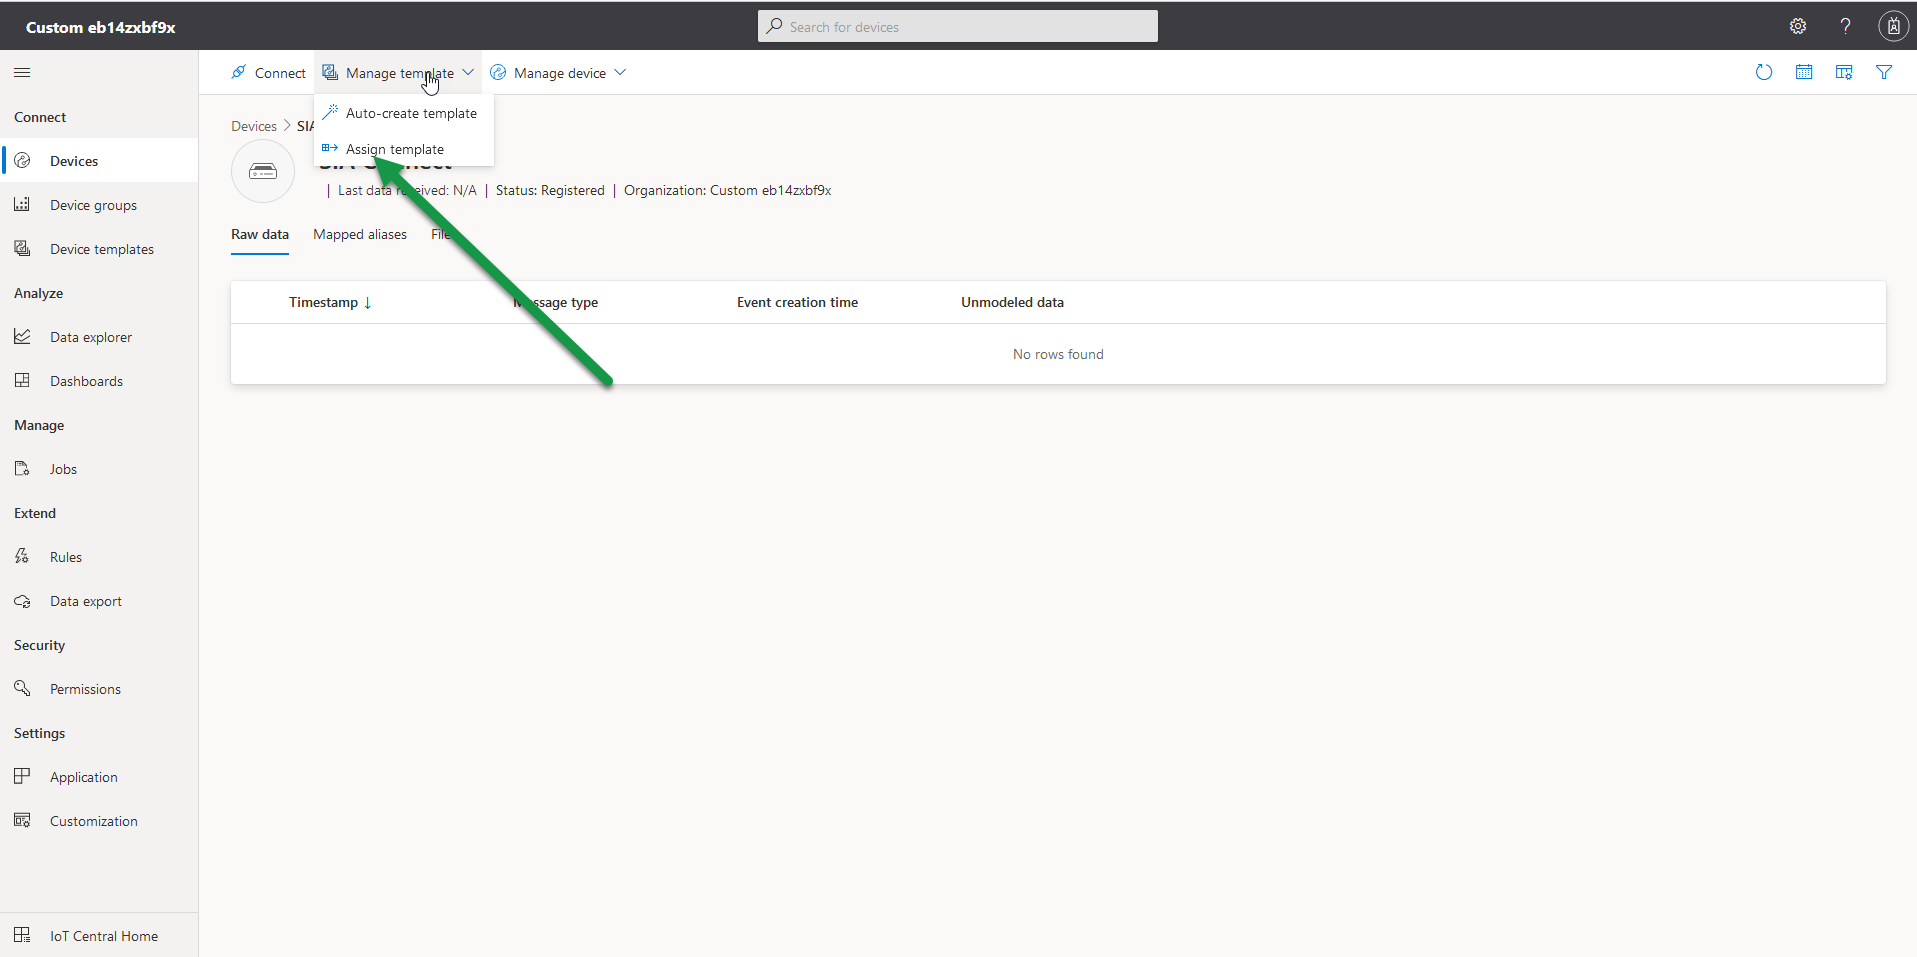
We then choose our newly created template.
Under your device, you should see a Form, where the properties can be managed:
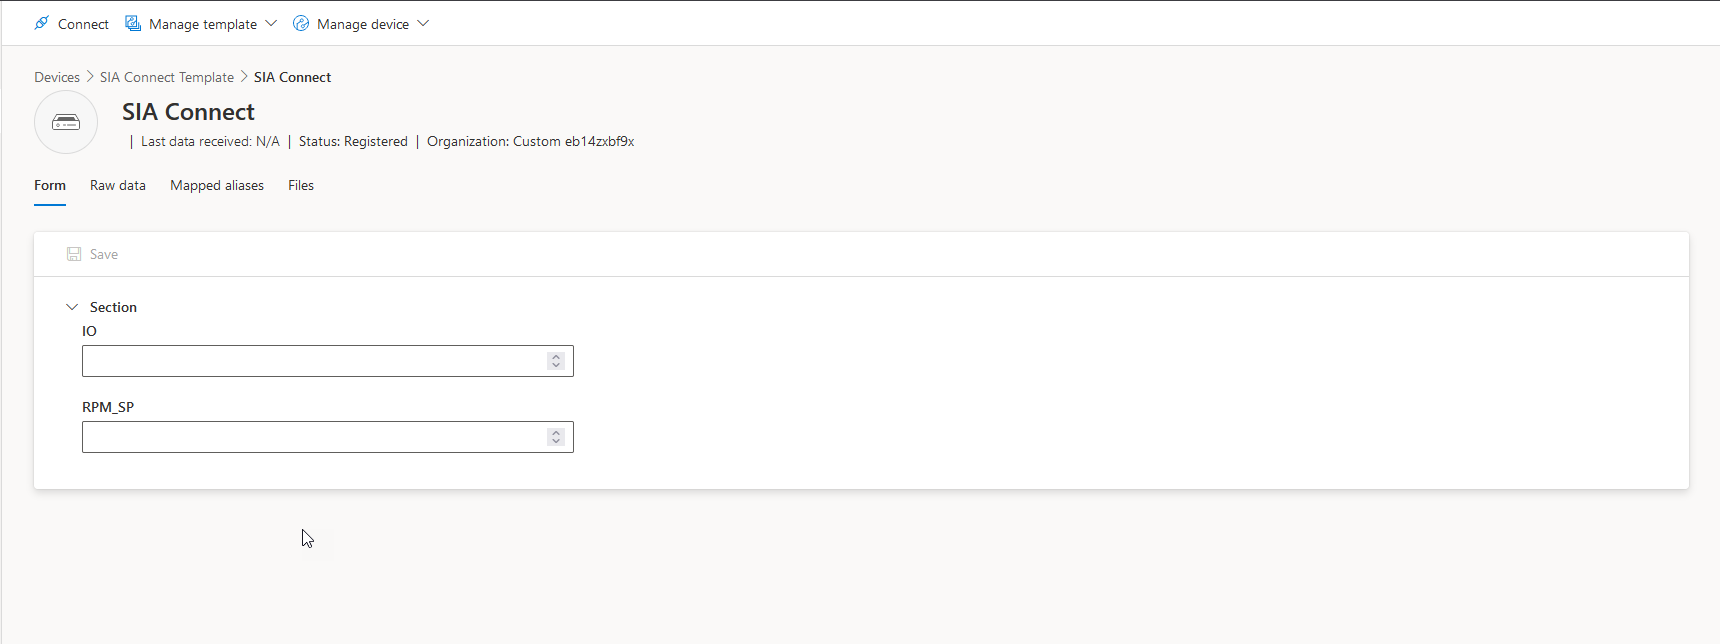
Now that we have a template created, which has the properties we want, we can create and map them to the desired instance properties in SIA Connect. The next section will explain how we create the properties in SIA Connect and how we can move data between our instances (Siemens S7 PLC in this example) and the Azure IoT Central
Mapping properties to real data points
Properties in IoT Central appear automatically under the SIA Connect instance when they have been set to a desired value from within IoT Central. This can be done simply by sending values from the Form (created in the previous step):
Input your desired values and click Save

In the instance of the IoT Central instance on SIA Connect the properties will be created automatically as items:
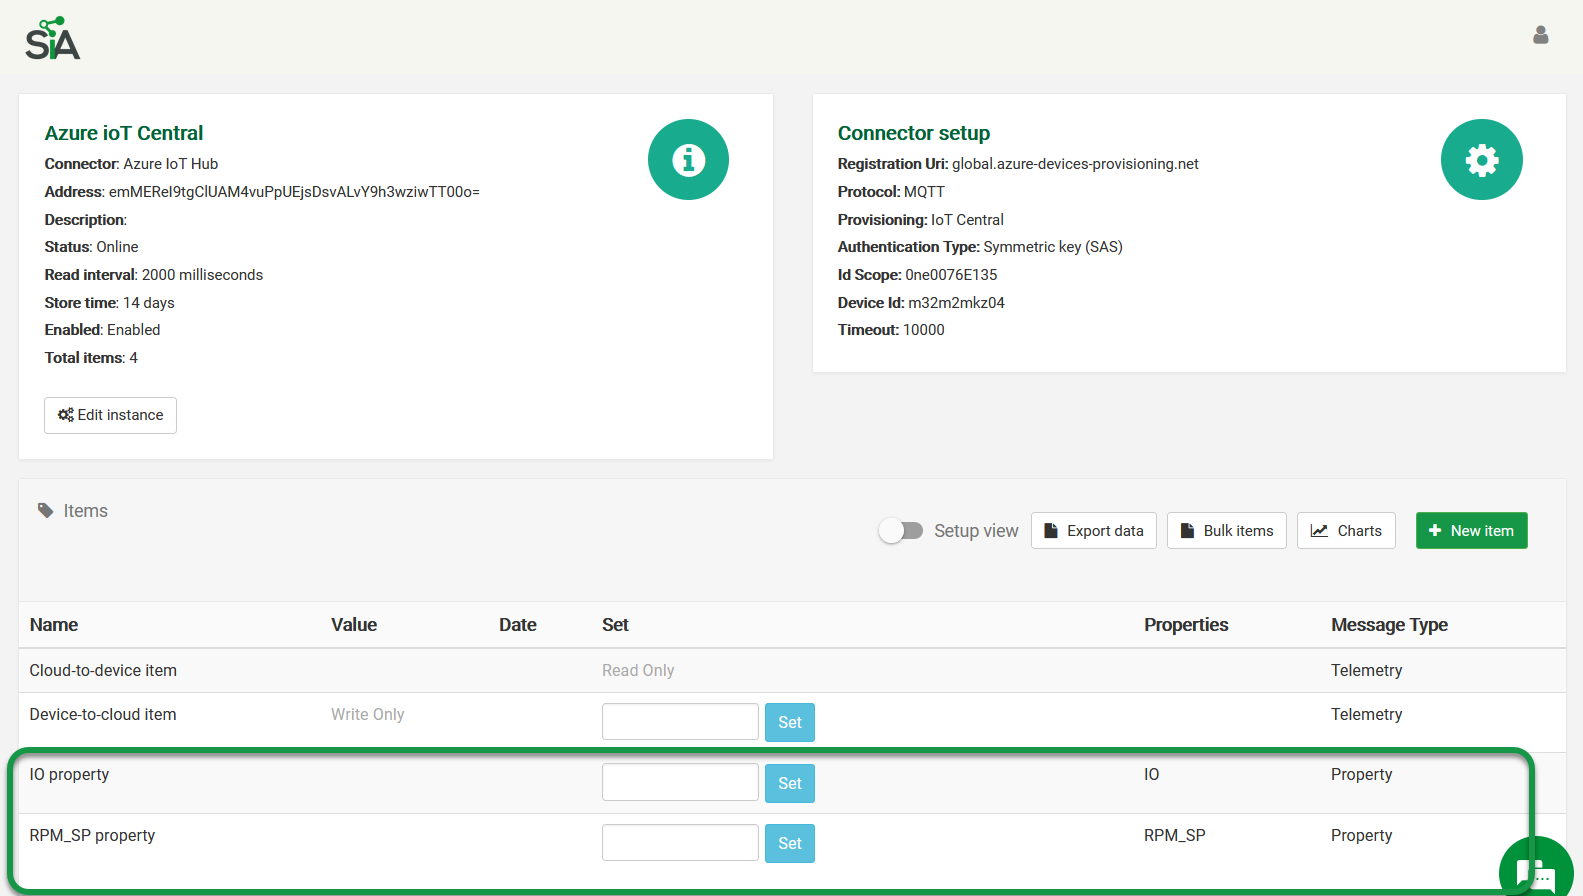
To map the property from IoT Central to an item (actual data point) in another instance a mapping needs to be created between the Azure IoT Central property item in SIA Connect and the item we want to associate it with. In this example, the Siemens S7 PLC items of the same name; IO and RPM_SP are used.
In the sender/master item select the Siemens S7 and the IO item and Azure IoT Central and the IO Property item in the receiver/slave item.
Enable Bidirectional synchronization and Acknowledge writing if it is a writeable property.
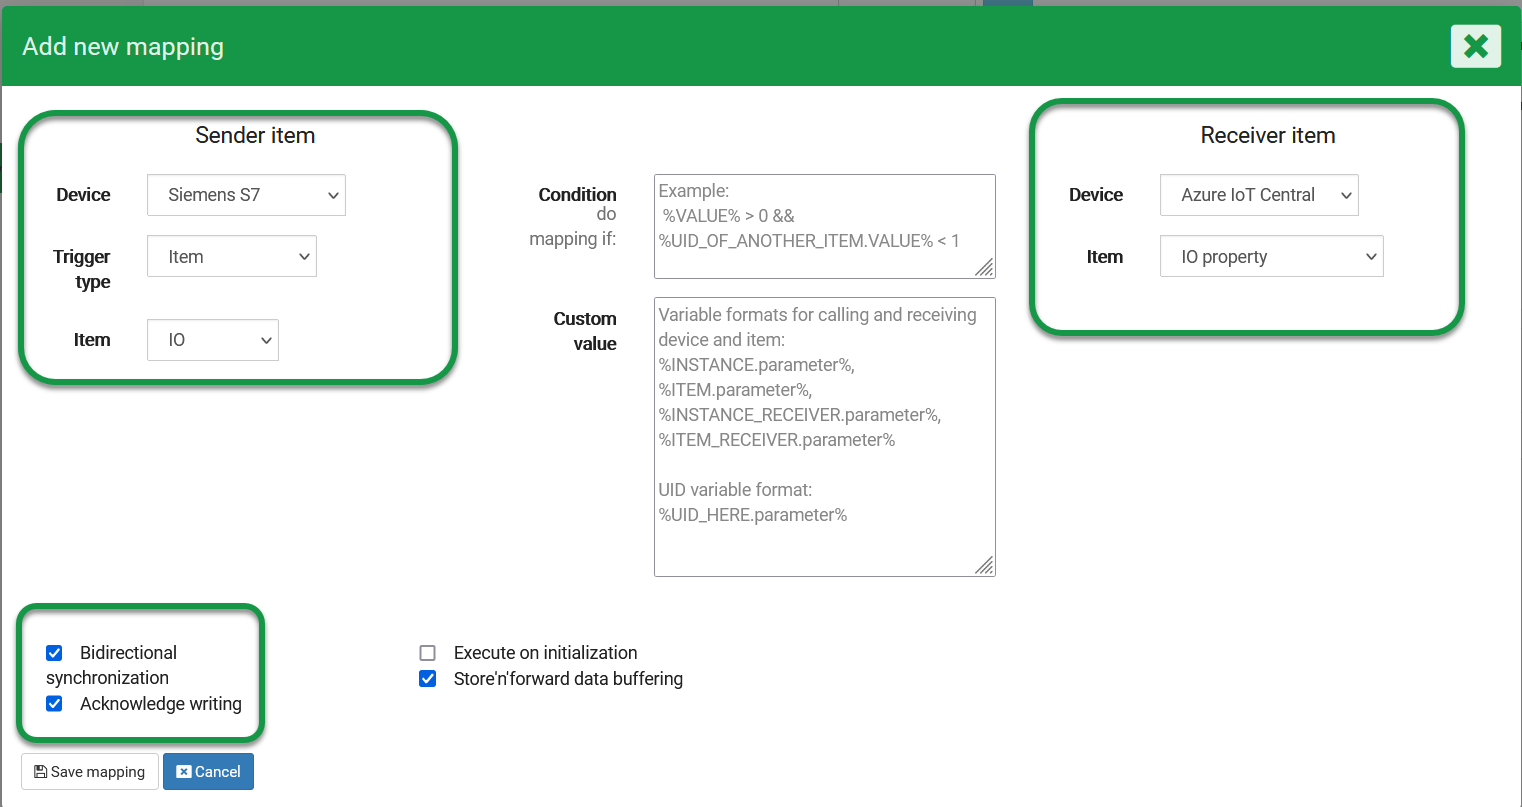
Apply the same configuration for the RPM_SP item
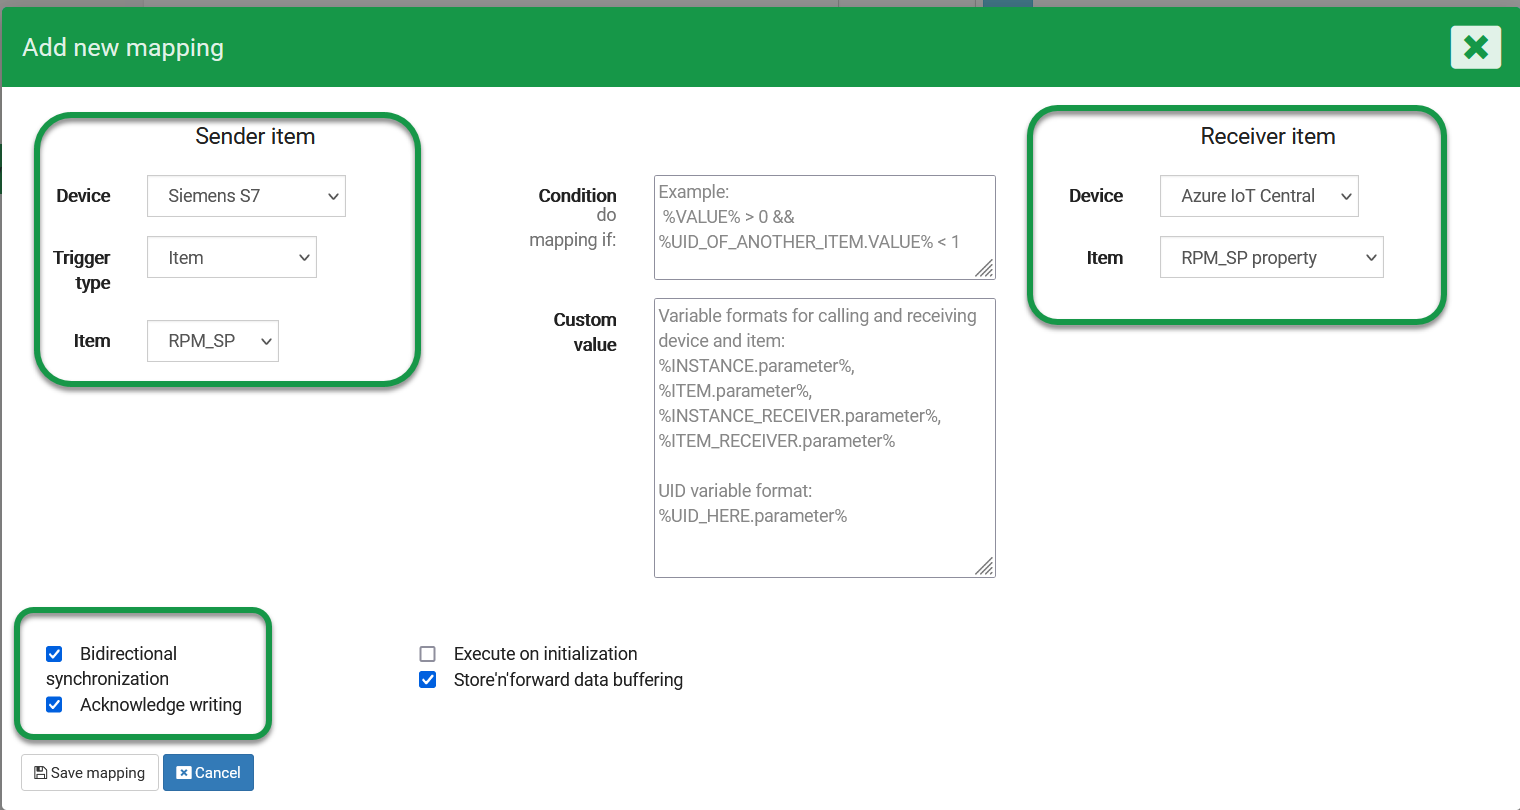
Actual property data are now streaming from the instance (Siemens S7 PLC) to Azure IoT Central, and the actual property can be controlled from Azure IoT Central.
Validating property synchronization
To validate the properties in Azure IoT Central and the actual properties in the instance, go to the instance in SIA Connect, enter your desired values, and click Set
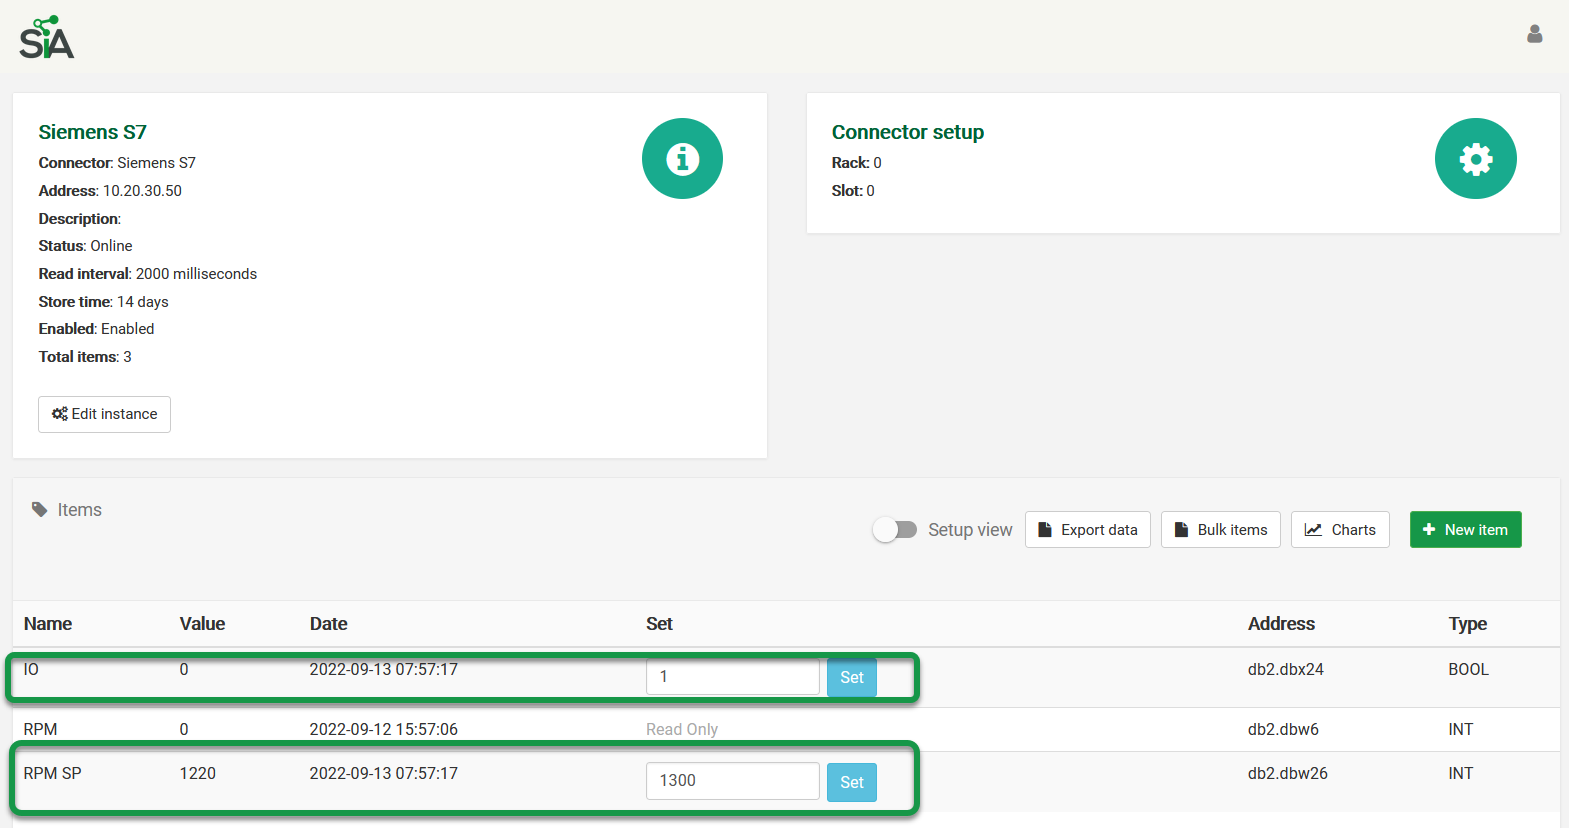
In Azure IoT Central, the new actual property values will appear from the instance.

To validate the properties can be set from IoT Central go to the device and its Form. Set the desired values, and click Save
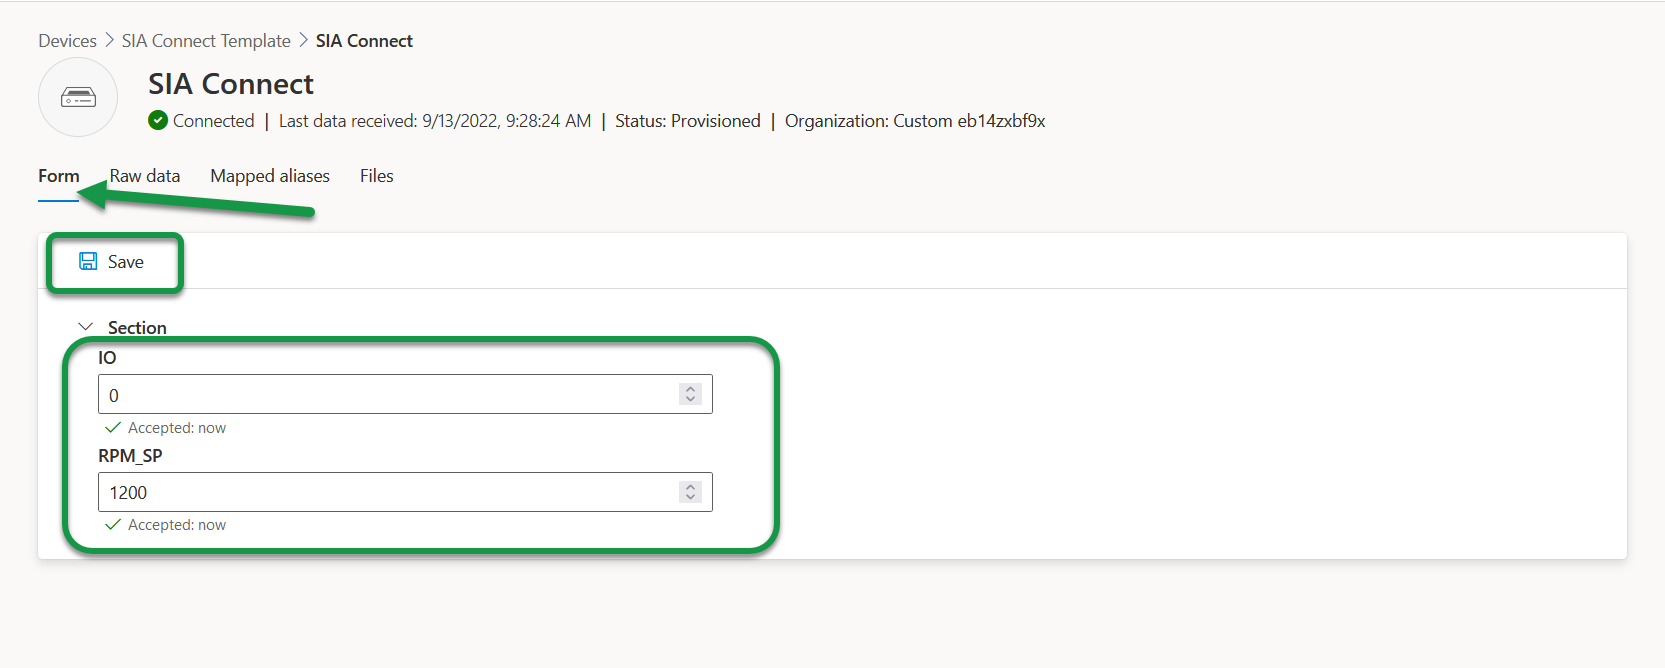
In SIA Connect the new properties have been updated with the values written from Azure.
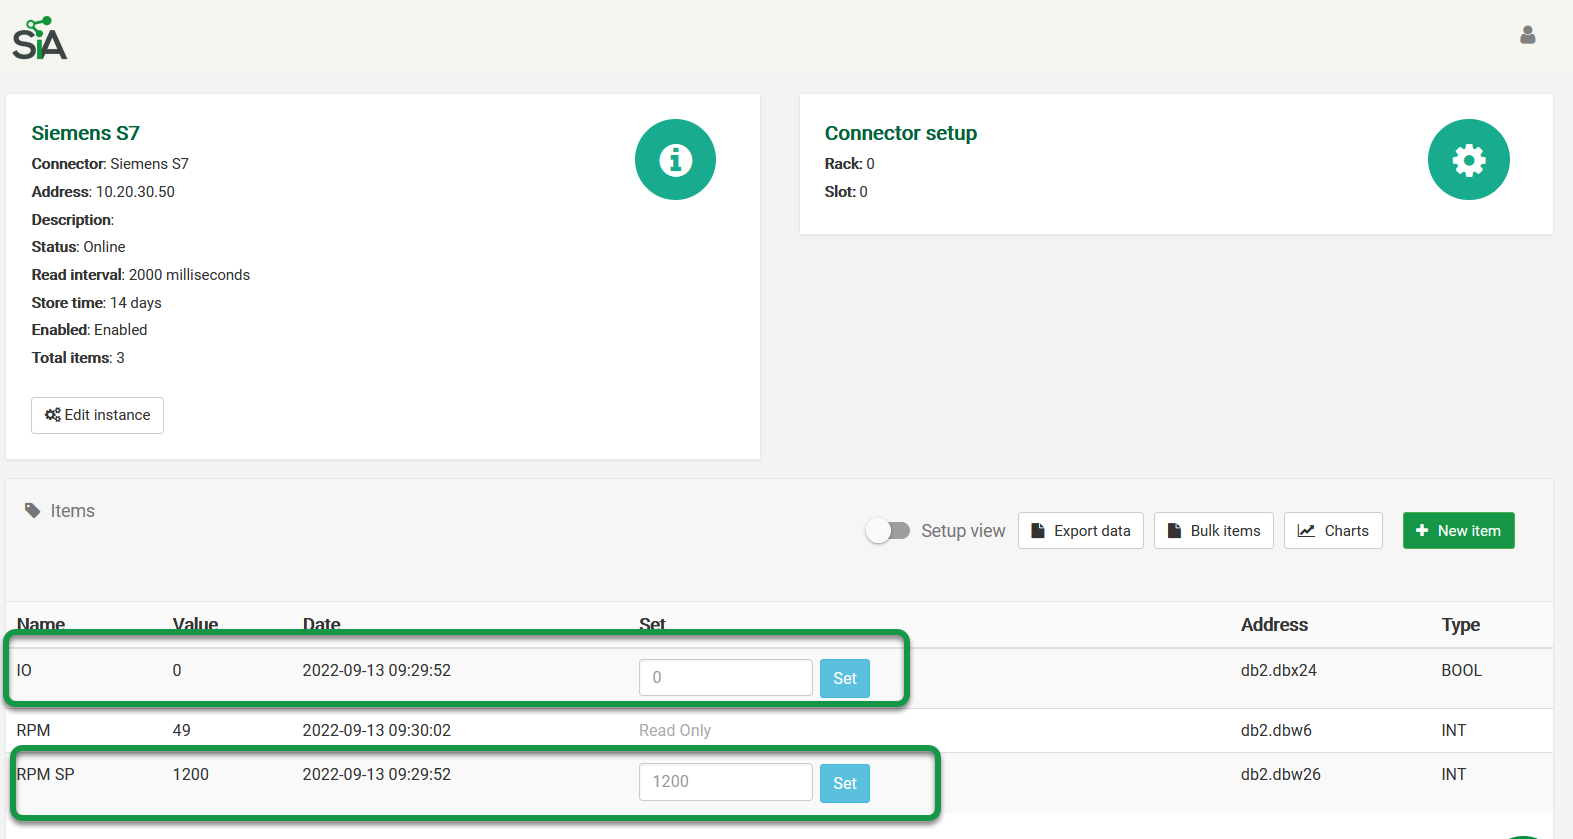
As you can see, the values are synchronized between the Azure IoT Central and the instance's actual properties (Siemens PLC).