How to get started with Azure Device Provisioning Service in IIoT
Learn how to get started with Azure DPS for Industrial IoT and how to use it for better provisioning to Azure

If you are looking into multiple many edge gateways to Azure IoT Hub their Device Provisioning Service (DPS) might be the preferable way to move forward. DPS allows devices to be automatically assigned to IoT Hubs which is very convenient in many scenarious. Just to mention a few:
- Assignment based on e.g. regions, certificates, load balacning
- Reassigning of new IoT Hub (new tenant or changing of subscription plan)
- Mass provisioning of Industrial IoT (IIoT) devices
DPS automatically generates a new device in the assigned IoT Hub and under the hood provides the Connection Information to the edge device. This is very handy when you have to dynamically provision devices as the IoT Hubs are generated for you by the DPS.
The flow for the provisioning service comes as:
- IIoT Edge device connects to Azure DPS
- Azure DPS returns connection information to the assigned IoT Hub.
- If the device is not already assigned, a new IoT device is created in the Hub.
- The IIoT Edge device connects to the IoT Hub with the returned connection information
This enables seamless provisioning of the IIoT Edge device and gives the flexibility of the Azure user to reassign to a new hub without any struggles in modifying the configuration on the device.
After data is streaming to IoT Hub it is up to the developer to manage it. Examples are:
- Stream analytics job to SQL, PowerBI or Time Series Insight
- Azure functions to make an app handling the data (e.g. API, database, AI)
- Monitor the data in desktop app using Azure IoT explorer
Using Azure Device Provisioning Service (DPS)
Utilizing the Azure Device Provisioning Service (DPS) for provisioning the device and the Shadow API is the most automated approach and scaleable. The DPS will automatically assign the device to an IoT Hub while SIA Connect automatically fetches the configuration and adds this as the Shadow API configuration making it very automated and scalable.
Preparing Azure DPS with authentication certificates
Upload certificates to Azure DPS
In order to authenticate against Azure DPS we need to add the Root CA which is going to issue the authentication certificates that we are about to use for authenticating our devices. You can also use Symmetric keys as authentication, but in this example we will show with certificates.
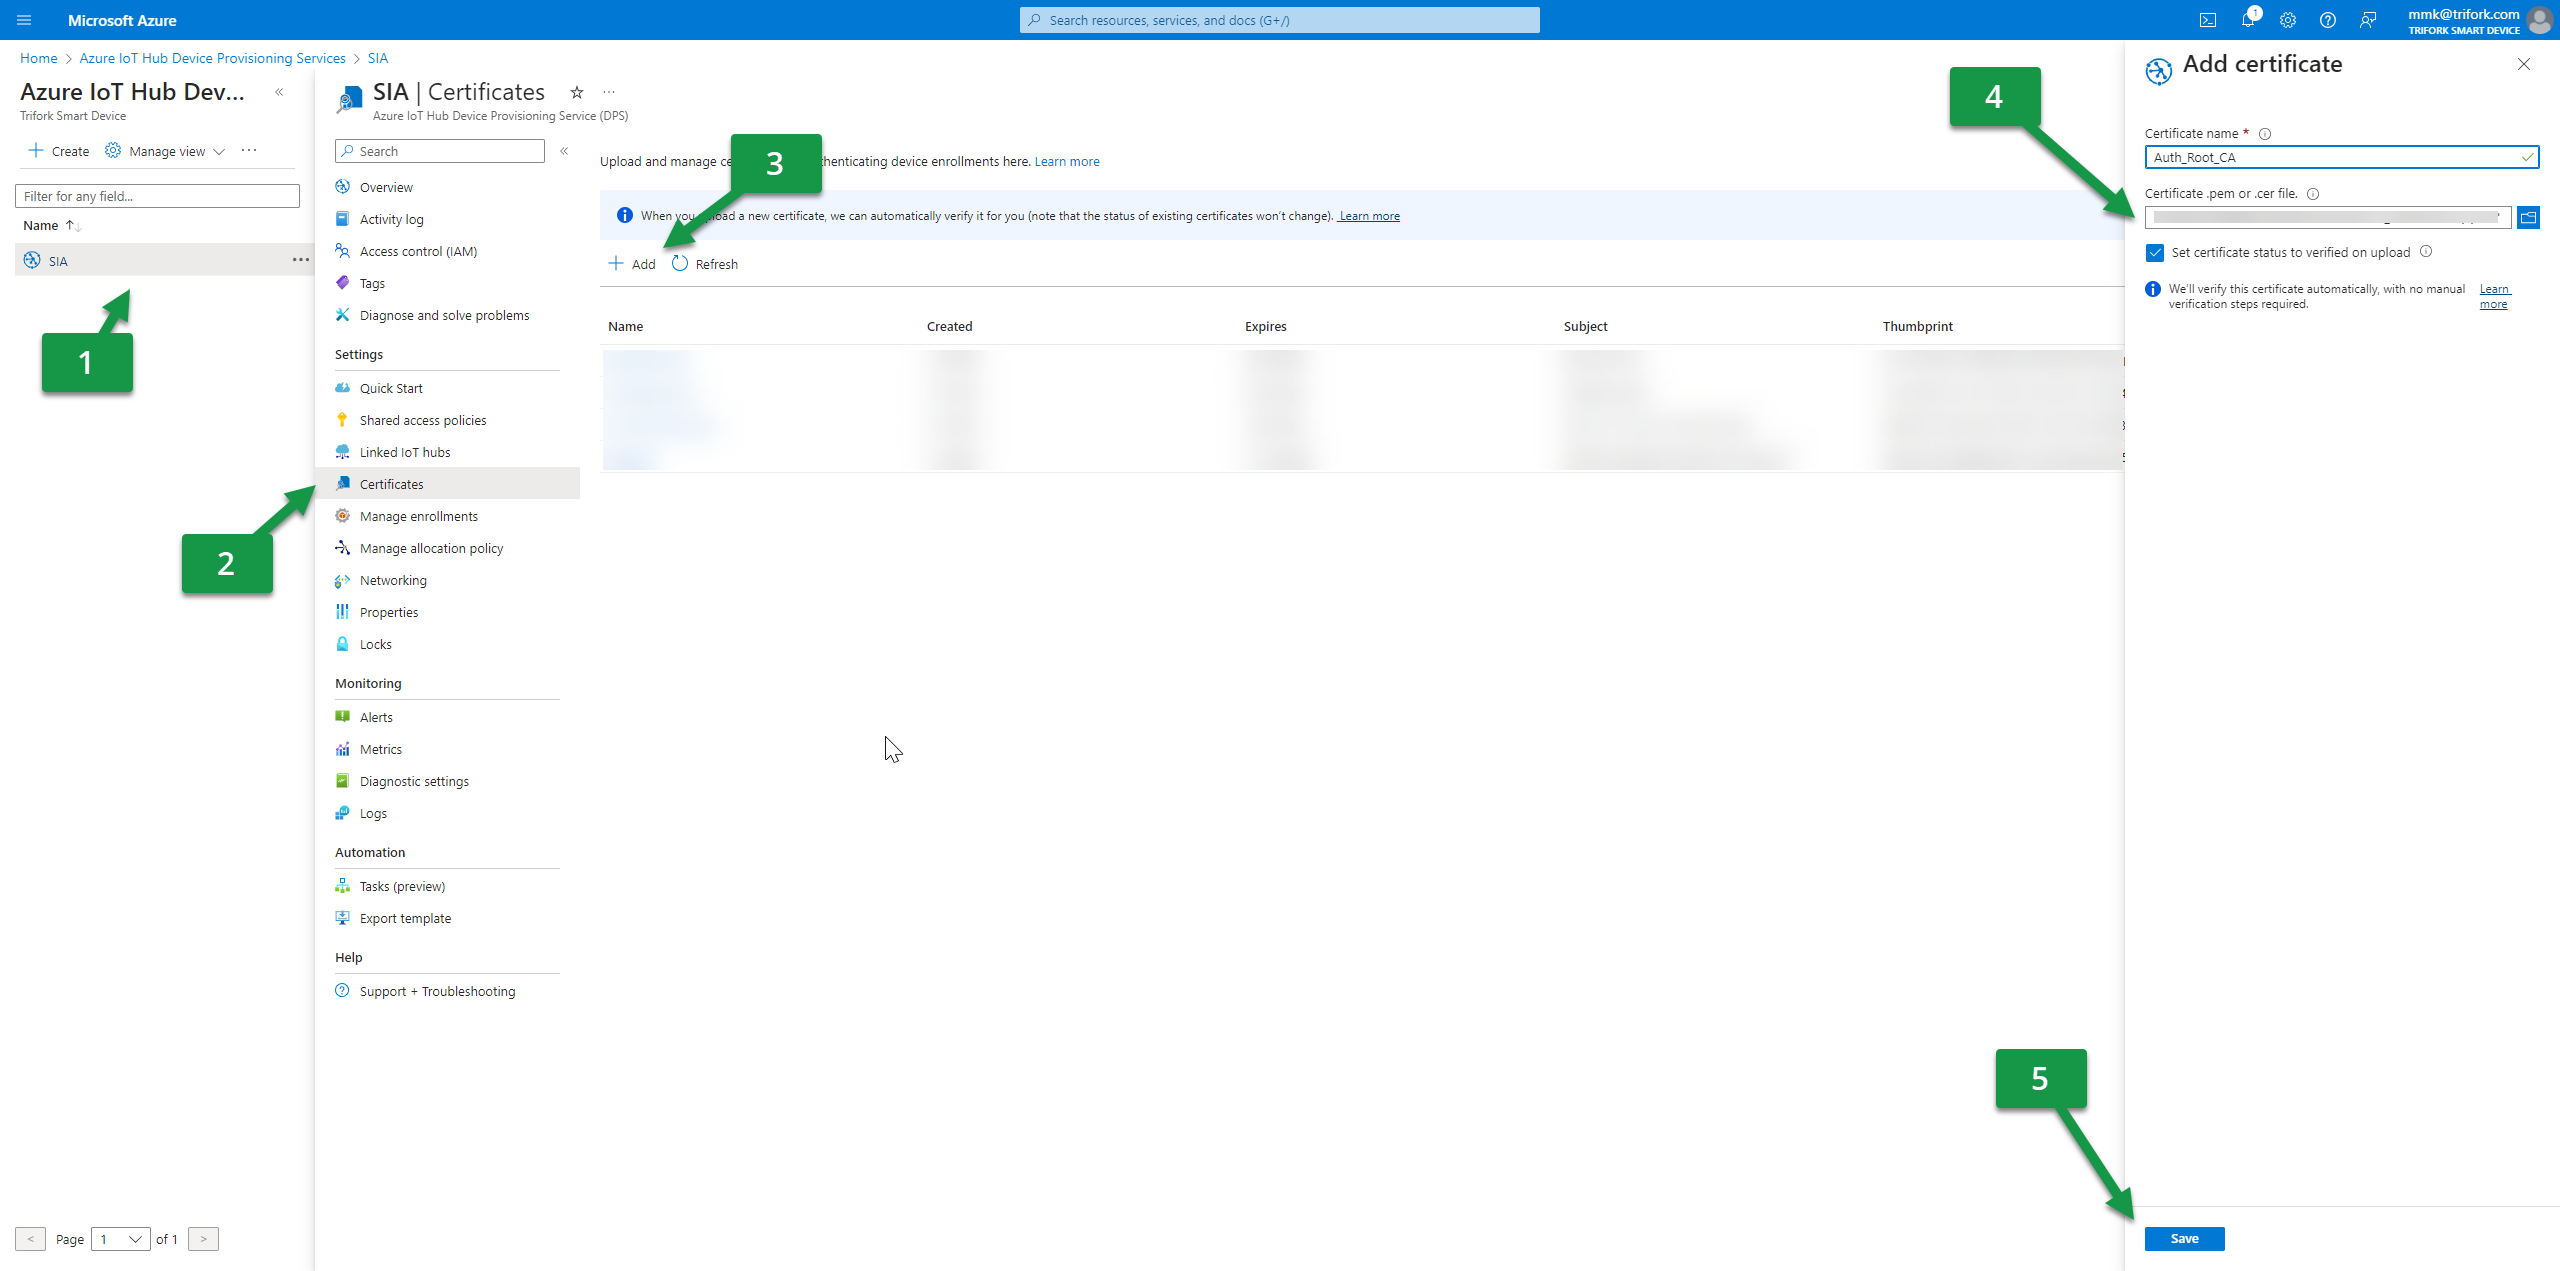
- Go to your Azure IoT Hub Device Provisioning resource
- Click certificates to get the overview of all the authentication certificates for the DPS
- Add a new Root or intermediate CA which you are using to issue the authentication certificate that is being added to the SIA Connect solution
- Mark “Set certificate status to verified on upload” (unless you want to validate it manually)
- Press save. Now we are ready to add the enrollment in the next steps
Creating and manage the DPS and associated Azure IoT Hubs
To make the provisioning work we need to create a new enrollment. We have the following options for enrollments:
- Enrollment groups: A group of devices that uses the same authentication certificate or symmetric key to enroll.
- Individual enrollments: A single device which uses a certificate or symmetric key for enrollment.
In this example we will use the enrollment group.
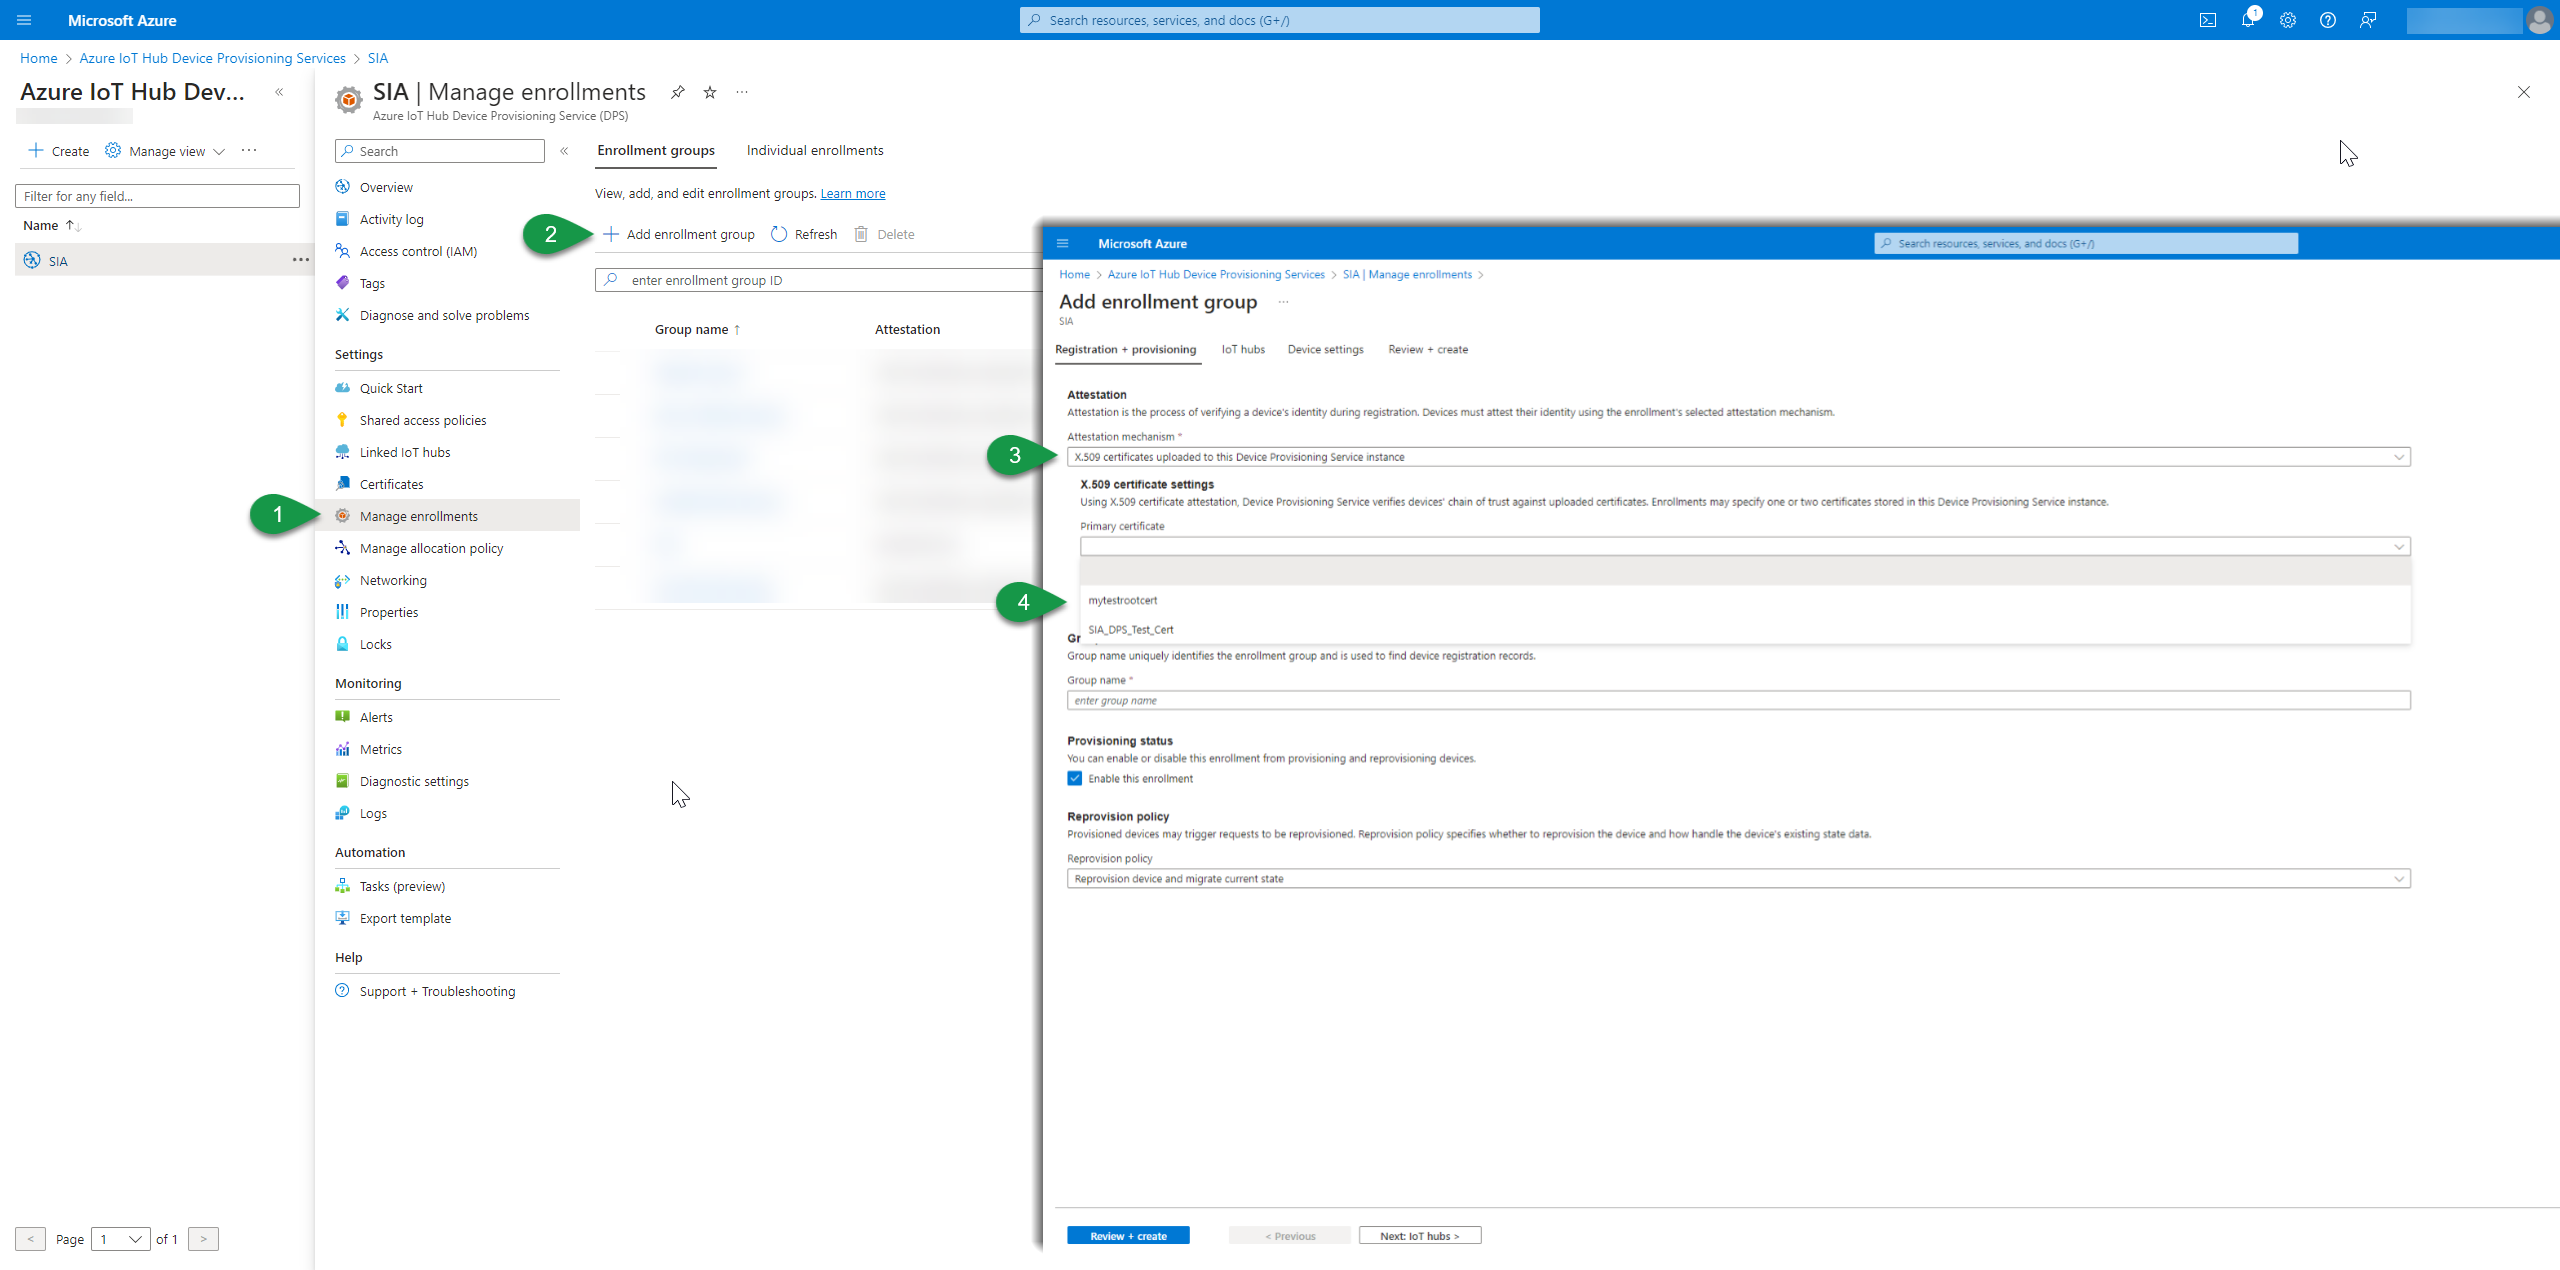
- Go to the menu Manage enrollments under Settings in the DPS menu
- Select the Enrollment group and then Add enrollment group to create a new group for enrollments
- A new page will open. In the Attestation section select “X.509 certificates uploaded to This Device Provisioning Service instance" to select the certificate that was previously uploaded for authentication. You can also in this step upload a new certificate (and skip the previous upload part).
- Select the uploaded certificate to be used for authentication and set a group name
Additionally you can go to the IoT Hubs tab in order to decide how and which IoT Hubs the provisioned devices should be allocated to. You can set various rules in there and also create your custom Azure Function to make the decision.
That's it, press Review + Create and your Azure DPS is ready for devices to use for provisioning an IoT Hub to.
Preparing Azure DPS with symmetric keys
In addition to use certificate for authentication you can also use symmetric keys.
The steps are the same first we have to create an enrollment policy. We have the following options for enrollments:
- Enrollment groups: A group of devices that uses the same authentication certificate or symmetric key to enroll.
- Individual enrollments: A single device which uses a certificate or symmetric key for enrollment.
In this example we will use the enrollment group.
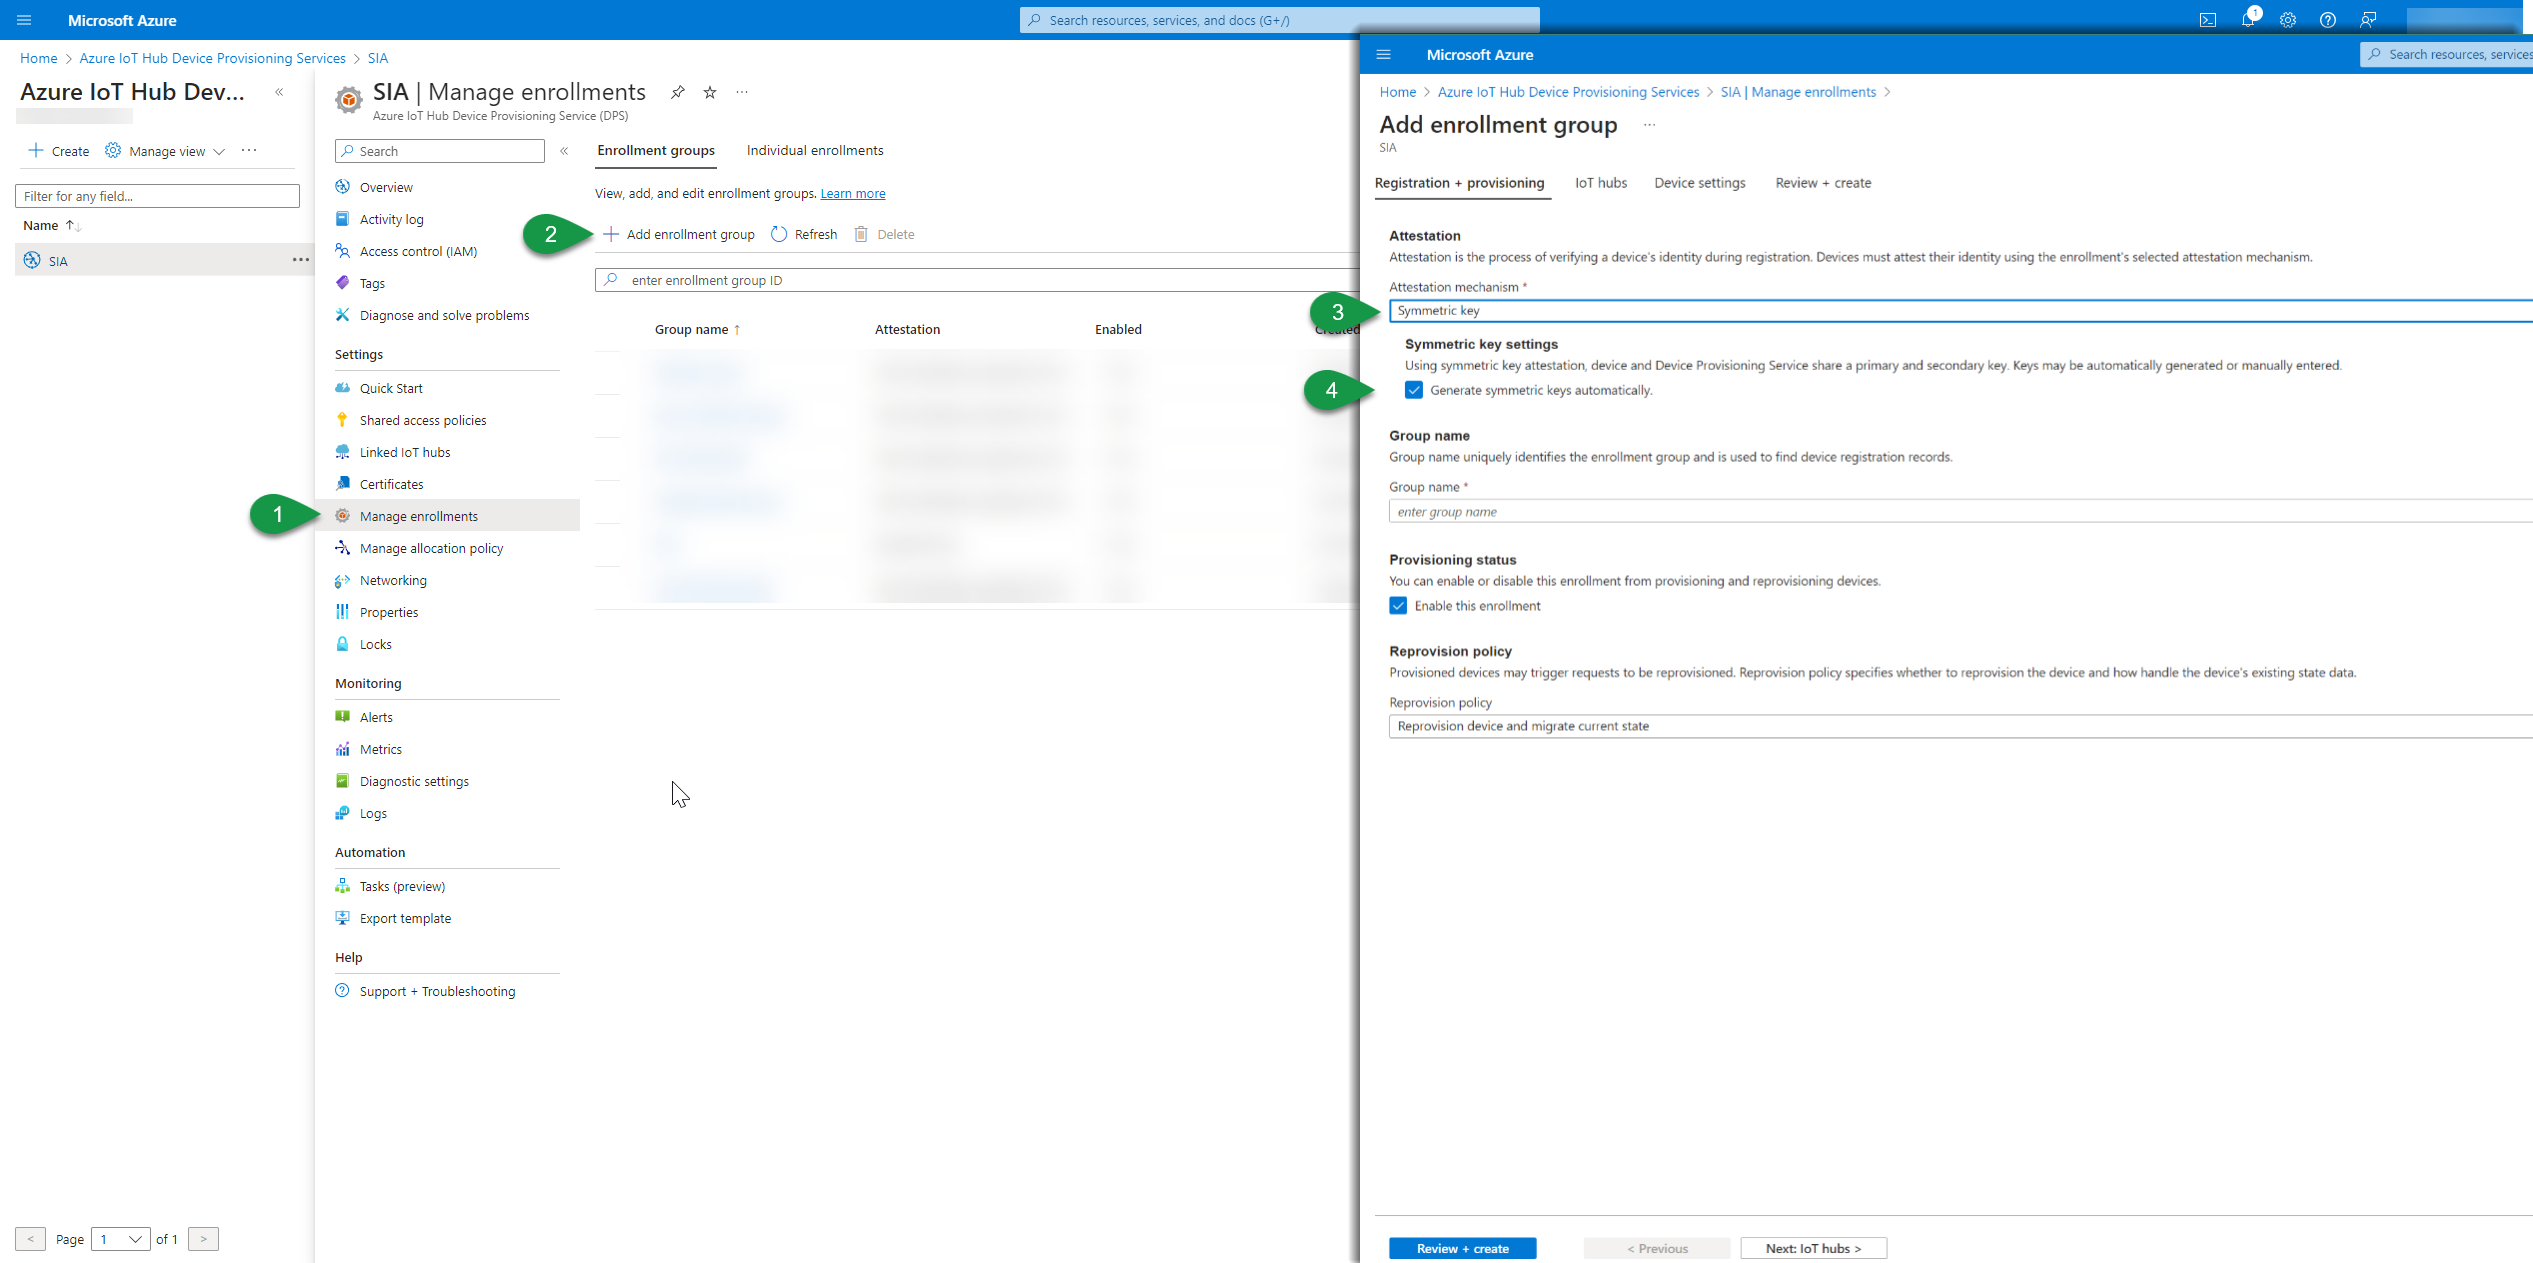
- Go to the menu Manage enrollments under Settings in the DPS menu
- Select the Enrollment group and then Add enrollment group to create a new group for enrollments
- A new page will open. In the Attestation section select “Symmetric key" that was previously uploaded for authentication. You can also in this step upload a new certificate (and skip the previous upload part).
- Select if you want Azure DPS to generate the Symmetric Keys or define them your-self. They must be in base-64 if you define them.
Now press Review + Create and your Azure DPS is ready for devices to use for provisioning an IoT Hub to.
Connecting industrial devices to Azure DPS
By using SIA Connect as Edge gateway you can easily connect your industrial or building devices to Azure DPS and get assigned an IoT Hub. Ensure the Connector Azure IoT Hub is installed on the solution and that you have added an instance and items to read data from the desired device (PLC, BMS, etc.) you want to get data from.
- Under Instances add a new instance with the Azure IoT Hub Connector
- Use the following parameters for the Azure IoT Instance
| Parameter | Description | Example |
|---|---|---|
| Name | Any meaningful name | My Azure IoT DPS |
| Address (only for symmetric keys) | The symmetric used for authentication which can be found in Azure under Manage Enrollment and then the desired DPS. If you are using x.509 certificate then leave it blank. | LxFda9GZbkOalrrU951uEh4MUt9jRo+VBZ/zcRhXgF2ZvbnGASMHsVYj3KFSYQ13qzAgiTLDvMU8r2BOKPrnLA== |
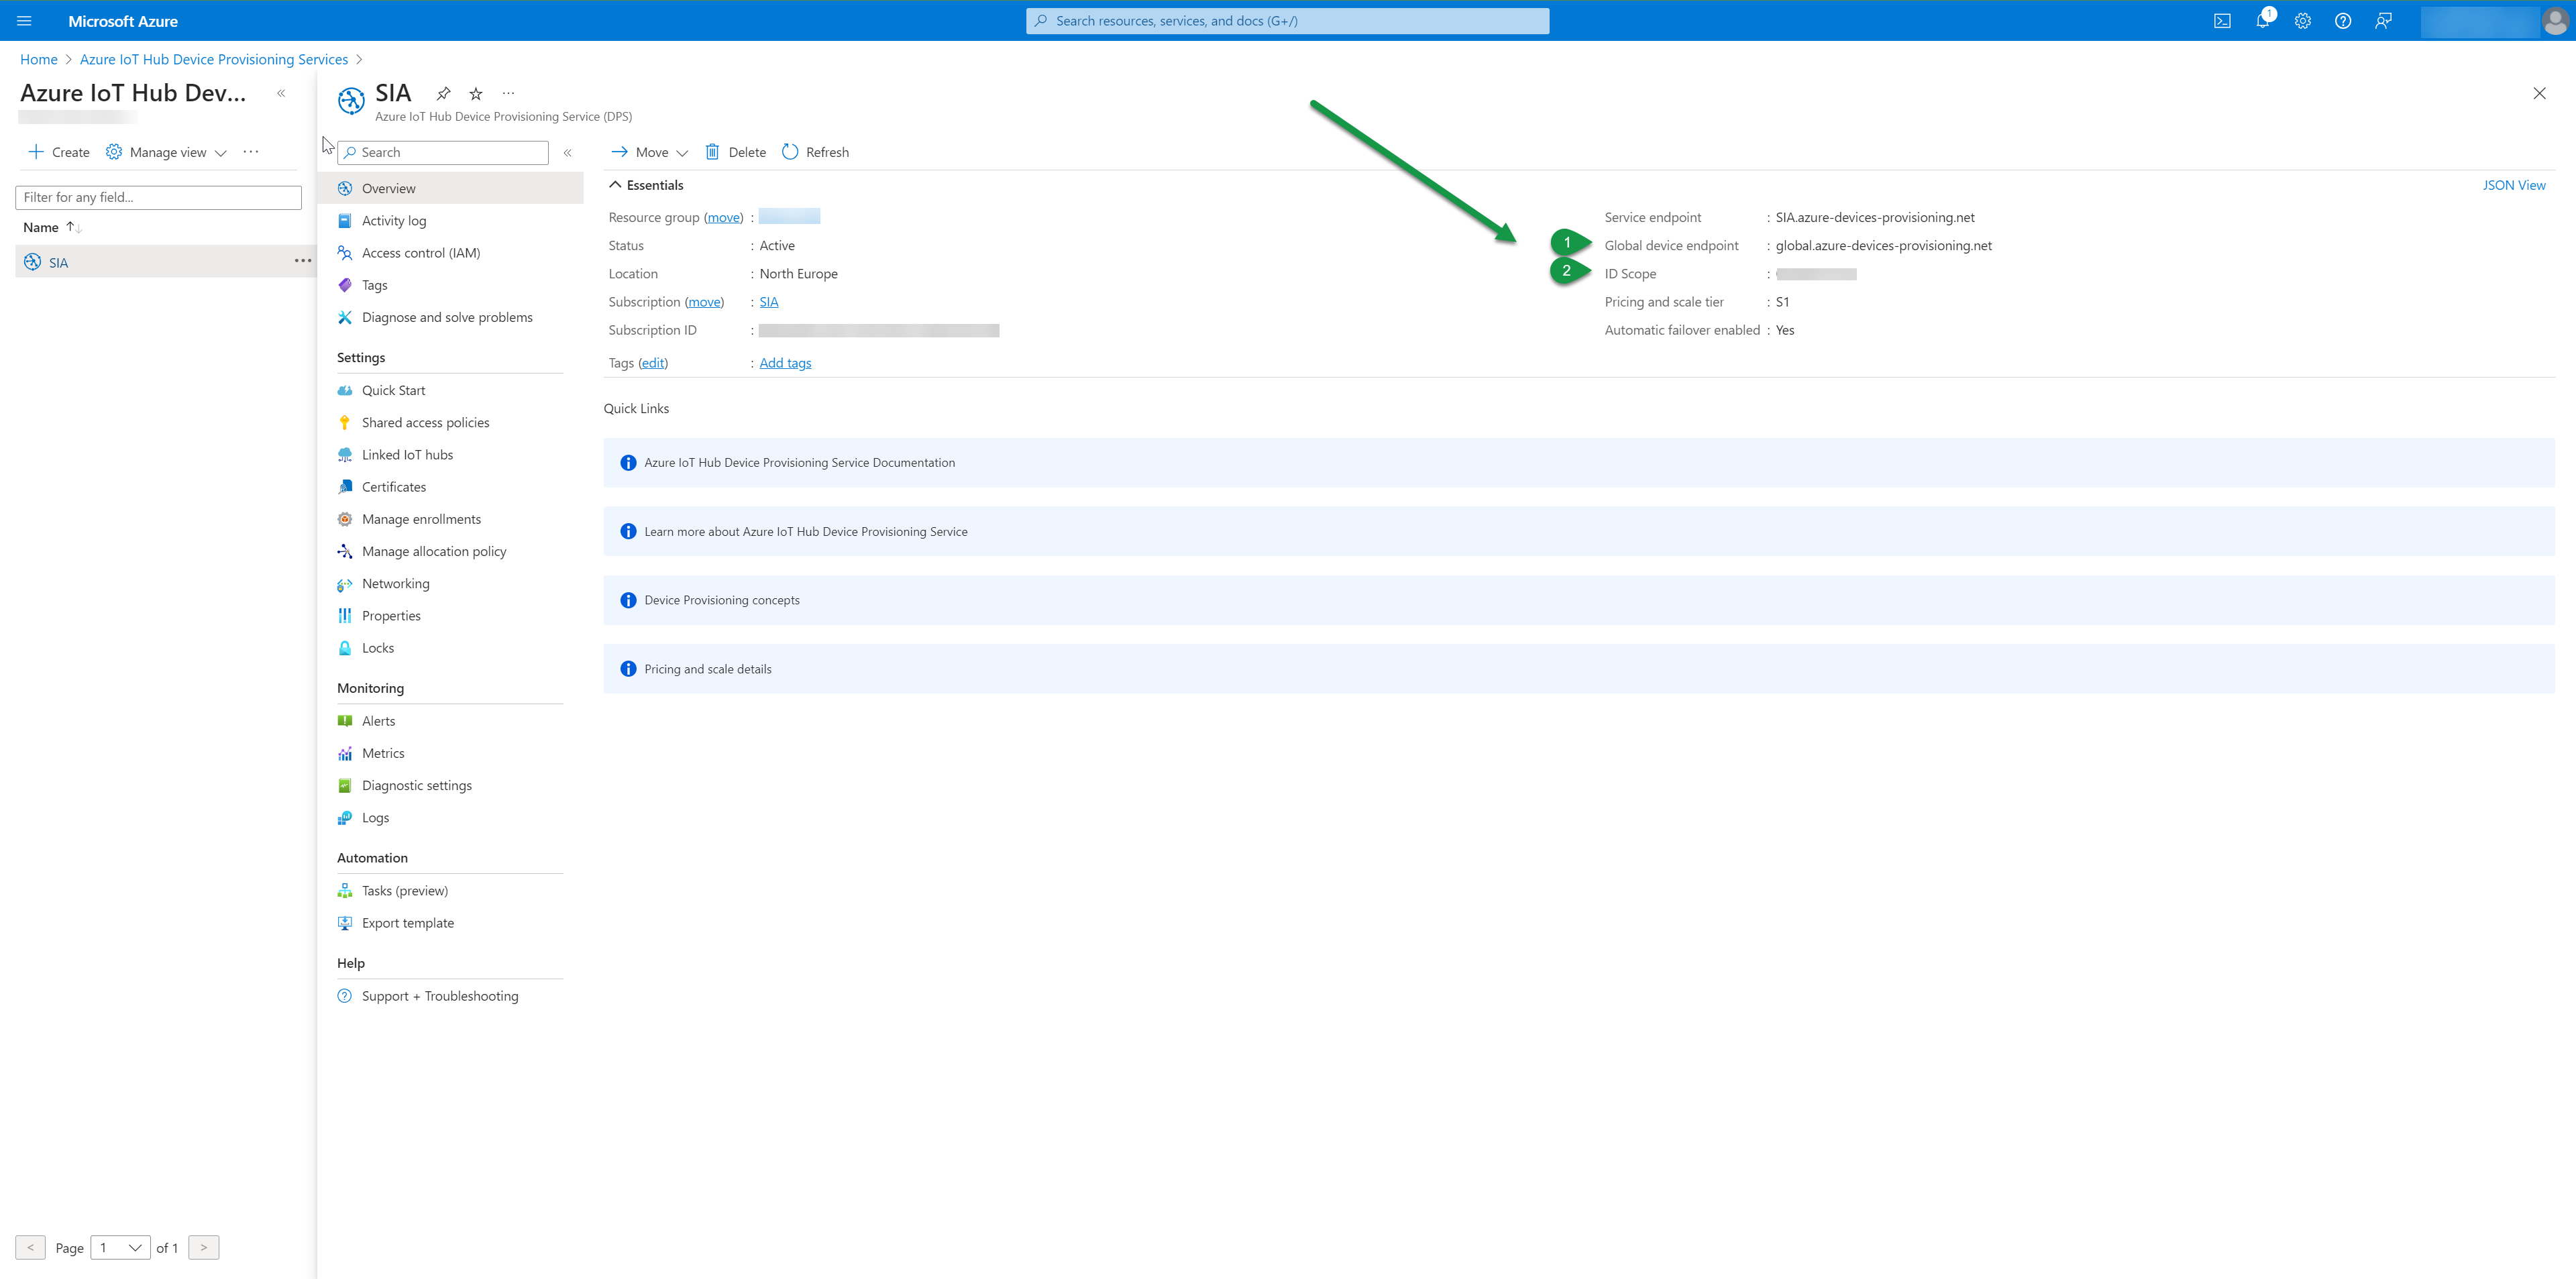
| Registration URI (1) | Endpoint for the device to register. See screenshot below to see where you find this in Azure DPS | global.azure-devices-provisioning.net |
| Protocol | Select between the transportation layer of native MQTT and AMQP or over WebSockets | MQTT |
| Provisioning |
Select which type of enrollment the Azure DPS is setup to
|
Group |
| Authentication type | Select between the x.509 certificate or symmetric key depending on how you configured the Azure DPS | x509 Certificate |
| ID Scope (2) | See screenshot below to see where you find this in Azure DPS | 0ne0027F7A8 |
| Device ID |
The device ID will be the name of device in the IoT Hub when it is being created. x.509 authentication: Device ID should be the same as the Common Name (CN) in the certificate |
sia-connect_4d2057 |
| Device Twin |
If your IoT Hub supports Device Twins select Yes. IoT Hub Basic tier: Select No as this does not have support for Device Twins |
Yes |
Successful provisioned to an IoT Hub
After successful provisioning of the device you should see two items in SIA Conenct named Device-to-cloud and Cloud-to-device which can be used for mapping data.
To find the ID Scope and Registration URI see below screen shot from the Azure portal:
Setup messaging between IIoT Edge devices and IoT Hub
To get data streaming as Device-to-Cloud messages and Cloud-to-Device messages a few steps is needed:
- Define payload of messages
- Setup mappings between the edge device items and the IoT Hub items
Define the payload of the message
You can setup the payload in two ways:
- A template for all messages to make all the messages have the same format
- Customized per mapping if individual messages requires a different format.
You can also add message properties as a parameter under the Device-to-Cloud item under the recently added Azure IoT instance.
In this example we will be using the following payload:
{
	"name": "%ITEM.NAME%",
	"value": "%VALUE%,
	"time": "%VALUE.TIME%
}
For full reference for all available dynamic variables check out these articles: Instance variables, Item variables and System variables
Setup a message template
- Go to the recently added Azure IoT instance
- Click the Device-to-cloud item
- Set the Input template parameter to the desired format
Customized per mapping
A mapping needs to be created before this can be set. Customized mapping messages will override the template only for that mapping
- Create a mapping between the Edge device item and the Device-to-Cloud (See how to add a mapping)
- Click on the mapping a modify the Custom value to the desired payload format
How to add a mapping
For further guidance on how to add a mapping between items please check out the Add Mapping article
Validate the data flow
To validate the data flow open either Azure CLI or Azure IoT explorer in to start monitoring. You can also from the Azure portal send a Cloud-to-device message which will appear under the item in SIA Connect.
Click here to learn how to use Azure IoT Explorer and Azure CLI for message monitoring
What is the cost for this setup?
It all comes into how many message you use in the IoT Hub, how many IoT Hubs you require and some various small variations such as data center location.
Azure DPS charges 0.094€ per 1.000 operations. An operation is an event such as a provisioning which happens everytime you re-initialize SIA Connect or restart it.
To get a price estimation use Azure's cost calculator. In most simple setups the estimated cost would be around 25€ per months for the Standard tier and 10€ per month for the Basic tier both including for 400.000 messages per day and free if you have below 8.000 messages.
Azure IoT Hub devices does not cost additional. You will be charged per message
Consider the Basic tier if you do not plan to use Cloud-to-device messages and the Device Twin functionality